Showing posts with label triangles. Show all posts

Monday, May 13, 2019

Mildred and Ethel

The last time I was ordering crossweaves for some more Liberty + crossweave quilts, I saw an olive green crossweave that I thought might be nice to try for a change away from my neutral neutrals. (I think you can use certain colors as a “neutral” for a background, like in nature - blues, like sky, and greens, like foliage, in particular.) I was ordering from my phone and the thumbnail photo of the green crossweave had a sort of grunge/crosshatched look to it that all my other crossweaves and chambrays did not. I figured it must just be something about the way the colors photographed. Well, it came and it looked precisely like the photo did! 

I was really confused. The look and texture were completely different from all the other crossweaves I had ever seen, and not in a way that pleased me. I’ve lookked about a bit on the internet and apparently Moda makes two sorts of crossweaves. Now I know. This one is more like a barkcloth, similar to the Outback Wife fabrics I have. I really didn’t like it at first and didn’t know what I was going to do with it. 

But since it has such a retro look and feel to it, I decided maybe I could pair it with some other retro-ugly fabrics I have and it might actually make something I could love to hate. With more projects on my plate and in my head than I can ever complete, I don’t know why I even gave this a thought. But I scrounged through my Liberty stash for those prints I don’t like and also pulled some I do like that matched and came up with something kinda funky and vintage and likable. 


There are six Liberty prints here that speak a certain vibe to me which pairs with the grungy crossweave. Three of them are prints that I was never going to use anywhere else, so I figured it was worth a shot to use them now. The other three I do like but I’ve used them before so the leftovers were expendable. So despite the fact that I have oodles to work on already, I cut into this stack of funkiness and made some triangles. All my other Liberty + crossweave quilts are random bricks and strips patterns, but something about this pull was saying triangles and diamonds to me.


These are two of the prints I wanted to use up, so I cut as many of them as I could from my yardage. They will both feature twice as often in the quilt as the others will.


I'm using up the bulk of this Betsey in yellow for half the backing and on the front.


The backing is also a departure from my previous Liberty church quilt "score" I was working from. I didn't want any of those "ugly" prints left, so I worked what was left from cutting triangles into strips for the backing.

It's been a while since I sewed any triangles, so I looked up the method online, thinking there was some trick I was forgetting. Nope. Just line them up and fold them over to sew. They came together so fast!


I'm making green diamonds and the Liberty prints make patched together diamonds of two prints.
I could hardly have picked two sillier fabrics to cut into triangles and sew on the bias cuts, but they behaved nicely enough. my points aren't all perfect or completely lined up, but with the amount of distortion and stretching I could have had compared to what I got, I'm not complaining. Triangles want to be triangles even when your tana lawns and crossweaves also want to stretch bit.


This weekend my husband was so sweet and gave me the gift of time to do as I liked as a Mother's Day gift. So in only 4 days I had the quilt fully pieced, a backing done, and everything pinbasted, ready for some delicious handquilting. This is an unprecedented record for me. Have I actually gotten a bit faster at quilting? That seems to be a theme this year, so maybe I have. And along the way I've actually pretty much fallen in love with this crazy, funky quilt. 

It reminds me very much of something that would have been found in one of my great-grandmother's houses during my early childhood at the dawn of the 70's, perhaps something that had been there since before my birth. Maybe it was that combined with Mother's Day weekend that inspired me to name the quilt "Mildred and Ethel" after my two maternal great grans, both of whom I knew and visited a little in my toddler years. 

Four Generations: Grandma Dorothy holding my sister Loree, Ethel (Dorothy's m-i-l), me held by my mother Jan (Marmee)

Ethel, for certain I remember, and her lovely backyard garden in Logan, UT, with the Logan temple (where my parents were married) in the background. Her basement with the taxidermy always creeped me out, but I enjoyed the rest of the house. It's part of my earliest memories.

Mildred I remember less well, but I do have a few distinct memories of her home: the Christmas village with train under the tree in winter, a refrigerator on the back porch, and her cherry trees, which seemed a vast orchard to tiny me, but were apparently only a few in number. Apparently I don't have any photos of me with her, either. I'll have to go to my aunties and see what they have for me.

I'm not sure which lady is the green crossweave and which is the Liberty, but the two distinct fabrics make me think of there being two of them. I'm also going to handquilt this in two colors, white and olive green, one for each lady.

With summer coming on fast, I am trying to get as many projects as possible into handwork mode so i have something to take on our travels that doesn't require me to be a machine. I'm pretty chuffed to have this vintage-esque lady in the position to be handquilted to my heart's content.

Monday, January 1, 2018

Dorothy's Girls - a quilt finish


instagram is so instant! my goodness, it's taken me far too long to get these photos here and make this post. but i wanted to talk about this quilt in more detail than even a looooong IG post allows for. and since this quilt was finally completed in april, it really is time to post about it.

this quilt is made from the "indian blanket pattern" by rachel hauser of stitched in color, available as part of her online ::angled:: class, which i took in 2015. i adore rachel's original version of the quilt with its crisp contrast and bold, summery colors. as i chose to work with fabrics strictly from stash and to try a very new-to-me color palette based on two prints, my version is quite different from hers. mine's romantic, rather vintage-y, warm and more fall-ish feeling. rachel's "indian blanket" has a definite pattern to the value placement and the combinations feel more consistent in the value contrasts. mine are all over the place. one of the intriguing aspects of quilting is what changing value or color placement or fabric types will do to the same exact pattern. you can see our quilts are related, but they look like very different quilts from opposite ends of the family spectrum. i like them both for different reasons.


my favorite part of this quilt just might be the back. i used the 3 strip accent stripe backing format i have used for a few other quilts, this time using kona cotton solid in "curry" as the main fabric. i think it's absolutely delicious in its warmth and simplicity. the 3 accent stripes are out of the two main inspiration fabrics and another pick from the quilt top, "antique flower" by julia rothman for cloud9, that has emerged as a favorite fabric as i've worked with it.

the binding i chose is nothing special, but it works and i'm fine with it. (some french general for moda, i think?) it certainly adds to the vintage feel of the quilt.

 for the quilting, i used a soft, peachy-pink aurifil 2415 thread, which contrasts so beautifully with the solid curry backing, but doesn't photograph accurately. my fmq pattern is a set of modern loops done in rows and sized to fit each row of triangles. this is a quick and effective pattern, which was nice since the quilt is so large and took so much time to assemble. also, i think the loops contrast well with the sharp angles of the triangle pattern.


this was my first time working with triangles in a quilt. it was a fun challenge and a skill i'm happy to have added to my tool box. i did pretty well with my points, too. that is always satisfying.


the part i like most about the quilt top is the fabric pairings. some of them are just so good and make me happy when i look at them. namely, those i've photographed to share here. other combos are less pleasing and if i were to do the quilt over, i would remove them and just do more of the ones i liked. but it's a done deal. since this quilt was in part done to use up stash, it's inevitable that that happened.


but the fabrics that do please me please me a lot! i love to sit with the quilt and look at the good ones. each of these photos may look almost identical to you, but they don't to me. they are quite distinct and examining up them up close is what i enjoy about the quilt.

originally, i was using each fabric once in its own row. however, once i got going, i decided more of a good thing was good. so i added a row or two. and since the triangles were of various sizes, the rows didn't always come out equally long. instead of cutting some short, i made others longer. which just kept slowly increasing the size of the quilt. it ended up a whopping 68" x 90" total, a fair twin-sized quilt. but i made it as a throw, so its kind of too large. i tend to always add to quilts to make them "just a bit bigger." not because any of us are big people but because i want to make sure it's big enough to fully snuggle under, and then when it's almost big enough to use on a bed, why not make it big enough? i think the experience of this quilt has taught me that lap-sized quilts and a little restraint is a good idea.


one of the fun aspects of this pattern was the mix of triangle sizes and the occasional randomness and break from form thrown in. rachel directed us where to do that in a few places and i picked some other spots on my own.

in the above photo, you can see the row that's a mix of large and small triangles, as well as a few different fabrics, some of them seemingly out of place with the pattern and rhythm of the row. i like that.


every once in a while, i would throw in a triangle that felt the same as the other fabrics in the row, but wasn't, like the middle triangle in this photo. i like that, too.

so there you have it -  the "dorothy's girls" quilt is done.

but what about that name?

originally i was going to call this something like "indian summer" as a nod to the warm color palette and rachel's pattern's name. but back when i started actually quilting it, my aunt came down with breast cancer at the same time my mom, her sister, was diagnosed with colon cancer. i wanted to gift a quilt to each of them and quickly, but as my husband had just had a major accident (yes, it was a crazy time!), i was in no position to make new quilts, which i don't do quickly anyway. whew! this is complicated. so, i decided to give my mom the penny patch 2.0 quilt, which just needed quilting, and was considering giving this quilt to my aunt. long story short - i didn't. she got the "love all around" quilt instead.

i got to keep the triangles for myself. but i kept thinking of my aunt and my mom while working on it. and of their sister, billie, and their mother, my grandmother, dorothy. grandma dorothy generally brings the color brown to mind, but aspects of this quilt do remind me of her. and those 3 stripes on the back remind me of her 3 daughters. i was hoping the number of rows would come out to equal all the granddaughters, too, but it doesn't. anywho, all that thinking of grandma gave me a name for this quilt and thus it is "dorothy's girls."

Saturday, March 21, 2015

at the end of a triangle: a trimming technique

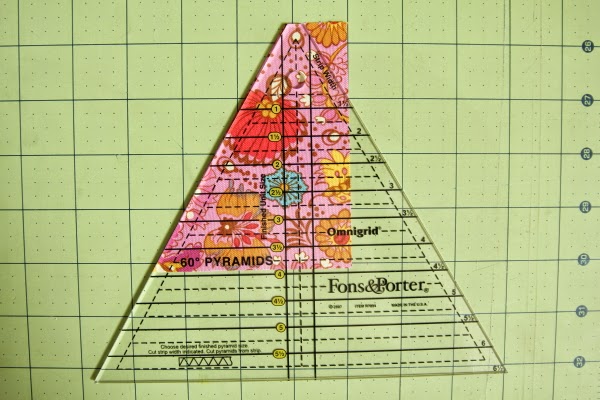
 i've been cutting lots of triangles for my "indian blanket" quilt. the fons & porter 60` ruler works really well for this. i especially like two things about it: the top tip is blunted and it has maths on the ruler for you. the ruler is marked with the strip size you need for the finished height you want to achieve.

all that said, i was having one trimming issue - whenever i reached the end of the strip, it was hard to figure out where to cut the last piece straight so i ended up with a half piece, which i need for the quilt. after all the triangles are cut, you are left with a bit that is angled on one side but too wide to be a half triangle.

what i wanted was a piece that is cut down that middle dotted line there, bisecting the triangle in half.

here's a closer look at the line i wanted to trim on. trouble is, of course, that you can't cut through the ruler. so i usually either flip the piece over, shift the ruler to the side, and trim off on the angle (which leaves you with a skinny, angled piece with two bias cut sides), or i use the straight ruler to make a cut, but this is hard to figure out accurately.

well, the other day, my long-buried geometry knowledge kicked in and somehow i got the idea to simply shift the ruler around to get my straight cut. please don't ask me which theorem i used or the measurements of the angles that make this work. i don't know. but i do know this works!

as you can see, i lined up the center line with my outside angled edge and my blunt top tip with the top of the fabric. then i cut down the angled edge of the ruler.

this gave me the perfect half triangle i was looking for and the leftover piece is straight cut, not biased, on both sides.

now i take my bow and leave you for today.


Saturday, January 24, 2015

cutting edge

aren't all the itty bitty chained pieced bits of my "kitty in the corner" (my modernized name for "puss in the corner" block) just darling? it's like a mini bunting this way and may have inspired a project idea. but in the meantime i am once again full speed ahead on the gypsy wife quilt. i've been tackling lots of the intricate main blocks, one at a time, and doing so much cutting. which has inspired me to talk about my cutting tools, some of which are recent acquisitions.

most quilt teachers or books for beginners will tell you that you only need a few quilt rulers to get by. and this is very true. i did just fine with a 6"x24", 9.5"sq, and 12.5" sq ruler for my first several quilts. these are enough for squaring off fabric, cutting strips, trimming blocks. they're quite versatile. you can even successfully cut triangles with those rulers.

but over time i found myself thinking a few other sizes would be more manageable for different jobs. so whenever i had a coupon or rulers went on sale, i would pick up one that seemed handy. when discounted, they are only a few dollars each. given enough sales and enough time, i've amassed a good pile of rulers.

when it comes to square rulers, which are fantastic for trimming blocks precisely or fussy cutting certain sizes of fabric, i now have each graduated size, by the 1/2", from 2.5" to 6.5", minus the 3", which was out of stock at the last sale. (but two of the 4" because they both came with some sets i bought. i suppose i have a spare. one for upstairs and one for down?)


the 2.5"sq came with a mini cutting mat i bought for travel purposes. at the time i thought it was too ridiculously small to use but have since been proven wrong. even that tiny fella gets a turn at the mat periodically. like when i'm trimming up mini hsts.

my gypsy wife quilt, which features a great variety of block sizes, is the type of project that makes all these different rulers quite handy. i'm continually needing to either fussy cut or trim up blocks. so i find myself frequently reaching for those square rulers.

my rotary cutter is a gingher i got on sale from joann crafts. i love my gingher shears and snips, and i thought it looked really nice, so i picked this instead of an olfa when i started quilting. they routinely go on sale and so do the replacement blades. for my cutting surface i have a 36"x24" fiskars self-healing mat. i really like the soft green color (it's butter yellow on the other side). i find it to be very accurately marked and no longer use two rulers for squaring up or cutting strips. rather, i use the mat-and-ruler method.

my cutting area lies at the end of the table so i can work off the three edges easily, which is quite helpful when cutting as it allows me to move myself rather than the fabric or block at least half the time. however, the fabric inevitably has to be moved at some point. here enters the genius called "rotating cutting mat." i had heard of these wonders a time or two but didn't think they were for me. until i was elbow deep in gypsy's blocks and always having to shift everything. so i looked on amazon and found the olfa 17" rotating self-healing rotary cutting mat. there are smaller mats, too, but i had the space so i wanted as much rotating space as possible. i can see how it would be convenient to cut small blocks on a smaller mat, but i'm good with this one.

there is the black under-mat, which stays put, and the top green cutting surface rotates a full 360 degrees in either direction for cutting. its perfectly smooth and wonderfully flat.  just look at the following photos to see it move.

spinning to the right

and all the way back around again
i was a little skeptical of just how useful this might be but i can sing it's praises now that i've given it a go a few dozen times. i'm certain my trimming accuracy has increased and it definitely saves me time. i'm doing a ton of trimming for the gypsy wife as i am working on my accuracy with all the points involved.  each block is a mini project and i trim most every bit accordingly.

one nice thing i just discovered is that since the diagonal of this mat measure 24" across, i can still trim strips longer than 17" if i just put the fabric on the diagonal. very handy. otherwise i have to move the rotating mat off the big one. maybe someday i'll have a dedicated sewing room with both these mats in their own spaces.

as for my other rulers, i have two 6"x24", a 3.5"x24", and a 3"x18"rectangles. the two long ones are for squaring up fabric, making large cuts, and trimming quilts. the long skinny one is for when i am making skinny but long cuts and don't want to deal with the width of the wider one. like when i am cutting strips. and the short skinny one is for shorter strips or smaller cuts when i don't want all the length of the other two. this mostly goes by feel. if i find i have too much width or too much length for what i'm cutting i'll switch to another ruler. i store these on a recipe book stand.

the stand is also good for holding up quilting books or patterns i'm working from and it houses my quilting notebook, which is for keeping track of projects, working out maths, and sketching out ideas.

then there are the triangle rulers! you can definitely cut triangles without special rulers, but i've found it simpler to use them for cutting rather than trying to use the lines on the straight rulers. also, the fons and porter rulers have some of your math already worked out for you right on the ruler. i have been using the 60degree pyramid ruler for my indian blanket quilt and epp cutting. i liked it so much i picked up the flying geese ruler at the last sale. i've heard it highly recommended by others, too.

so that's the scoop on my cutting gear.
i used to despise cutting when i first began quilting. it was one of the most difficult parts for me. but over time, with practice, i've gotten better at it and actually enjoy it in doses now. having a variety of tools on hand to help makes it that much easier and more enjoyable for me.

happy cutting and sewing all!

***i should probably put some sort of disclaimer on here that no one asked or paid me to say any of this, that i purchased all these tools myself for my own use. i'm just sharing what i use and why i like it.

Monday, December 1, 2014

indian summer bliss

while i was plugging away at horrid straightline quilting on "bandwidth" all through october and into november, i kept eyeing this tempting pile of loveliness so fetchingly stacked in front of my AMH rose print atop a shelf in my sewing room. as much as i liked my colors in "bandwidth," orange and navy were getting old and quite boring. i longed for fresh, pretty colors the way one longs for spring in the dead of winter.

i kept telling this pile, "soon, soon!"

but i also really, really desperately want my kids to each have their mama-made quilt done and wrapped around them. so i kept at those not-so-straight lines. endlessly.

then one day the lines were done.

did i rush straight to this pile? that was my plan. but on the morning of my freedom i passed by my penny patch 2.0 pile, which was stuffed in a bag and set in my bawthroom sewing area months ago. sure enough, i cut into the penny patch pile that night instead of the triangle quilt stack.

but the next day, a blissful friday of nothing much but sewing, i alternated back and forth between the two projects. if i felt like triangles, i did triangles. if i wanted squares, penny patch it was. that afternoon i decided i didn't have enough room on my design half-wall, so i just up and made another one.

 my current half-wall simply leans up against the room wall, so i figured it was easy enough to slide one behind the other when not in use. the excess batting on the first wall wasn't quite enough to cover the second wall fully, but it's functional for now and i am considering sewing together batting scraps to make up the difference. and someday, when i get my dedicated sewing room, i'll have one whole wall when i attach these two, one above the other.


i got to sew most of saturday, not just that friday, which was a welcome treat after very little sewing time for most of the fall months. i managed to get two more rows of triangles together. the top row had me holding my breath a bit because the ditsy floral is a silky, somewhat slippery cotton lawn rather than a quilting weight. add the slippery lawn to a bias cut and there's plenty of potential for trouble. but so far so good!

there are now three rows done and they are looking a bit clashy as is. i hope when i get the other rows in between them all will play nice together. if not, there's room for rejects on the back, right? this quilt will have such a different feel than rachel's original, but i am liking it thus far. she called her quilt "indian blanket." with the golden and rosey colors in this one and the warm, extended summer we've had around here, i think mine feels more like an "indian-summer blanket."

all this bliss sewing has been so refreshing. soon i'll have to get that "bandwidth" trimmed and bound. then the wonky stacked coins will need to be finished for s1. in the meantime, i'm going to keep my indian summer sewing of triangles and penny patch 2.0 inching forward whenever i need a break from orange and navy in boy prints.

linking up with lee's wip wednesday at freshly pieced.

Wednesday, October 15, 2014

angling into triangles

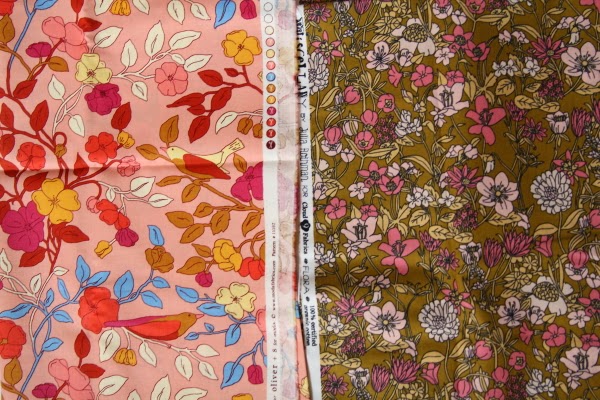
 back in the spring, when i was still struggling with fabric fasting, i picked up this intriguing little half yard bundle off etsy while i was snatching up heather bailey prints. it seemed so vintage and bold in a color palette i wouldn't normally go for. but i have been looking at it and loving it ever since it arrived. after it came, i realized it was "the ladies' stitching club" from liesel gibson of oliver + s for moda fabrics. when that line came out, i thought i didn't like it but apparently i do. funny how that works - you see bits of a fabric range paired together in a unique setting and it actually does appeal to you.


well, that bundle has been sitting atop my bawthroom sewing table being admired for months. sometime during the summer i broke it open and began to pull other fabrics that had similar colors to the shades of plum, pink, gold, peach, ochre, and a touch of blue, that were found in the large floral. i had also acquired another pink and ochre floral print (from "miscellany" by julia rothman for cloud 9 fabrics) that had a vintage, hand drawn vibe to it, which i wanted to use with the stack if possible.

in the end, i got this pile together. it's rather unusual for me, a real departure from my normal palette. it feels like it's either going to be totally cool or a complete disaster. granted, the fabrics are not represented to the scale they will appear in the final quilt. i also think it needs a few more low-volumes and maybe another plum fabric or two to round everything out. but i do not want buy any fabric right now and since this is a longterm project, i can hold off on those for a while.

so what am i doing with this? and why have i started something new again? well, i'm currently taking the "angled" class with rachel hauser at stitched in color. the class has been going for several weeks and so far all i've done is read the material and drool over the photos. i want to make three of the quilts and am really excited to tackle triangles, diamonds, and flying geese! (not "dying geese", right deborah?) but i just don't have time to sew right now. and lately i've realized i mostly just want to finish off the projects i already have going, hopefully by the end of the year, and start fresh next year with new stuff. but, but, but i did want to participate in the class just a little and at least give the new skills and directions provided a try.

so yesterday i tackled triangles.

i'm starting with the "indian blanket" quilt using this radical palette i pulled. i already had one huge pile of fabric i'd amassed when i tried to participate in paula's triangle quilt along earlier this year, but i still want to do that quilt and didn't like that pull for "indian blanket," so i turned my attention to that pile on my sewing table which had yet to be assigned a pattern. i'm kind of excited and also very nervous about it. i'm taking a "well, we'll see how it goes!" approach to all of it. i'm just doing a row or two for some practice, then i'm going to set it aside and finish my boys' quilts. and that "bloom where you are planted" quilt i started on my birthday.

rachel provided directions for cutting using a standard 6" x 24" grid ruler. that was very helpful because it means you don't have to buy a special triangle ruler. but i already own one, so i opted to use that for my cutting. however, my ruler has a blunt tip and after doing all my cutting, i realized that blunt tip cut off 1/4" of the triangle so by following rachel's instructions, i had made my triangles 1/4" too high. darn it. trimming 1/4" off 28+ triangles seemed like too much work and too much room for error, so this particular row will have to just be 1/4" too high. now that i think of it, hopefully that doesn't throw off the placement of the triangles in the quilt too much. "well, we'll see how it goes!" right?

 the blunt tips also threw off the alignment directions rachel had given, so i had to do a bit of trial and error (sewing all three seams on the first triangle) before i got it right. but here's what i discovered in case anyone else wants to know. if you want your on-grain edge (which is opposite the blunt tip if you cut with the blunt tip on the grain edge of your fabric piece) to be at the top or bottom of your row, line the two triangles up with the tips alternating along the top and bottom.

i know this is a really loud and bold pairing of fabrics but i've already decided that if i don't like it, i can always use it on the back! with the sizing mistake i made, i may have to.

 then fold the right triangle over the left one, keeping that middle edge where you'll sew the seam aligned along the diagonal. you can't just pick it up and place on top, you have to fold it over diagonally, which feels like you're folding the triangle down rather than over.

 then align the triangles along the cut edges. the first/bottom triangle will still have it's blunt tip  pointing up and the right/top triangle will now have it's blunt tip in the lower right corner. (you can see a little of the blue peeking out there.)

 now sew down that seam. you'll be sewing the side opposite the two matched pointed tips, aka the side between the two blunt tips.

sew in pairs first, then start adjoining those, which is a whole different alignment issue! it took me no less than three tries to get this right the first time. not having all the dogears made it harder to follow rachel's instructions, but i got it in the end.

i have nearly a whole row complete now! i think i'll do one more so i can see how well my points turn out when i match everything up. wish me luck! then i'll be putting these triangles away and getting back to some straightline quilting.

linking up with lee's wip wednesday at freshly pieced.