Showing posts with label stitching. Show all posts

Sunday, June 30, 2013

conference weekend sewing, day 2

day 2 of our general conference weekend sewing, i did some community service sewing whilst listening to the prophets. it seemed fitting. i have a pile of "mama, please fix this" jobs that i normally delegate to my mother, the original sewer-upper. i decided to take on some myself instead. 
 first up, there were some gaping wounds to be healed. i don't have a fancy method for this, i just pick a generally matching thread, double up, knot it, and start whip stitching. at least that's what i think it's called. it feels like i'm whipping through it.
 i just go round and round through the two sides til it looks like there is a satin stitch over the whole area because i keep the stitch that close. this is most definitely not how my uncle ray, the vet i worked for in college, dealt with his patients, but these stitches are meant to be permanent rather than removed. btw, i can remove real stitches, too, if you have a need. i did pick up one or two skills working in a veterinary office for 4 years even if i dislike working in the medical field and really am not much on pets.

 after yogee the bear came little ducky, who had her back wide open. this is an especially vital fix since little ducky was given to daughter#4 by my mother to show her how tiny she was at birth. little ducky is the same size d#4, my littlest at 4 lb, 14 oz, appeared at birth.


d#4 @ 4 wks with little ducky on easter
 

see, if you don't count d#4's tadpole legs, they are the same size. oh, she was sweet! mommies don't have favorites, but some they enjoy more than others at certain stages. my angel.

back to the present. there may have been more patients in need of assistance, but i quit photographing after two. enough documented.

 my oldest daughter did a free-styled embroidery of a temple while she listened. it's not any one temple in particular, but it has the layered look that some of them do and an angel moroni on the top, so it counts. it also reminds me of a wedding cake. i love all their efforts, especially those purely out of their own imaginations.
bountiful, ut temple
in between sessions i managed to baste up "romance in the garden." and make my nephew cry. while i was basting in the main hallway (all that tile makes for the perfect spot), he ran from the back door to the front. right across my quilt! i called out in surprise, stopped him, and kindly (i thought) explained that he'd just stepped on something i was making. he continued on his way to grandma's house next door. (my in-laws are our neighbors. how's that? it works mostly great, thanks for asking.) about 30 minutes later grandpa and said cousin returned with cousin in tears. oops. i really thought i'd been gentle in my straightforwardness, but he's a sensitive 8 year old soul and i'd stomped his feelings more than he'd stomped my quilt. we made up and all was well.

after we were all spiritually full and the sewing was done, we played with cousins in the glorious spring weather gracing our backyard. the girls spent hours carefully collecting the blossoms that fall from the mesquite tree. they thought the blossoms were seeds and could be used to plant more magnificent trees. i didn't disillusion them since they were so pleasantly occupied.

only 6 more months until the next general conference session when we'll get to have another weekend of spirituality and sewing at home. hopefully, some cousins to play with, too.
happy Sabbath, all!

Saturday, March 31, 2012

securing corners when blanketstitching

i've never had trouble with corners slipping on the blankets i've made as far as i know. no one's complained or mentioned it happening. but still, i've begun taking the extra precaution of tacking down the corner stitch when i edge my 4sq blankets. it's simple.

when making the stitch around the corner, i make sure to grab a bit of the corner with my needle by going under just a few threads before catching the thread.

then bring the needle up under the thread as you normally would

and pull tight, as usual when completing a stitch

then loop back around to where the thread entered the fabric and insert the needle again
pull the thread snug and continue stitching down the next side of the blanket

your corner is secured in place

when done carefully, the tacking stitch is not noticeable.

Friday, March 23, 2012

4 sqr #10 & a scrap book

i'm pretty sure this blanket was on hold longer than any i've made thus far: bought the fabric last spring, completed the top in late summer, my mom sewed on the flannel back for me in the fall while i bedrested, and i completed the border stitching for it this month in a few short sessions. whew! done, wrapped and ready to hand over to baby charlotte, who is now 6+ months old.
i have to say she is one of my favorites for a few reasons.
1. i adore the lily and will fabrics from bunny hill designs for moda. very feminine, baby, soft, vintage and classic but in that more modern color combo of pink and brown. i've gotten lots of compliments on these fabrics whenever i've been seen working on the blanket. love of fabric is one of the reasons i started sewing so you better bet i'm gonna gush a bit over designs i love. i am especially tickled by all the sweet bunnies worked into the designs of this line.

2. i really like how the brown stitching contrasted with the ivory flannel on the backing.

3. on this blanket i upgraded my technique for the blanket stitching in 3 new ways.
*i was having problems with getting my thread knots to pop in and out of the fabric. sometimes it worked perfectly and other times i had difficulties galore. finally i realized i could just put my hand and needle in the opening i left for turning the blanket. i did this to plant the thread whenever i started a new section of floss.
*i started anchoring the corner stitches (more on that when i upgrade the tute).
*i quit popping the knot in when i tied off a section and began tying off right on the stitch. this is not as hidden of a techinique, but easier, quicker, and more secure. i'll upgrade this section, too.


so long, pink lily and will bunny blanket!
i still have some of this fabric to use for myself but no plans yet. maybe i'll just put it away for use on a scrap project from the newest quilt book i bought, sunday morning quilts.

this book has some great projects for using up your scraps, as well as tips on how to store and sort them. looking over it last night, i'd say the book is for sewers/quilters with some experience because there was a lot of assumed knowledge. but if you have enough scraps to create entire quilts, then you have probably been sewing a while. fair enough. i especially liked having ideas for using my strings and the little triangle corners i cut off projects because i save the all, every last bit. even selvages. at $10+ a yard and rising, designer fabrics are precious to the last thread.

Monday, March 21, 2011

juggling

having more than one project going at a time can be fun, but it also means some projects take a backseat, getting pushed further and further behind. i have at least 3 prominent projects i'd like to complete immediately. finally, i've got a brainstorm of how to embellish "at last" and i'm still in the middle of "out on a limb." also, now that i know a bit more about sewing and quilting, i realize some mistakes i made when i started up "star cookie." that's lead to some decision making regarding unpicking stitches and possibly even more fixes than that. i'm torn between just moving ahead and redoing a major portion of what i've already done. one of the curses of a little knowledge, i suppose. when i didn't know any better, i was blissfully stitching away. can't do that now. i'm feeling a bit pressured to be done with these quilts not just because of the excited babies who keep saying, "is my blanket done?!" every time i touch them, but because i'm taking a quilt class next month and that will mean another project in the mix.

"star cookie" has been pinned together since october, which is a big no,no. i live in one of the driest places on earth, so i didn't worry too much about rust in the beginning. but now that i sew in the bawthroom, i need to get those pins out. so today while the 4 yr old had her bath and the 3 yr old played with some of my recent project scraps, i worked on unpicking a few of the handquilted seams i completed last october. (see how long it's taking me to decide and finish up this project?!) my problems lie in that i didn't square off the quilt sandwich before i began stitching and my straight piecing seams are not very straight, hence some discrepancies between the quilting lines and the fabric seams.  i think i'm going to compromise at unpicking the last few seams and leaving the rest. i really need to undo those because i ignorantly just followed the stripes on the fabric not knowing they weren't necessarily straight and definitely not in line with the previous stitching i'd done.

one good side effect: i know the marking pencil i've been using really will disappear because i can no longer see the guide marks i made last time i worked on this quilt.

Thursday, February 24, 2011

blanket stitch tutorial

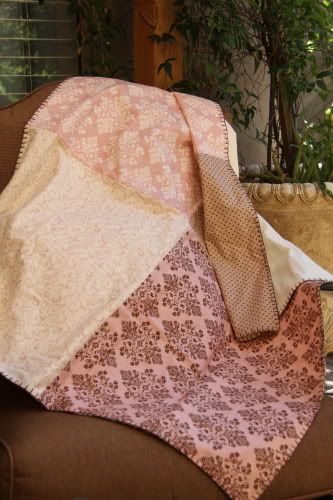
i adore blanket stitch. it's simple with so much rustic charm. (and i just realized my muddled mommy brain has been inexplicably calling it "backstitch" for a few days - why, oh, why?)  it can be used to edge many types of projects, not just blankets, and also for decorative effect on flat items like applique, but that will be dealt with at another time. here's how to blanket stitch an edge, like on my 4sq baby blankets.


tie a knot in the end of your thread/floss. bring your needle up between the folds of the two fabric edges.  pull needle and thread all the way through. when you get the knot to the fabric, grasp the fabric close to where the knot is with one hand and gently but smartly tug the thread through where it is exiting the fabric. you will hear a satisfying "pop" when the knot goes through. this is called "burying the knot." be careful you don't tug too vigorously or you will pull it completely through the fabric and possibly make a hole.


on the front side that is facing you, insert the needle from front to back of the fabric about a 1/4" inch below the fabric's edge (or whatever depth of stitch length you desire). grasp the thread with your non-needle hand and pull the thread behind the needle in the direction your stitches will be moving in. here, i'm stitching right to left, but you can certainly stitch left to right if you want. whatever's more comfy for you.
i pinch the thread down along the seam and hold it there while i pull the needle and thread through. once you have the thread pinched down with the needle between the thread and the fabric, pull the needle and thread through to the backside until the stitch is tight and complete.

i let go of the thread with my pinching hand once i get close to finishing the stitch.

a this point, if you notice your thread is not inside the loop being created, stop and pull your needle through the loop or you will miss the stitch. this can happen when you don't keep the thread all to the side you are moving toward as you start your stitch.

pull until stitch is snug, but not too tight, pulling straight up and away from the seam.

if you somehow missed and didn't catch the stitch, you can loosen the botched stitch up a bit and run the needle under the stitch, making sure to catch it and correct the miss.

then start again by inserting the needle in the front of the fabric and repeating the same stitch again always making sure to keep the tail of the thread (end away from the needle) pulled to the side in the direction you are stitching. if you don't keep the thread to the side you are moving toward, you can miss the stitch and end up with a diagonal stitch instead. just correct as described above.

when you have a little more than one needle's length of thread left, tie off and bury your knot. this is not a time to be frugal with your thread. quite often i try to eek out a stitch or two more past where i know i should stop, and i always regret it. you need enough thread left to work with, especially to bury the knot. otherwise you will find yourself very frustrated and spending a lot of extra time repeatedly rethreading increasingly fraying thread and trying desperately to get it tied off. no fun. go ahead and "waste" that last few inches of thread.

my method of tying off is not the best, but i know of no other. please, anyone enlighten me who knows a better way. here's how i do it:

i loop around the final stitch, making sure to pull my needle through the loop to create a knot on the thread.

about a 1/4" away from the knot you just tied, wrap the thread around the end of the needle twice. pinch the thread where you just wrapped it and pull the needle through your fingers, keeping it pinched. this makes a knot.
then insert the needle in the seam under the last stitch.

push the needle between the two fabrics for an inch or two, making sure not to peek through either side of fabric until you are ready to exit. then pull needle and thread out of the fabric and tug until you hear the "pop" of the knot being buried. it's very important to make sure you get the knot buried. sometimes i have to use the needle to manipulate it into the seam if i just can't get it to pop.

when the knot is buried, trim off the thread, making sure not to cut into your fabric. tuck the little ends back in if you have to and smooth over the hole. i pull the thread out a little more than necessary, which makes the fabric pucker a bit, snip it, and then pull the fabric smooth and the tiny bit of end left sticking out will pull itself into hiding.

to start up the next length of thread, tie off the end with a knot like you did in the beginning and bury the knot as before, inserting the needle an inch or so back from the end of the last stitch.

OR insert your hand into the hole left open and place your needle in position from the inside.

now just pick up where you left off, stitching as before.


don't forget to hold down that thread along the seam in the direction you are moving and to keep all the thread to that side of the needle.


for how to turn a corner, go here

once you get the hang of blanket stitch, it moves along nicely, falling into a wonderful rhythm. i like to edge my 4sq blankets when i'm at my kids' after school activities, while talking to friends, and i've even started watching a movie or two with the kids when i need to get some stitching done. then again, it's a nice way to busy my hands while my mind roams free, contemplating life and the cosmos. simple but deep stuff!

please let me know if this tutorial made sense to you, how your blanket stitching adventures go, and ask any questions you might have. i'll sure try to answer them.

next up will be a full tutorial on the 4 sq blanket, as requested by shannon. i just got an invitation to a baby shower next week and will be making a new blanket for the occasion, so i'll photograph as i go and get the tutorial posted shortly there after.