Showing posts with label beginner. Show all posts

Monday, August 31, 2015

"cinched" pattern tutorial


this is a simple strip quilt pattern which utilizes a jelly roll and a bit of extra yardage for an accent strip and block across the upper portion of the quilt. it comes together quickly and easily, with a few opportunities to embellish the design for more detail.

in this tutorial, i will give basic instructions for the pattern. for more detailed instructions, please refer to the links to each section of assembly.


fabric requirements

i'm starting with a generous amount of yardage partly because i already have it in my stash and partly because i simply like to work that way. generally i need room for error and i happen to adore scraps, so leftovers are quite welcome. 
  • one jelly roll (or 45 - 2.5" wide x wof  strips, see further options below)
  • fabric a - 1/2 yd for accent block and backing strip a (could be done with 1/4 yd or fat quarter if adjusting measurements slightly - see section on accent block)
  • fabric b - 2/3 yd for accent strip and backing strip b
  • fabric c - 1/2 yd for extra strips and backing strip c
  • fabric d - the equivalent of one jelly strip for strip joining squares (if using)
  • optional fabric e - 1/3 yd for accent block
  • 1/2 yd binding fabric
  • 3 1/4 yds backing fabric, 4 1/4 yd if using a directional print
it's a pretty small list. if you want more variety in the strips, which i do, you can use additional coordinating pieces. 

* note - 1/4" seams used through out and all measurements are for "cut" (seam allowance included) not "final" unless otherwise noted.

make the strip sections

cut the selvages off all jelly roll strips. (for more detailed instructions on preparing the strips, see cinched pattern, part one.)

select 30 jelly strips to be cut in half and used for the upper section. (set the other 10 strips and the 30 half strips aside for the lower section.) arrange these 30 half strips in a row for the upper section. (for a detailed discussion of strip selection and construction options, see cinched pattern, part one.)


layout the lower section with 30 full strips in a row. these full strips include the 10 remaining jelly strips from the jelly roll, your 5 additional full strips cut from fabric c yardage, and 15 full pieced strips constructed from the leftover halves from the upper section.


you can either simply piece the leftover half strips or . . .


you can make pieced strips that include small 2.5" x 2.5" cut joining blocks, for more interest. i did this, varying the placement height of the joining blocks in the strips, and also using three pieced sections and two blocks for some of the strips. (see cinched part one for a discussion on these joining options.)

cut the accent strip and accent block pieces from fabric b and e.

the accent block can be a simple 10.5" square of one feature fabric e or you can create any quilt block of your choice 10.5" in size. in this quilt, i chose to make a courthouse steps block. (for a discussion of block options and how i made my accent block, see cinched pattern, part two.)

join your accent strip pieces to your accent block to make the middle accent strip of the quilt top. there is a little extra length to this piece as cut so you can play with placement of where you want the accent block to fall.

lay all the pieces out either on a design wall, bed, or floor to check the placement of your strips in the upper and lower sections with the accent strip in between them so you can see how you like your layout.

join the strips in each sections together to create two panels, an upper panel and a lower panel. (for more details on joining the sections together, see cinched pattern, part three.)

join the three panels together to complete your quilt top, which is now approximately 70" h x 60"w, once you square it off. (i used 31 strips so my top is actually 62"w.)

next, create a backing. i like to piece my backings and used a three-strip accent stripe for the back of this quilt. (for directions on making this backing, see three strip accent stripe pieced backing.)


sandwich, baste, and quilt.


for the "out on a limb" version of this quilt, i did a simple echo quilt of all the seams. this resulted in lots of straight lines and a flatter, less-crinkly texture.


for "bloom where you are planted," i used a loopy figure eight quilting pattern, which ran along the strips. this quilt has glorious crinkle texture to it, if that is your preference.


in the accent strip, i stipple quilted for some contrast and added interest. the accent block also had some unique quilting in it's sections. (for a discussion of my quilting choices, see "loops and crinkles.")

"bloom" is bound in some lovely olive lottie dot from heather bailey's "lottie da" collection

now you just need to bind your quilt and you are ready to wash and snuggle!
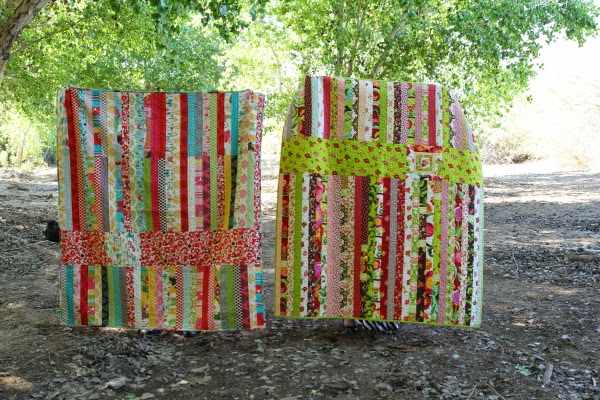
i've completed two versions of this quilt so far, and have the fabric for a third set aside. "limb" lives on our living room couch and is regularly used and greatly loved, despite all it's imperfections, which i don't really notice any more. "bloom" was gifted to my dear friend and quilting buddy, jill, who has moved away. despite the fact that my 16 yr old photographer did not notice "limb" was upside down, you can see the two versions of the quilt here together and how the slight variations affect the look of the quilt.

i've greatly enjoyed this pattern, which is so simple and satisfying. having designed something myself, especially as a new quilter, is very gratifying, indeed. giving the gift of love made tangible in the form of a cuddly quilt is the best part of all.

i hope you enjoy this pattern and would love to see any version of it you create.

happy quilting!

the detailed steps for this tutorial are spread over 6 posts i wrote as i made the "bloom" quilt and worked on the pattern. find the others here:

cinched part one - fabric requirements and strip preparation
cinched part two - the accent strip and block, modifications from the first quilt, joining blocks for the long strips
cinched part three - joining your strips and sections to assemble your top
the three-strip accent stripe pieced backing - how to make the backing
loops and crinkles - quilting choices for "bloom where you are planted"
cinched part four - quilting, binding, and gifting

linking up with friday finishes at crazy mom quilts

Saturday, February 7, 2015

dreaming easy: a checkered arrow quilt pattern tutorial

if you would like to read about how i came to create this quilt and it's process, as well as get information on how i chose my fabrics, please read this post - dreaming easy: the genesis.


i've tried to write the directions with a beginner in mind so although this is a very easy, fast block, the directions look wordy. more experienced quilters can likely just quickly glance at the photos to get a feel for block assembly. if this is your very first quilt (how exciting!) you are going to need more explicit instructions on basic skills and quilt finishing than i provide here. sarah schraw at sarah quilts and rachel hauser at stitched in color have both done beginner-friendly instructions on these topics.

dimensions

  • 56" x 72"
  • 63 - 8"sq finished blocks composed of 4 - 4" units
  • 7 blocks per row, 9 rows 
*it is possible to make a slightly smaller quilt at 48" x 56" with just 4 charm packs (two of each type). this would yield a 42 block quilt of 6 blocks by 7 rows.

supplies

  • two patterned charm packs of the same fabric line (42 squares ea) for 42 arrow shapes*
  • three solid colored charm packs (42 squares ea) for background 
  • various coordinating prints or solids, at least 5"x10" pieces of each, for 21 additional arrows*
  • 1/2 yd binding fabric
  • 4 yds backing fabric (or the equivalent for piecing a backing)
  • batting
*a single 42 - 10" square layer cake of one fabric line, if subcut into 5" squares would yield 4 squares of each fabric, resulting in enough squares for 84 arrow blocks, 21 more than needed for this size quilt. you could simply select 16 of the squares to use, yielding 64  blocks (only1 extra), or omit some of the excess pieces and save for another use.

**two charm packs will yield 42 of the 63 blocks needed. each arrow requires either two charm squares or two 5" squares of the same print fabric so gather enough additional fabric to make the 21 extra arrows. an 18"x20" fat quarter will yield 12 - 5" squares/6 pairs so you could use a minimum of four fat quarters to round out the fabric needs for the additional arrows, with a bit to spare.

block assembly directions

before beginning assembly, cut all the additional squares to supplement the charm packs.

for ideas about sewing hsts with directional prints, read this post here.
and for information about using low-volume (light colored) prints and being able to see the pattern in this quilt, read here.

chain piecing assembly line

also, please note that the whole process can be streamlined by chain piecing all the blocks at once at each step and doing your pressing and cutting assembly-line fashion. because each block uses only one print fabric, it's pretty easy to keep the block pieces straight and not confuse them.

all seams sewn with a 1/4" seam allowance.

each block will require two identical squares for the arrow shape and two background squares. one of each type will remain a square (top two in the photo), the other two will be used to make hsts (bottom two in above photo).

draw a diagonal line from one corner to it's opposite corner on the wrong side of your background (white) square, then layer it on the printed square, right sides together.

if you are chain piecing, do this for all your blocks before proceeding to the sewing, cutting, and pressing steps.

sew a seam 1/4" away from the diagonal line on each side.

cut between the seams on the diagonal line you drew. press each block open either to the printed fabric side or fully open. your preference. i pressed this seam to the side.

you now have two hst units and two squares. position as shown to create your arrow shape. sew the top two blocks together down that center seam and the bottom two, also, by layering the blocks with right sides touching. if you have the block laid out like this, simply take the units on the right side and fold them over so they are face down on the left side unit. then, without flipping or turning anything, sew down the right hand side of the units.

note: originally, when i began, i was trimming the square units down to 4.5" before i assembled the larger block because that's close to the size of the hst units. however, i found that since i was trimming up my blocks anyway once they were done, i was double trimming and wasting time. the pinked edge of the charm squares can be troublesome to match up and i find that i just don't get the piecing as precise as i'd like, so i prefer to do a quick trim of the blocks when finished. you make the call about how much and when you want to trim. the only time i found it at all helpful to do a pre-trim was when i wanted to sort of fussy cut the square blocks to match up with a certain part of the hsts.

for a detailed picture tutorial of that process, go to this post: checkered arrow block sans pretrimming.

once you've sewn the two sets together, press fully open.

at this stage, i found it helpful to press the seams open instead of to the side. it's kind of a pain because it takes longer, but the bulk begins to add up in these blocks and i found it really helped them to lay flatter when pressed open from here on out. if you really don't want to press fully open, press to the side of the square unit so you have opposing seams for lining up your units.

now you're going to sew the two half units together to complete the block. lay the units together, right sides touching, and match up the center seams by either butting the opposing seams together (shown above, slightly staggered so you can see how they fit together) . . .

 or by matching the seams up (above) depending on how you pressed. if you are a pinner, pin at the seam. i tried both ways and found i prefered pressing the seams open and pinning directly into the seam. above you can see how the pin is actually between the two pieces of fabric where it enters and exits.

sew together and press open.


voila! matching seams. so pretty. but not fully necessary here. on the blocks where my seam was a tad off, it didn't really show up in this pattern like it does in some others. so don't stress over your seam matching here unless you really care.

here's my first block after initial assembly. you can see that even though on the first one i pre-trimmed the square units before assembly, it's not a precise block and i still have odd pinked edges in places. this is why i decided to try forgoing the pre-trim and it totally worked! see photos of what that looked like in process in this post here.

here is my beautiful arrow block all trimmed up.
i like it!

once all your blocks are complete, you need to lay them out in a 7 across by 9 down grid and assemble your rows.


i first assembled each row individually by sewing adjoining pairs across the row, then attaching the pairs to each other, pressing all seams open after assembly, of course. then i sewed two rows together, and then the pairs of rows until the top was completely assembled in a 7 x 9 block grid.


you can read about my process for piecing the backing here.

when your top and backing are complete, sandwich, quilt (i stippled), and bind.
your lovely checkered arrow quilt is ready for use.

linked up with wip wednesday at freshly pieced.

Saturday, June 15, 2013

the not-quilt goes camping

i didn't finish the not-quilt all in one day like i hoped, but i was able to complete it in two. that's a happy consolation.
i probably could have found a better binding that incorporated supporting colors from both sides of the quilt if i had shopped and looked hard, but i chose to quickly shop my stash instead. i selected a heather bailey freshcut print (top) which had many of the same colors as the amy butler daisy chain, including that purply-pink background color in both prints. once on, it took on a very pink and white appearance, which contrasted nicely with the vintage-looking print on the back and blended with the daisy chain on the front. i would have preferred it to stand out from the daisy chain print more, but it's good enough.

friday morning we were heading out the door with my now 11 yr old daughter and 6 of her friends for an overnight campout to celebrate her birthday. i knew the wilderness was going to entertain the girls plenty, i was mostly there to chaperone. this meant lots of free time for me. therefore, i hustled myself to get the binding prepared before we left so i could work on it during the campout.

everything went well until i tried to connect the binding ends. this is a process i still don't have memorized. i always refer to nettie (a quilt is nice) 's "machine binding tutorial" for connecting my binding ends. i've used it for every quilt except the first one and it never fails me. i don't machine bind my quilts, but this part of the tutorial has always helped me. there were times i couldn't understand the photos exactly but just followed the words in the instructions, with great results.

i have finally wrapped my brain around how to make a binding (i used to always stitch the wrong direction at least once or twice) and with those synapses now connected, i could visualize how the ends were supposed to be connected and why as i was reading the tutorial. but somehow i managed to completely botch it up. it was a mess, quite mangled. i think part of the problem was i had the tails too close to a corner. i probably should have been further away than just a few inches. my husband was running around like a crazy person preparing to go and i finally gave up, intending to just bind the rest of it on the trip and fix the ends when i got home. however, one guest was late and i got just enough time to fix it while we waited for her to arrive. whew!

off we went.

i did some stitching in the car, but patched up a pillow pet for one of the girls first. mr. wiggles had a gaping hole in his tushy. once he was closed up, i started binding. then the roads got too curvy and i had to give up.

i used the same method and measurements i always use for my biding, but somehow, this time it was not even on both sides - thin on the front, thicker on the back. i guess i need to make adjustments for the new machine. i'm okay with it, though.

 when we got to the campground, the girls headed right down to the creek to play in the water. i sat and watched them, kicking myself for not bringing the blanket along to bind while i lounged around chaperoning.

i took photos instead. it's my first hobby love, anyway. can't complain. and while there i stumbled over a photo tip to share. the setting was gorgeous, but i was having trouble capturing the true lush greens of the place. even with adjusting my aperture and lens speed settings, it kept looking like this:


finally i decided to mess with something i don't normally touch: the white balance. i switched it off "auto" to "shade"; presto!, i got this:
 much prettier, warmer, and more accurate. and that, friends, is why you should learn to play with your white balance settings.

here are a few other color/texture shots i took:


 and a selfie to prove it was me, that i was there.

when the splashing was over,  i started the stashing/sewing part. i sat on my comfy camping cot and bound that not-quilt up surrounded with the fresh forest breezes blowing and the smell of sun-baked pine needles.

i'd brought along my little on-the-go sewing tin, but i still don't have a proper project bag. i just grabbed a knapsack my son brought back from soccer camp and stuffed everything in there. these can't be hard to make. i vow once my 4 major quilt projects are over that i will make myself a project travel bag!


 i kept stitching right up til dark. our camping neighbors stopped in to say hello. we discovered we live two miles away from each other at home and are both mormons. funny. also, katherine, the wife, was crocheting to pass the camping time. that made me feel a bit more normal.

i didn't try to stitch by the campfire light even though it sounded like the old-fashioned thing to do. but i may or may not have used the not-quilt a wee bit to keep my legs warm from the night chill. it was sitting on my legs while i was working on it, i just didn't remove it when i stopped. so now it will be a "gently used" gift.

in the morning, i completed the binding while the girls made forts out of sticks and pine needles. i thought those mossy (or is that lichen?) rocks by the creek would make a lovely setting for shooting my finish.

 with such a beautiful setting, i was wishing i had a "real" quilt to shoot. i love the idea of the not-quilt, but i was rather craving some patchwork or a few seams for variety at least. another time. simplicity, is good. it is.

this bit of dried wildflower landed perfectly on the not-quilt while i was photographing it. lovely, isn't it? mother nature styled well for me.

now all the not-quilt needs is a run through the wash to bring out that crinkly texture, which i hope helps hide my sporadic stitch size, and wash away the yummy campfire smell it acquired in the wilderness.

that's my second baby gift completed in the week! aside from the time the fmq took, the not-quilt was just as easy as the 4sq. i'm glad to have added it to my quick-gift repertoire. thanks for the idea, liz!

linking in with "let's get acquainted! monday" by plum and june, hosted this week at lucy's "charm about you"

Wednesday, May 8, 2013

starting a stash

 2010 was the year i finally got in to sewing. my desire to sew had started a year or two before that, with some crazy, "i want to create!" spring fever each year. but it wasn't until Scrapbooks, ETC, my local store, began carrying designer fabrics as well as scrapbook supplies that i made the leap. i already had a book or two about some simple projects like aprons and softies. (i always start with a book; i'm a bibliophile and book collector first and foremost.) when my birthday month came around, i took advantage of the store's birthday coupon, good for 20% off an entire purchase, to start my stash.
really, i had no specific project in mind. i just wanted to make something and get some fabric, especially since i could take advantage of my coupon. this is not the best way to fabric shop. once there, i wasn't even sure how much of the fabrics to get. i went for 2 yds each of my favorites. i knew a yard might not be quite enough for a skirt or larger project, so i aimed at 2. it was just a shot in the dark. i also purchased 39 (!!!) fat quarters, a few sewing tools - including my gingher rotary cutter, and some 100% wool felt in about 20 colors. even for my birthday, and with a coupon, it was a large purchase.

last weekend, while sorting scraps with a sick little girl for entertainment, i came across the receipt from that original purchase. it made me smile. then i remembered i still had a stack of that fabric (or most of it) on my stash shelf. so i photographed it. i was curious to see how much of it was still there. looking at what's listed on the receipt compared to this pile, i've only dipped into this once or twice. i've used some of these fabrics for projects, but have always rebought them first, for some reason. probably because i selected them to go with the other fabrics for those projects without remembering i had them.

these are still some of my very favorite fabrics. my tastes haven't changed. sandi henderson and heather bailey are well represented: pop garden, nicey jane, meadowsweet. they continue to be my top two designers and favorite lines. i'm surprised to see there's no amy butler since i know i went in looking specifically for her designs. i'd read enough sewing material at that point to know her name. maybe i got fat quarters of her stuff. those are so thoroughly mixed i have no idea what came when.

it tickles me to see that i have this original pile mostly intact. it actually goes together pretty well. maybe what i need to do is make an entire project out of this "pull." with about 30 yards total, there is more than enough here. i could probably do a couple of quilts out of this.

but i'll start thinking about one.
definitely a quilt.
and i already know the name for it: starting a stash.

Monday, April 11, 2011

accurate seams. or not.


i had a horrible time with my seam matching on my "taite" blocks. i couldn't ever predict accurately if i was matching them up or not. it was completely hit or miss. part of my problem might be that i don't pin, but pinning doesn't ever seem to give me better results, so i gave up on that to save time. also, jill and i went with the modern quilting trend of pressing all our seams open, which might have made it harder to match up those opposing seams. i can't wait to see how much we've scandalized louise when she discovers that we didn't press to one side like she told us to. well, elizabeth of oh, fransson  recommends it in her book practical patchwork, my current personal favorite book and quilting bible. and nettie of a quilt is nice was just trying it out. lots of quilters use this method now. i like it, too. it is twice the pressing, but can be more accurate. except maybe when getting opposing seams right.

i think maybe i should rename this blog "sloppy quilting" because i'm so not accurate and quilting is all about accuracy. i just keep telling myself i'm learning, wonky is nice, and "it will be okay." my quilts are getting done whether perfectly or not and that, for now, is good enough for me. this is a complete shift in paradigm from where i once was on the perfectionist continuum. one thing i did this week that has helped out in the accuracy department tremendously is to purchase a 1/4" guide foot. it's a dream! someday i'll take a picture of it when i have the macro lens on my camera so you can see the little guide bar that runs along the side of the foot. all i have to do is keep my fabric lined up along that bar and i have a perfect 1/4" seam. it's magical! my machine has a nifty see-through plate so i can keep an eye on the bobbin thread, but it makes gauging my seam allowance pretty tricky. i felt like i was skating all over the place as i tried to piece my quilt. this $13 little do-dad has solved my problem. i totally recommend it to any beginner or accuracy-challenged sewer like me.

ps - here's the foot:


Wednesday, February 16, 2011

my journey to sewing

loree and i in our homemade dresses (and haircuts), c.1975
my experience with sewing stretches back to my very beginnings. my mother was a competent seamstress that sewed all our dresses, which made up the majority of our wardrobe, for most of my childhood and continued creating dresses for us as teenagers, when we wore them mostly to church on sunday and to dances. she sewed the wedding dresses for all five of us girls and one for a sister-in-law as well. we grew up with pins in the green shag carpet of our houston, tx home on ainsworth. pattern pieces were regularly held up to our little selves for measuring. designs for clothing were doodled on all sorts of paper bits. (mom could draw as well.)

3rd grade school photo in a shirt my mom made
hours were spent looking over pattern books and racing through the isles of bolt after bolt of fabric at hancock's. it was as much a part of our childhood as breathing and eating and living in a house of eight kids. she was notorious for sewing on the finishing touches or pinning parts "to be finished later" on us as we ran out the door for a function. i'll never forget the morning of my wedding, walking in the door and seeing my dress with the buttons still not on - the buttons that were the only decoration on the front of the gown.

mom-made halloween costumes 1978
halloween was wide open to our imaginations and our costumes were far superior to the then-popular one piece vinyl body suit and plastic mask jobs everyone else wore. i never went to a school dance (sniff, sniff) but my sisters all had exactly the dress they wanted for their dates, made to order in every detail. we believed she could sew anything. but somehow, sadly, the skill was never passed on. maybe mom thought we were absorbing it by osmosis. i do remember her instructing me about lining up the pattern on the grain of the fabric. that's it.

i excitedly took home ec in middle school. i produced one pillow with an embroidered checkerboard pattern of pink pigs and lips that read "hogs and kisses" in the middle square. i don't remember anything else about middle school home ec other than being terrified my finger would get sewn through and our teacher telling us through her tears that the challenger space shuttle had exploded with school teacher sally ride on board. (that'll date me pretty accurately.) i did not pick up the ability to sew.
easter dress mom made my freshman year
high school was much the same. i took general home ec freshman year. when we reached the the sewing portion of the term, our darling elderly old maid teacher assigned us a rounded make-up cape for the project. if girls ever did use make-up capes to protect their clothing while applying make-up, no one i knew in three generations had. and it was one big circle. my mom completed the project for me. that was the end of home ec sewing instruction. and honestly, sewing just really wasn't cool at that point.

for christmas my junior year, mom surprised me with a basic model singer machine that she'd had on layaway for months, paying off bit by bit so she could give me a machine. i believe i cut out two squares to make a pillow for my bedroom, but it was never made. somehow the machine followed me out to college and into my marriage. when i took a puppeteering class as part of my early childhood education degree, i was surprised to find i could whip up a basic handpuppet shape rather easily. but sewing still wasn't cool and i had no interest.

a scrapbook page with hand and machine stitching on it (click to enlarge)
when my second child was born, i took a scrapbook class from heidi swapp that was all about making your own custom-sized page-protectors and stitching on your pages. i was smitten. i realized i really liked the feel of needle and thread in my hands even though cross-stitch was "not my style" for other craftables and wall decor. i used the machine to make some fun effects on my scrapbook pages from time to time, but my machine was located in the laundry room downstairs and my scrapbook room was upstairs.

after i was exposed to the world of blogging and on-line sharing about the time my sixth child was born, i slowly became aware of the handcrafted movement and dyi chic. i found myself wanting to make things with my own two hands, pretty fabric, a needle and some thread. kelly mccaleb had a tutorial on her blog for a vintage block baby quilt that looked doable. (which has since disappeared - oh, kelly, please bring it back!)

volume 1
the clincher, my true fall through the rabbit hole into the wonderland of sewing occurred when i came across the premier issue of stuffed, a softy magazine, whilst browsing scrapbook magazines at the bookstore. a fascination with softies quickly led to browsing in the craft book section which led to buying idea books on aprons, embroidery, then clothes, then whatever else i could get my hands on. my addiction to books is longstanding, crafting books being just an extension of that love and a marrying of the two.

i began looking for the designer fabrics i saw in the books. low and behold my favorite local scrapbook store opened up a small fabric section which soon took over a quarter of the store. i was completely hooked. but i still hadn't sewn more than the body of one small softie. all the females in my family were getting together for our annual "girls weekend", where three generations of ladies hang out at my s-i-l's cabin for a weekend of bonding on all sorts of levels. crafting is always involved. i had purchased a fabric headband at a boutique store that i was sure we could make for pennies on the dollar. it became our project for girls weekend 2010. i bought lots of those delicious fabrics, had my machine serviced, and set out for sewing fun with my seesters.


as i sat down to sew my first headband that weekend, i had a mild panic attack. i wanted so, so, so badly to be able to sew and i was terrified i wouldn't be able to actually do it. i got my headband all ready to sew, threaded the machine, put the headband in place, pushed the presser foot down and . . . nothing. nothing! i knew it. "mom! my machine won't go. what have i done wrong?" my wise and patient mother replied, "did you turn it on?" oh. i grinned sheepishly, turned the machine on, and started sewing. it worked! it wasn't perfect, but it was just fine and it worked! i made three more headbands that weekend for me and my girls. my seesters declared the project a hit, working well into the wee hours of the morning to knock out some really stunning numbers.


with a few simple projects under my belt, my confidence grew just a little. a couple weeks later with the mr. out of town on a hiking trip with the four oldest children, i decided to visit the fabric store again. i took along the two youngest charges in my care. in order to occupy the four year old, i let her pick out some fat quarters, thinking of a simple four square baby blanket i'd been gifted with my third child. it should be simple enough and fun to make for her. little did i know where it would lead.

fabrics: soliel by annette tatum for freespirit
my daughter has dubbed it her "star cookie blanket", an allusion to a fancy nancy book

the original blanket was backed with a coordinating flannel solid but the designer colors my sweetie had selected could not be matched by the standard stock of colors. i visited three fabric stores with two small girls trying to find a suitable flannel. none could be found. so i decided to just quilt it. sure, why not? then i could use one of the fabrics she'd picked as the backing and learn a little about quilting while i was at it. that turned into an eight panel baby quilt that i decided to handquilt, thanks to inspiration from jane brocket's the gentle art of domesticity.
 
an absolute must read
and quite a nice way to pass the time at soccer practice
 

 i started reading up on quilting and found a tutorial for hand quilting on the internet. that reminded me how i had longed to learn to quilt for just ages (another saga to be written at another time.) my store was offering classes. i was especially interested in the beginner class, which met monday mornings for four weeks and your first quilt would be done. finally, i decided to just do it. why not? homeschooling and six kids under twelve aside, i could make it happen. so i just did. the mr. was silent if not supportive; he knows my tendency to get obsessed and disappear. when my obsession was cooking that wasn't so bad because people still got to eat. years of slaving away over healthy, delicious dishes to be greeted by little people with "yuck!" put a damper on that one.


pressing and trying not to drool on myself as i eat a sucker in class


it was certainly an education taking that class; yet another saga i may or may not record. i learned a lot from what i did wrong just as much as what went right. and it got me addicted. completely addicted. before the class was over i had everything picked out for at least two more quilts, including the same pattern again with new fabrics. my fellow classmates and i reasoned we were familiar with it now, doing it once more would help cement the skills we were learning without throwing anything new into the mix. i found out my favorite part of quilting is probably handsewing the binding. love it. that takes me up to just about where this blog is going to start. i'm so excited to see where it's going to go from here. you're welcome along for as much or little as you'd care to see.

happy sewing, y'all.