
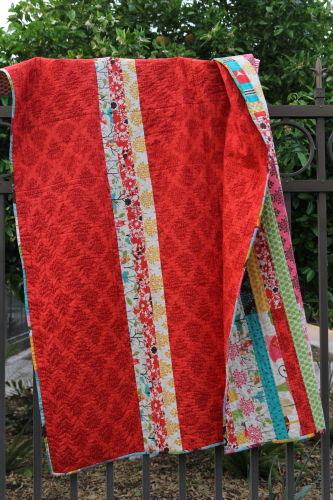
i chose to piece this backing because i was leery of trying to match up the strong graphical pattern repeat in the red fabric. and because i just love a pieced backing as an additional design feature for a quilt. i chose to offset the stripe not only for design interest but because it would keep the quilt from having a seam down the middle of the back, where a quilt often gets folded. apparently, this is supposed to stress the seam.
because i was so pleased with this backing and because it's so easy, i've tried to duplicate the back on two other quilts. tried. sure, i was able to use the exact same method for the other two quilts, but somehow it didn't have the same effect. and after looking at the other two, i know why. if you look at the first quilt, you'll see i have a strong feature fabric that has little contrast in it's design (it's a simple, tone-on-tone red print). the contrast comes in to play with the strips i used between the large panels. i chose the three fabrics based on fabrics i featured in the front of the quilt. the blue owl strip was my accent block print, the red bandanna print was from the accent strip, and the low-volume yellow strip was used repeatedly on the front, more times than other strips were. i placed the red strip in between the other two prints so it wouldn't be right up against the red panels. and this is the formula for success.


i cut the main fabric in half, resulting in two panels approximately 72" high x 42" wide when the selvages were removed. the top for this quilt was 70" high, so this didn't give me a lot of wiggle room for shrinkage and shifting when quilting, but i took the risk. a safer length would have been 4 1/4 yards of the main fabric, which would have given me 76" in height.
here, with the three strips sewn to the two panels, i have a backing measuring 72" high x 90" wide, more than ample in width for my 60" wide top. but this gives me room to place my top exactly where i want it in relation to the strips on the back. also, because i was using a directional print, i did not want to piece one of the side panels, which i could have done out of one yard of fabric. if i'd done that, the print would not have been running the same direction on both sides of the stripe.
however, if you are not using a directional print, you could use 3 1/4 yards of fabric. cut one panel at 2 yards and 6" long (78h" x 42w") and cut the remaining 1 yard 3" in half (2 - 19w" x 42h" pieces), which can be pieced together to create a second panel that is 19"w x 84"h. cut it down to 78" high to match the other panel. when these two panels are added to the strip section (78" x 6.5", which you made longer than my 72" strips to match the increased height for these more generous measurements), you will have a backing that is 78"h x 65"w. this doesn't give you exactly the 4" on each side normally recommended for a top to backing ratio, but it's pretty good.
if you use the 4 1/4 yd method, you're going to have some nice scraps leftover from cutting the side down 22". just be happy you have enough of your lovely fabric left to use it again in another quilt! (or if you're using the "cinched" pattern, maybe you used if for your accent strip or additional jelly strips for the front? there's an idea!)

when placing my top and bottom together around the batting, i tried very hard to get the strips to line up as best i could. this can be done by seeing that your backing stripe lines up with the same strips from the quilt top at both the upper and lower edges of the top. also, you might be able to see in the above photo that i could vaguely see the backing stripes through the batting. so i slowly and carefully lined up the seams on the strips with the top as i placed the top on the batting.
this is not essential, but if you are doing some echo or straightline quilting, it will make the back look better.
there you have my favorite pieced backing in a nutshell.
or maybe a few nutshells.
i'm not very brief. ever.
the detailed steps for this quilt's tutorial are spread over 5 posts i wrote as i made the "bloom" quilt and worked on the pattern. find the others here:
cinched part one - fabric requirements and strip preparation
cinched part two - the accent strip and block, modifications from the first quilt, joining blocks for the long strips
cinched part three - joining your strips and sections to assemble your top
loops and crinkles - quilting choices for "bloom where you are planted"
cinched part four - quilting, binding, and gifting
cinched full tutorial
You may want to consider using solid fabrics for the stripes when the backing fabric is so busy if you are looking for high contrast. They all look great and they are done. Congratulations.
ReplyDelete