april combines two sections of the gypsy wife quilt, yet it's still a small-ish month of making. section three is only 5 blocks and a very few short sections of strips. section four is only 2 blocks, period! i almost wonder why it's designated a section unto its self. the only explanation i can see is because of how it fits in with the rest of the quilt. studying the final assembly diagram, i can see that no matter how cleverly we may have avoided partial seams before, there is going to be no getting around them in the end. never fear, megan has shown us how really un-intimidating and doable partial seams are! she gave me the courage to try. really, it can be done. see her thoughts for attaching these sections to the larger quilt here.
so let's talk about this month's specifics.
section three components
all measurements are cut/unfinished, not finished
blocks
5.5” sq in sq (3.5”), bordered A9/pg 22, pg 23
4.5 sq in sq, XX/pg 22
10.5” sq in sq w/ courthouse steps A13/pg 23-24
9.5” colour wheel A/pg 5
strips
28 – 9.5”, 8.5”
29-33 – 3.5”
34-37 – 3.5”, 1.5”
section four components
8.5” courthouse steps U/pg 20
8.5” hst block L/pg 16
the 5.5" bordered sq in sq block is very straightforward. make a 3.5" sq in sq, and add a border. you should be starting to feel familiar with the sq in sq blocks by now. section three incorporates the block in two sizes, as this bordered block starts with the 3.5", and there is also a 4.5" unbordered sq in sq. (i shared an alternate construction method and measurements for the 3.5" and 4.5" blocks already for those who don't prefer the stitch and flip method in the pattern.)
the 10.5" sq in sq has courthouse steps around the central square and a border on the outside. ms. kingwell seems to refer to the added borders on squares inside the blocks as "courthouse steps". that's the difference between the sq in sq blocks and the sq in sq with courthouse steps, in case you couldn't tell. (which i'm sure you smarty pants already could.)
colour wheel is a fun block. it's the very first one i ever made for this quilt, so mine's been hanging around here for quite some time. that elephant in the middle and the colors i chose for this block have really guided my choices for the entire quilt as i have proceeded. megan shared her process and some snags to look out for on her post this month.
there are two courthouse step blocks this month: 8.5" for section four and 10.5" for section three (which i still haven't done). this is very similar to a log cabin block only the layers are built symmetrically in pairs around the central piece rather than singly in a winding/spiraling fashion. this block is just a lot of strip cutting and sewing. press all your seams as you go and watch that scant 1/4" seam.
section four's second block is the hst block, a simple composition of 16 - 2.5" hsts in a 4x4 grid layout. i talked a little bit about making my block here, as well as the project it inspired.
there you have it, now go get sections three and four!
happy gypsy-ing, friends.
march is winding up, so it's time to complete section two and link up your posts below.
no one minds that mine is still technically in 5 pieces, right? that will be dealt with shortly.
how did this month go for you? i know pershing was quite a block to tackle. still, i have seen many section two's completed on instagram. i think in general it was an easy-ish month/section. hardly any strips this time around.
the main complaint i am hearing is people are having difficulty in getting the sizing right on section pieces which leads to them not matching up well. if you are experiencing this, you are not alone! this is such a huge frustration after all the work put into individual blocks. i think the key here is in the scant 1/4" seam. i've noticed that even when my component pieces are perfectly sized i can have trouble with the block being a bit small. just the nature of working with so many intricate pieces, i suppose. so if my pieces are accurately sized, it has to be my seam wherein the problem lies, right? it's not too hard to adjust for that when a few pieces are going together, but it can make a big difference in the areas where there are lots of pieces or strips. my best advice is master that scant 1/4" seam and keep trucking. i know we all want these labor-intensive quilts to be perfect, but i'm told by the veterans that it's such a busy quilt, the little faults tend to get lost. so let's just keep going, shall we?
did you know that even those spectacular 1/4" piecing feet you buy for your machine need to be checked? if you are having sizing issues, i suggest you check your foot for accuracy. and the next step is to figure out the scant 1/4" seam, which basically means you are sewing a thread or two less than 1/4".
for some guidance on the scant 1/4" seam or how to find out if your machine foot is accurate, check out some of these tutorials:
you know what else is giving me just a bit of trouble? keeping track of my strips! goodness, they switch places quickly. currently, i have a whole section on design wall A where i am storing the strips in order. some of them are already cut into the smaller sections, so i just layer them together in their place. i've seen some ladies label their strips with the id numbers i assigned them. very smart!
so how did you do?
what do you think about this section and it's blocks?
any tips or suggestions for others who will be doing these in the future?
the gypsy wife quilt calls for two old maid's puzzle blocks. it's a fun little block with lots of room for fabric play. there are two types of component pieces included in the block: a bow tie piece of hsts and squares, and a crazy triangle/hst mash up piece. both of my blocks use uniform fabrics for mirrored sections of the block, but you don't have to do that. you can use as many fabrics as you like!
A photo posted by A Pieceful Journey (@apiecefuljourney) on
or, instead of totally scrappy, to define this block in an already crazy, scrappy quilt, you can use just two or three fabrics for the whole block.
now how to make it.
first, decide on your fabrics, and which you want to use where. i selected a low-volume stripe for my background, the red with white flowers for my bow ties, the yellow pinwheel fabric for my large triangles, the red ditsy floral for my "background" triangles in the "crazy" piece half, and a dot for the inner triangle in the "crazy" piece half (which i later changed to a blue and white dot for a bit more color).
here's a diagram from the pattern that i will use to explain fabric placement.
i'm calling the upper right and lower left component pieces "bowties." the upper left and lower right component pieces i'm calling "crazy hst" (for lack of a much better term). the crazy hst is composed of a large triangle and the crazy side, three background triangles and one inner triangle.
the bowtie component has two hsts and two squares. i used only two fabrics for this piece - background B (two squares and two hst halves each piece) and bowtie fabric A (two hst halves per piece).
the "crazy hst" has three fabrics - the large triangle fabric C, "background" fabric D (three triangles per piece), and the small, inner triangle fabric E.
quite frankly, although i've followed the pattern instructions for this block twice, i've never been sure exactly which fabrics ms. kingwell is referring to in the cutting directions. and i altered those cutting directions, anyway, so i'm going to give you my version of the block directions. it comes out looking and measuring the same, so pick your preferred method!
i do apologize for the photo lighting quality here. it was night and there was nothing i could do about it. i have to quilt when i can, and that doesn't always make for ideal lighting. thank goodness i'm not a sponsored professional, right?
from the background fabric B for the bowties (my stripe), cut 2 - 3" squares, and 4 - 2.5" squares. (the top two are doubled up in the photo, so you can't see there are four. actually, i forgot to cut them the first time around, but pretend with me.)
from bowtie fabric A (red w/ white flowers), cut 2 - 3" squares
from large hst half fabric C (yellow pinwheel), cut 1 - 5" square, halved diagonally
from crazy hst background fabric D (ditsy floral), cut 3 - 3" squares
from crazy hst inner triangle fabric E (blue dot), cut 1 - 3" square
note - all my squares are slightly overcut and will require trimming of individual component pieces so your block comes out correctly sized.
now, if you are going more scrappy than this with your fabric choices, you will have to work out how many more squares you are going to cut for your hst units and all. basically, for each different colored triangle you want to use, you will need one full square to cut it from. the pattern says to cut all the squares in half and set aside/discard/scrap one of the halves from each fabric. another option is you could make hsts from all of them and set the extra hst aside for the hst blocks that are in sections 4 & 5 of the quilt. your choice.
take the 2 - 3" background fabric B squares and the 2 - 3" fabric A squares to make your 4 - 2.5" hst squares for the bowtie components. with your favorite marking device, make a diagonal line from one corner to the other on the wrong side of the lighter fabrics. (if you are using a directional print, like my stripes, make sure you have them facing the same direction when you mark them.)
place your squares wrong sides together and sew a 1/4" seam on each side of the diagonal line.
cut along your line, and press the hst units open.
these are slightly oversized, so trim to 2.5" each.
arrange your bowties, and sew together. again, if you are using a directional print, pay attention to where you place your fabrics so they run the same direction. i thought i was going to have stripes running in two directions until i flipped both my component pieces to exactly how they would appear in the final block.
once it's assembled and pressed, the bowtie components should measure 4.5" each.
now let's make the triangle half of the crazy hst components.
take one of the 3" squares of fabric D background, and the one 3" squares of fabric E, and make two hst units, just like you did for the bowties. trim this to 2.5" after you press open.
take another of the 3" background fabric E squares, and cut in half across the diagonal, forming two triangles. lay out your half crazy hst component as it will appear in the component piece. the long edges of the triangles will be on top, looking like and arrow pointing down. the hst unit will be in between them with the background piece on the bottom.
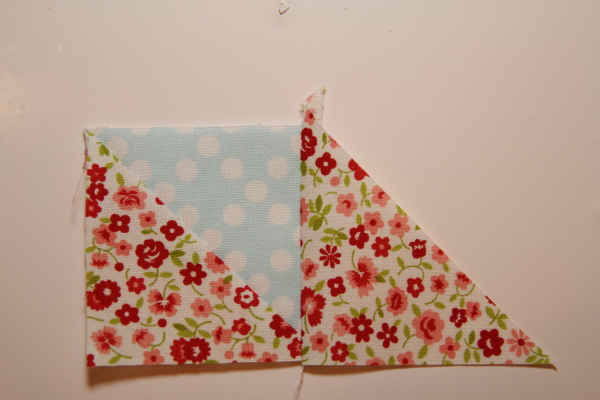
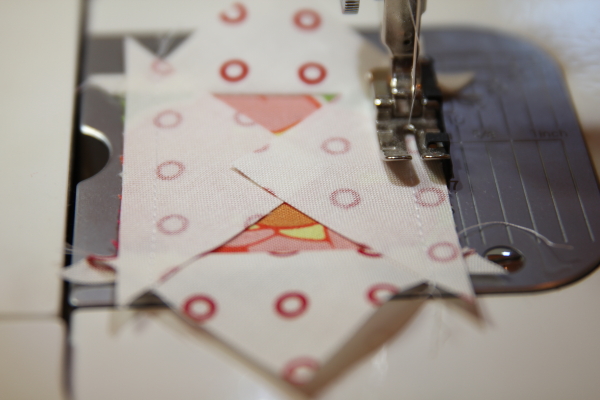
take the triangle on the right of the hst unit, and fold it over so the right angles are lined up. this will look really big and wrong, but it's not. you'll have about 1/4" of the triangle hanging out past the square on each side, but if your edges are lined up and your right angles match, you'll be good. sew on with a scant 1/4" seam along the right side of the hst unit.
press open. now they are starting to look more the same size!
put your sewn pieces back in place so you can see where to go next.
now fold the left side triangle down over the hst unit, again matching the right angles together, and aligning the edges of the square and triangle. sew with a 1/4" seam down the left side. press open when done.
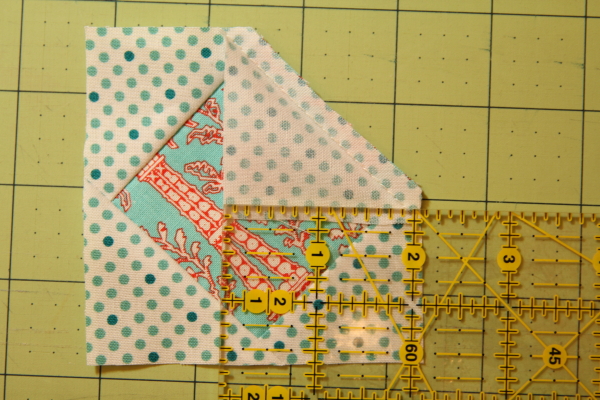
next, trim your triangle along the bottom/longest side. do this by lining your ruler up with the tip of that inner triangle 1/4" away from the edge. this will give your the proper spacing to keep your inner triangle edge. also, you can see i aligned the right edge of the piece with the 45degree diagonal mark on my ruler. this will ensure your new long edge is angled properly while still being distanced from the point at 1/4".
then line up one of the large triangles (fabric C, yellow) with your crazy triangles half, right sides together. if you're like me, the crazy side is probably slightly larger. so i just made sure my two long sides were aligned, and that there was approximately the same distance on each side of the points so that the triangle would be roughly centered on that crazy half. sew together with a 1/4" seam and press open.
once it's pressed open, you can trim the component down to it's 4.5" size. to get the best placement and to retain my triangle points, i made sure the diagonal seam line of the piece lined up with the diagonal marking line on my 4.5" cutting ruler (both yellow, so difficult to see here), and that the outer points of that small (blue) inner triangle were 1/4" away from the ruler's edge. if you have to choose, go with the out points so they don't get cut off.
now, arrange all four component pieces (4.5" sq, each) in the configuration shown in the pattern diagram, and sew together with a careful scant 1/4" seam. the final block measures 8.5" unfinished.
the pattern calls for two old maid's puzzle blocks, so make another one right away if you're feeling crazy. otherwise, you can wait until section 8 comes up.
hello, gypsy wife friends and on-lookers; who's ready for a new section and a bit more challenge this month?! i've seen several eager beavers who couldn't hold themselves back after the fun of section one and dove right in to section two. any of you who are joining the party late, or who haven't completed section one yet, should find this encouraging because it goes to show it won't be so hard to "catch up" with the group. (if you're worried about that. which you shouldn't be.) so let's take a quick look at what goes into this section.
section two components
all measurements are cut/unfinished, not finished
blocks
9.5” Pershing, pg 6
7.5” courthouse steps, pg 20
6.5” sq in sq (4.5”), bordered, pg 22/23
2 – 3.5” sq in sq, pg 22
8.5” old maid puzzle, pg 17
strips
H – 8.5”
I – 8.5”
47 – 8.5”
53 – 7.5”
54 – 7.5”
55 – 19.5” (optional 7.5” if you are piecing this strip to avoid partial seams)
before we get into the blocks, i'm going to reiterate some things i have found helpful as i have worked on more of the larger blocks for this section:
gypsy wife is a great exercise in accuracy. that's how i approach this quilt when i sit down to make it. i don't hold myself to perfection standards, but i do take my time with each block as a mini project, allowing myself to go slow and focus on improving my accuracy.
trim as you go. i figure out what each component size should be, overcut my pieces a bit, then trim after sewing and pressing.
carefully press each component of the block as you make it, not all at the end. carefully press - i'm amazed how quickly i can get distortion in blocks with so many parts and pieces.
work on your scant 1/4" seam. it will really help the blocks come out the right size. even 1/4" feet are not always accurate, so check the accuracy of your foot and figure out where your scant 1/4" seam is, as well. it seems fussy, but it's helpful.
again, give yourself time and space to work on each piece individually, if you can. i find it so much more enjoyable when i focus on all the mini projects included in this quilt. it's not unusual for me to spend an entire sewing session/evening on one large block. as i like to say, "little quilting chores make for big quilting finishes." this is a quilt of lots and lots of parts. one step at a time, one block at a time, we will get a gypsy wife quilt made!
so, about this month's section two - it's not a big section, but there is plenty of challenge contained in these few blocks, particularly in the pershing block, which some regard as the most difficult or time-consuming in the quilt. don't let that scare you away! just set aside an evening or chunk of time when you can focus on slowly working your way through this block with accuracy. megan has made a detailed tutorial of her process with this block on her blog, jaffa quilts. she has also included a link to a paper piecing pattern for pershing, if you would rather go that route.
pershing
i made my pershing block over a year ago, and did not take notes. so i'm unfortunately no help to you on this one. i've toyed with the idea of of making a second block so i can work it all out, but i'm not committing to it just yet. go visit megan's tutorial and you should be fine.
i do need to add a funny note here. for the longest time, my brain was filling in a missing letter in this block's name and i was calling it "perishing." i thought it was so named because you'd want to "perish" after completing it! but, actually, it was named after the block-designer's husband, "pershing." what an unusual first name! i discovered my mistake a few months ago when i read a small essay on the history of this block in a book or magazine. the block was designed for a newspaper contest, and when the maker was pressed for a name, she chose her husband's. i wish i had the details, but i've looked and looked through my considerable library and been unable to find the original information. you'll just have to take my word for it.
megan quite likes my name and finds it appropriate. she also likes how i've renamed "puss in the corner" to "kitty in the corner." does that make me a true quilter, my renaming and modifying traditional blocks?
7.5" courthouse steps block, left, being substituted with a 7.5" bordered sq-in-sq block, right
here is another modification i've made in this section of the quilt, a literal block modification. to balance out color and fussy cut animal placement in my quilt, i'm swapping a same-sized block for the 7.5" courthouse steps block. i'm using a 7.5" bordered sq-in-sq block from section 10 instead. (you might recall i originally started this quilt on the work-through-the-book schedule, not knowing where the blocks were going to end up or next to what.) this is one of the adjustments i decided to make when i switched assembly methods from working-through-the-book to section-by-section. you can see that the yellow-bordered block uses the same yellow solid i had in my pershing block, and therefore needed to go somewhere else.
also, the block itself is slightly modified because i had to make adjustments when my fabric fell short. those red corners aren't part of the pattern. but that's the lovely thing about this pattern - there is lots of room for modifying within the original frame work. in fact, i'll soon be posting about working with blocks that are the wrong size.
sq-in-sq blocks for section two
there are three sq-in-sq blocks in this section: 2 - 3.5" blocks and 1 - 6.5" bordered. again, my block is going to look slightly different from yours here because i used a 3.5" sq-in-sq block in the center of my 6.5" bordered block, rather than the 4.5" sq-in-sq called for. this had to do with laziness on my part of wanting to use a block i had already made rather than making another at the time. however, i think it would have looked better had i used a larger block in the center. but it's done and staying as is. (if you missed my tutorials for an alternate construction method for the sq-in-sq blocks, find the 3.5" here and the 4.5" here.)
old maid's puzzle
the final block for section two is "old maid's puzzle." this is another interesting and enigmatic name for a block, and i wish i knew it's history. there are two of these blocks in this quilt, the other falling in section eight, later on. many versions of this block go completely scrappy on the triangles. i meant to do that this time around after i was uniform in the fabric selection for my last version of the block, but i forgot. and so here is my second matchy-matchy block. i'll be sharing a detailed tutorial of the process for this block later this week.
section two falls directly below/south of section one in the quilt, so you will be using some of the same strips from last month again. if you opted to piece strip 55 instead of use a partial seam (which megan showed us are actually not scary at all), then please make note of the adjusted optional length for that strip in section two.
work ahead options
if you just can't stop with the blocks, the next two sections are mighty small - so small we've lumped them together for april's schedule. so you can either go for section three or four, or get a jump start on the largest section, section six (june) by making some of the sq-in-sq blocks or other basic blocks for that section. since they fall below sections one and two, you will know what strips they will be set in, which will help with color choices.
section three – april
blocks
5.5” sq in sq (3.5”), bordered, pg 22/pg 23
4.5 sq in sq, pg 22
10.5” sq in sq w/ courthouse steps, pg 23-24
9.5” Colour wheel, pg 5
strips
28 – 9.5”, 8.5”
29-33 – 3.5”
34-37 – 3.5”, 1.5”
section four – april
8.5” courthouse steps, pg 20
8.5” hst block, pg 16
instagram
a lot, i would say most, of the activity for our quilt along is happening over on instagram. here are some of the hashtags you can search to follow along:
the month is almost out and i have seen plenty of completed section one's on instagram (#GypsyWifeQuiltSection1), not to mention section two's completed by the speedy and addicted. we'll be having a blog link party about a week before the end of each month where bloggy friends can link their completed sections. don't worry if you haven't finished just yet - the link party will stay open a few weeks.
if you are doing a post about your section one, please tell us what you thought! what went well, what didn't, any tips you have to share. i know i'm super excited to see my collection of amassed blocks become an actual piece of a quilt. i like doing the quilt so much better this way!
i think the hardest part for me was keeping my strips straight. even though i had them laid out on my design wall in order, i had to keep a photo on my phone nearby to refer to so i didn't flip any bits around. but i did that anyway. i got that short little panel of strips under the kitty in the corner (aka puss in corner) block flipped the first go round. but it's all sorted out now.
i tackled the partial seams, thanks to megan's encouragement and found out that, wow, they really aren't that difficult! don't sweat the small stuff. i'd actually done partial seams before on other projects when i needed to fix a few things, and didn't even know that's what they were. so lesson learned from section one - partial seams are a-ok.
also, i got the maths figured out for my preferred method of square-in-a-square block assembly. there are plenty more sq-in-sq blocks coming up, so if you missed those posts, see them here and here.
that wraps it up for section one! nine more to go.
it's not too late to jump in and join us, if you'd like. and don't feel pressured to work any faster than you can. if your section one is still under construction, you are welcome to link up what you have.
look for the introductory post to section two next week on the first.
following the (eventual) success of finding the measurements for an exact cut method for the 3.5" square-in-a-square block, i've worked out the measurements for the 4.5" block. at first i was a bit perplexed how to do this since the first time around, i simply measured a completed block made with the flip-and-stitch method to discover the completed measurements. but i didn't have a completed 4.5" block to measure. i was going to make one with the other method first, but then i thought i could just draw one and take measurements. and it totally worked! (and despite the wonky, distorted look of the above photo, this block is spot on.)
here are the measurements:
center square - 3 3/8", diagonal orientation
2 corner squares - 3" each, cut in half on the diagonal
below follows a quick demo of cutting for this block.
i wanted to fussy cut my center square. to make this as easy as possible, i used my 3.5" square ruler, which is 1/8" over size. first, i aligned the square where i wanted to cut, around a cluster of mushrooms and flowers.
just a slice on each side and i have a square out.
then i used the ruler to measure off that extra 1/8" on two sides so my square would measure 3 3/8" rather than 3 1/2" i first cut. the green border on the top two sides of the diamond are 1/8", making this easy.
on a larger ruler, the 3 3/8"measurement looks like the above photo. if you look at the far right side, you can see the little, shorter dash marks on the grid lines that are the 1/8" measurements. it's easiest to see just to the right of the circle with 45 in it (which is marking the angled lines passing thru, not the across measurements).
next, cut two 3" squares and bisect them on the diagonal to make four triangles for the corners.
there will be a tiny bit left over to trim off each side. use the 4.5" ruler, or a larger one, to square off the block. again, to get the best points, make sure each of your points is lined up 1/4" away from the edge of the block. if you look closely, you can see my points are all 1/4" away from the ruler's edge. this means i got the measurements for the center square right. i was pretty happy to see this the first time around! it's so nice when math works out.
you know that saying, "why reinvent the wheel?," meaning, why redo what's already been done rather than use the resources already available? well, sometimes, you just have to because none of the wheels fit right.
all this is to say, i wasn't happy with the method for creating square-in-a-square blocks (sq-in-sq) that the gypsy wife quilt pattern book utilizes. the stitch-and-flip method of adding small corners onto a larger block made for a lot of waste, to my way of thinking. now, i do like scraps, but it was even more about getting my fussy cut center square right.
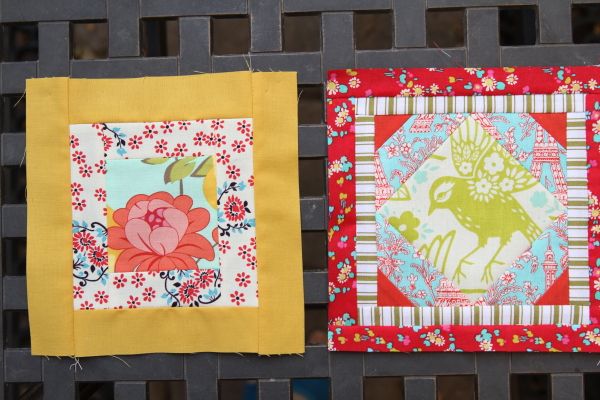
look at that bordered sq-in-sq on the right in the photo above. originally, i had a lovely square which contained a recognizable piece of the eiffel tower and a flower. the piece of the tower you can still see used to extend as far as the corners now do. but once i added the corners on and cut the excess off, it basically disappeared. for one, i forgot that the center square would end up "on point." so my tower was leaning. and second, adding the corners on, stitching and flipping to cut, took off nearly half my visible block rather than the standard 1/4" seam allowance on each side. with these little 3.5" blocks, that's a lot of visible fabric disappearing.
the pattern calls for you to cut a 3.5" square to begin with. once you add those corners, that center square shrinks not to 3", but to 2.125". that's pretty significant.
frustrated with my results, i decided to look for another method. the first thing i did was google "economy block tutorial" because economy block is the modern/common name for this block. or so i thought. in reality, though it is the base for the economy block, all the economy block tutorials i found had three layers of squares, not two, as this pattern calls for. it's a very small difference, but it meant none of the formulas or measurements out there (that i found) were helpful in getting the block i needed. hence, in my mind, "sq-in-sq" refers to a two layer block of simply one square in one square (needed here) and "economy block" refers to a third layer being added. there are some fantastic tutorials and formulas for getting any size economy block you want. if you're interested, try rita's at red pepper quilts for 5.5" econ blocks, catbird quilts' tutorial with formulas and cheat sheet for various sizes, or sewing lab's beautifully illustrated tutorial for a couple of methods, including paper piecing.
all of these were great tutorials, but did not help me a lick to get the block i needed!
so i just did it myself.
i started by measuring the finished center square to see how big it needed to be. it measures 2 1/8" . it needs a seam allowance, so add 1/2", which is a 1/4" for each side (which i did not do the first time, so my block was too small!). this gives you a measurement of 2 5/8". it's important that the center square be exact, because it has to end up with a 1/4" space between the points and the edge. otherwise, you'll either loose your points or have too much unwanted space.
so, simply put: cut one center square at 2 5/8"
and remember, this square will end up on point in the final block, so if you are fussy cutting, make sure you view it as a diamond sitting on it's points, rather than as a square sitting on one side.
2 5/8" looks like this on your ruler:
the 1/8" marks are the shorter marks on the grid lines. if you look at the numbers in the yellow cirlces, the 1/8" marks run on either side of the numbers.
now for the corners.
in the pattern stitch-and-flip method, 4 - 2" squares are called for. again, half of each of those squares will be cut off as scraps. much better to make two larger squares that are cut on the diagonal into four triangles.
this is where some people might prefer the other, more scrap-producing, method. if you make triangles, you are going to be working with a bias edge for a few moments. i was once really scared of those stretchy bias edges. but not any more. really, they aren't so bad - i promise! like everyone says, just use a light touch and avoid stretching them. you'll be fine.
now back to the corners.
mine measured around 2" (what the pattern called for). but you have to take into account that you're going to be cutting them in half and each half will need some wiggle room. i didn't take this into account the first (or second) time i attempted the block. but the third time around i got it right. really, i should have visualized that the seam allowance extended out 1/4" past where that corner currently ended. then i would have known i needed to add another 1/4" to that. (2 1/4" + 1/4" = 2 1/2")
for corners, cut two 2 1/2" squares then cut both on the diagonal to produce 4 triangles
with everything cut, you are ready to assemble.
gently fold the triangle in half, lining up your corners and the bottom edge. then finger press to make a crease. fold your square in half and crease, likewise.
these crease marks will help you line up the square and triangles. (and my center square is different here because i photographed my first mis-measured attempt at the block. even though it came out the wrong size, the method is the same. no need to rephotograph.)
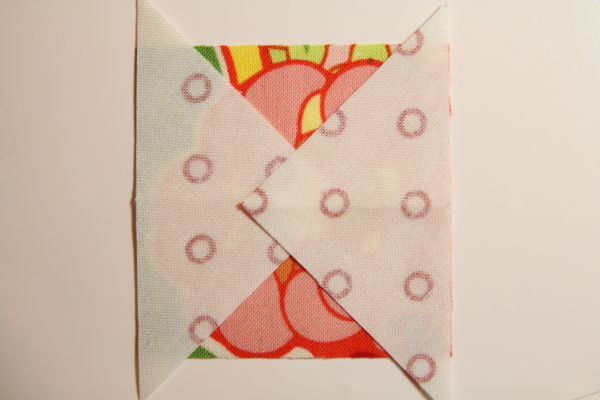
now place the triangle, right sides together, on top of the square with the creases lined up. (i put pins in the crease and at the edge of the triangle so you can see them better in the photo, but i don't find pinning necessary.) the tip of the triangle will line up with the crease, too.
lay another triangle on the opposite side of the square, once again matching creases. you can kind of see how the triangle creases are in line here, too.
sew one side on with a 1/4" seam allowance.
flip and sew the other seam at 1/4" also. really, a scant seam is best.
press those two corners open. these are small pieces and can be easily distorted, so handle with a bit of care. don't be afraid, just handle gently.
now you can crease the square in the middle the opposite direction and add the last two corners in the same manner you did the first two.
it's time to trim your pretty little sq-in-sq block to it's 3.5" unfinished size.
this is where i don't mind a little bit of trimming. the 2.5" squares we used for the corners provide just a tiny bit of wiggle room to give us more accuracy with trimming.
when you trim, line up the points of the center square with 1/4" marks of the ruler (see how there is a black dot at each of my corners?) and trim your square 1/4" away from those points. this will give you pretty, precise points on your block when you add it to the other quilt components surrounding it.
there you have a neat little 3.5" finished (3" finished/sewn in) sq-in-sq block.
it only took me 3 attempts and two bungled math problems to get it right. that's not too bad. i find when i make mistakes, it cements further in my mind the correct method and i'm much more likely to remember correctly the next time around because i don't want to repeat that again!
the pattern also calls for some 3" and 4.5" unfinished sq-in-sq blocks. i'll share the math for those once i've figured them out!