

you know that saying, "why reinvent the wheel?," meaning, why redo what's already been done rather than use the resources already available? well, sometimes, you just have to because none of the wheels fit right.
all this is to say, i wasn't happy with the method for creating square-in-a-square blocks (sq-in-sq) that the gypsy wife quilt pattern book utilizes. the stitch-and-flip method of adding small corners onto a larger block made for a lot of waste, to my way of thinking. now, i do like scraps, but it was even more about getting my fussy cut center square right.
look at that bordered sq-in-sq on the right in the photo above. originally, i had a lovely square which contained a recognizable piece of the eiffel tower and a flower. the piece of the tower you can still see used to extend as far as the corners now do. but once i added the corners on and cut the excess off, it basically disappeared. for one, i forgot that the center square would end up "on point." so my tower was leaning. and second, adding the corners on, stitching and flipping to cut, took off nearly half my visible block rather than the standard 1/4" seam allowance on each side. with these little 3.5" blocks, that's a lot of visible fabric disappearing.
the pattern calls for you to cut a 3.5" square to begin with. once you add those corners, that center square shrinks not to 3", but to 2.125". that's pretty significant.
frustrated with my results, i decided to look for another method. the first thing i did was google "economy block tutorial" because economy block is the modern/common name for this block. or so i thought. in reality, though it is the base for the economy block, all the economy block tutorials i found had three layers of squares, not two, as this pattern calls for. it's a very small difference, but it meant none of the formulas or measurements out there (that i found) were helpful in getting the block i needed. hence, in my mind, "sq-in-sq" refers to a two layer block of simply one square in one square (needed here) and "economy block" refers to a third layer being added. there are some fantastic tutorials and formulas for getting any size economy block you want. if you're interested, try rita's at red pepper quilts for 5.5" econ blocks, catbird quilts' tutorial with formulas and cheat sheet for various sizes, or sewing lab's beautifully illustrated tutorial for a couple of methods, including paper piecing.
all of these were great tutorials, but did not help me a lick to get the block i needed!
so i just did it myself.

so, simply put:
cut one center square at 2 5/8"
and remember, this square will end up on point in the final block, so if you are fussy cutting, make sure you view it as a diamond sitting on it's points, rather than as a square sitting on one side.
2 5/8" looks like this on your ruler:

the 1/8" marks are the shorter marks on the grid lines. if you look at the numbers in the yellow cirlces, the 1/8" marks run on either side of the numbers.
in the pattern stitch-and-flip method, 4 - 2" squares are called for. again, half of each of those squares will be cut off as scraps. much better to make two larger squares that are cut on the diagonal into four triangles.
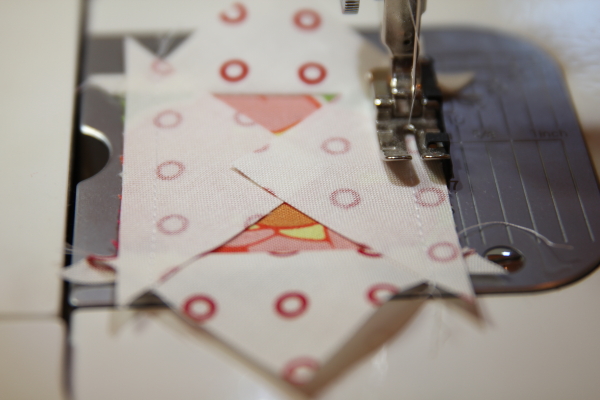
this is where some people might prefer the other, more scrap-producing, method. if you make triangles, you are going to be working with a bias edge for a few moments. i was once really scared of those stretchy bias edges. but not any more. really, they aren't so bad - i promise! like everyone says, just use a light touch and avoid stretching them. you'll be fine.
now back to the corners.
mine measured around 2" (what the pattern called for). but you have to take into account that you're going to be cutting them in half and each half will need some wiggle room. i didn't take this into account the first (or second) time i attempted the block. but the third time around i got it right. really, i should have visualized that the seam allowance extended out 1/4" past where that corner currently ended. then i would have known i needed to add another 1/4" to that. (2 1/4" + 1/4" = 2 1/2")
for corners, cut two 2 1/2" squares
then cut both on the diagonal to produce 4 triangles

with everything cut, you are ready to assemble.


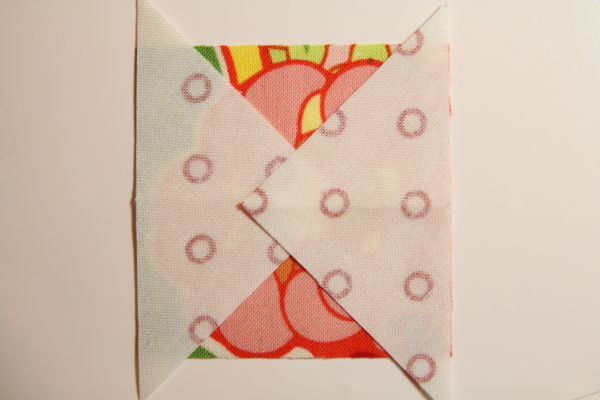


press those two corners open. these are small pieces and can be easily distorted, so handle with a bit of care. don't be afraid, just handle gently.

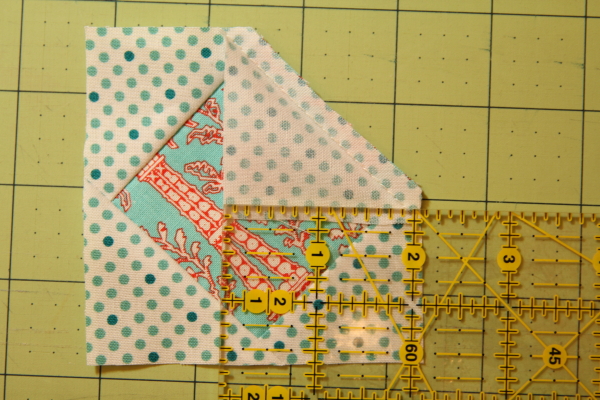
this is where i don't mind a little bit of trimming. the 2.5" squares we used for the corners provide just a tiny bit of wiggle room to give us more accuracy with trimming.
when you trim, line up the points of the center square with 1/4" marks of the ruler (see how there is a black dot at each of my corners?) and trim your square 1/4" away from those points. this will give you pretty, precise points on your block when you add it to the other quilt components surrounding it.

it only took me 3 attempts and two bungled math problems to get it right. that's not too bad. i find when i make mistakes, it cements further in my mind the correct method and i'm much more likely to remember correctly the next time around because i don't want to repeat that again!
the pattern also calls for some 3" and 4.5" unfinished sq-in-sq blocks. i'll share the math for those once i've figured them out!
Thank you for the math!! I love economy blocks so much better.
ReplyDeleteWow, thanks for doing all the math. I could never of figured it out. I love forward the the other two also. I have always loved that block.
ReplyDeleteYou are such a great help Hydeeann, I'm way too lazy to figure out quilt maths the way you do!
ReplyDeleteI agree with all the above comments - this is a great help! I now have all my strip order sorted so on to the blocks tomorrow!
ReplyDeleteThank you so much..I am not experienced and this tutorial is so helpful. I will be starting mine at the weekend.
ReplyDeleteThanks so much this makes sense now!!!! LOL
ReplyDeleteThis is the best square-in-square tutorial I've found, so I wanted to thank you. The directions on the Wanderer's Wife quilt weren't working for me at all.
ReplyDeleteAgain, best tutorial around and the most accurate. Thanks!
ReplyDelete