Showing posts with label process. Show all posts

Friday, May 23, 2025

edna fabric edit

choosing fabrics for a quilt is one of my favorite parts of the quilt-making process. it's really fun, but it can be super daunting and discouraging, too. if you add the quilts i've completed with the quilts i have in progess, i've picked fabrics for nearly a hundred quilts by now. i'm no expert, but i've learned by trial-and-error, failures and successes along the way, something about picking fabrics. this post is a detailed look into how i went about the process of choosing fabrics for one quilt.

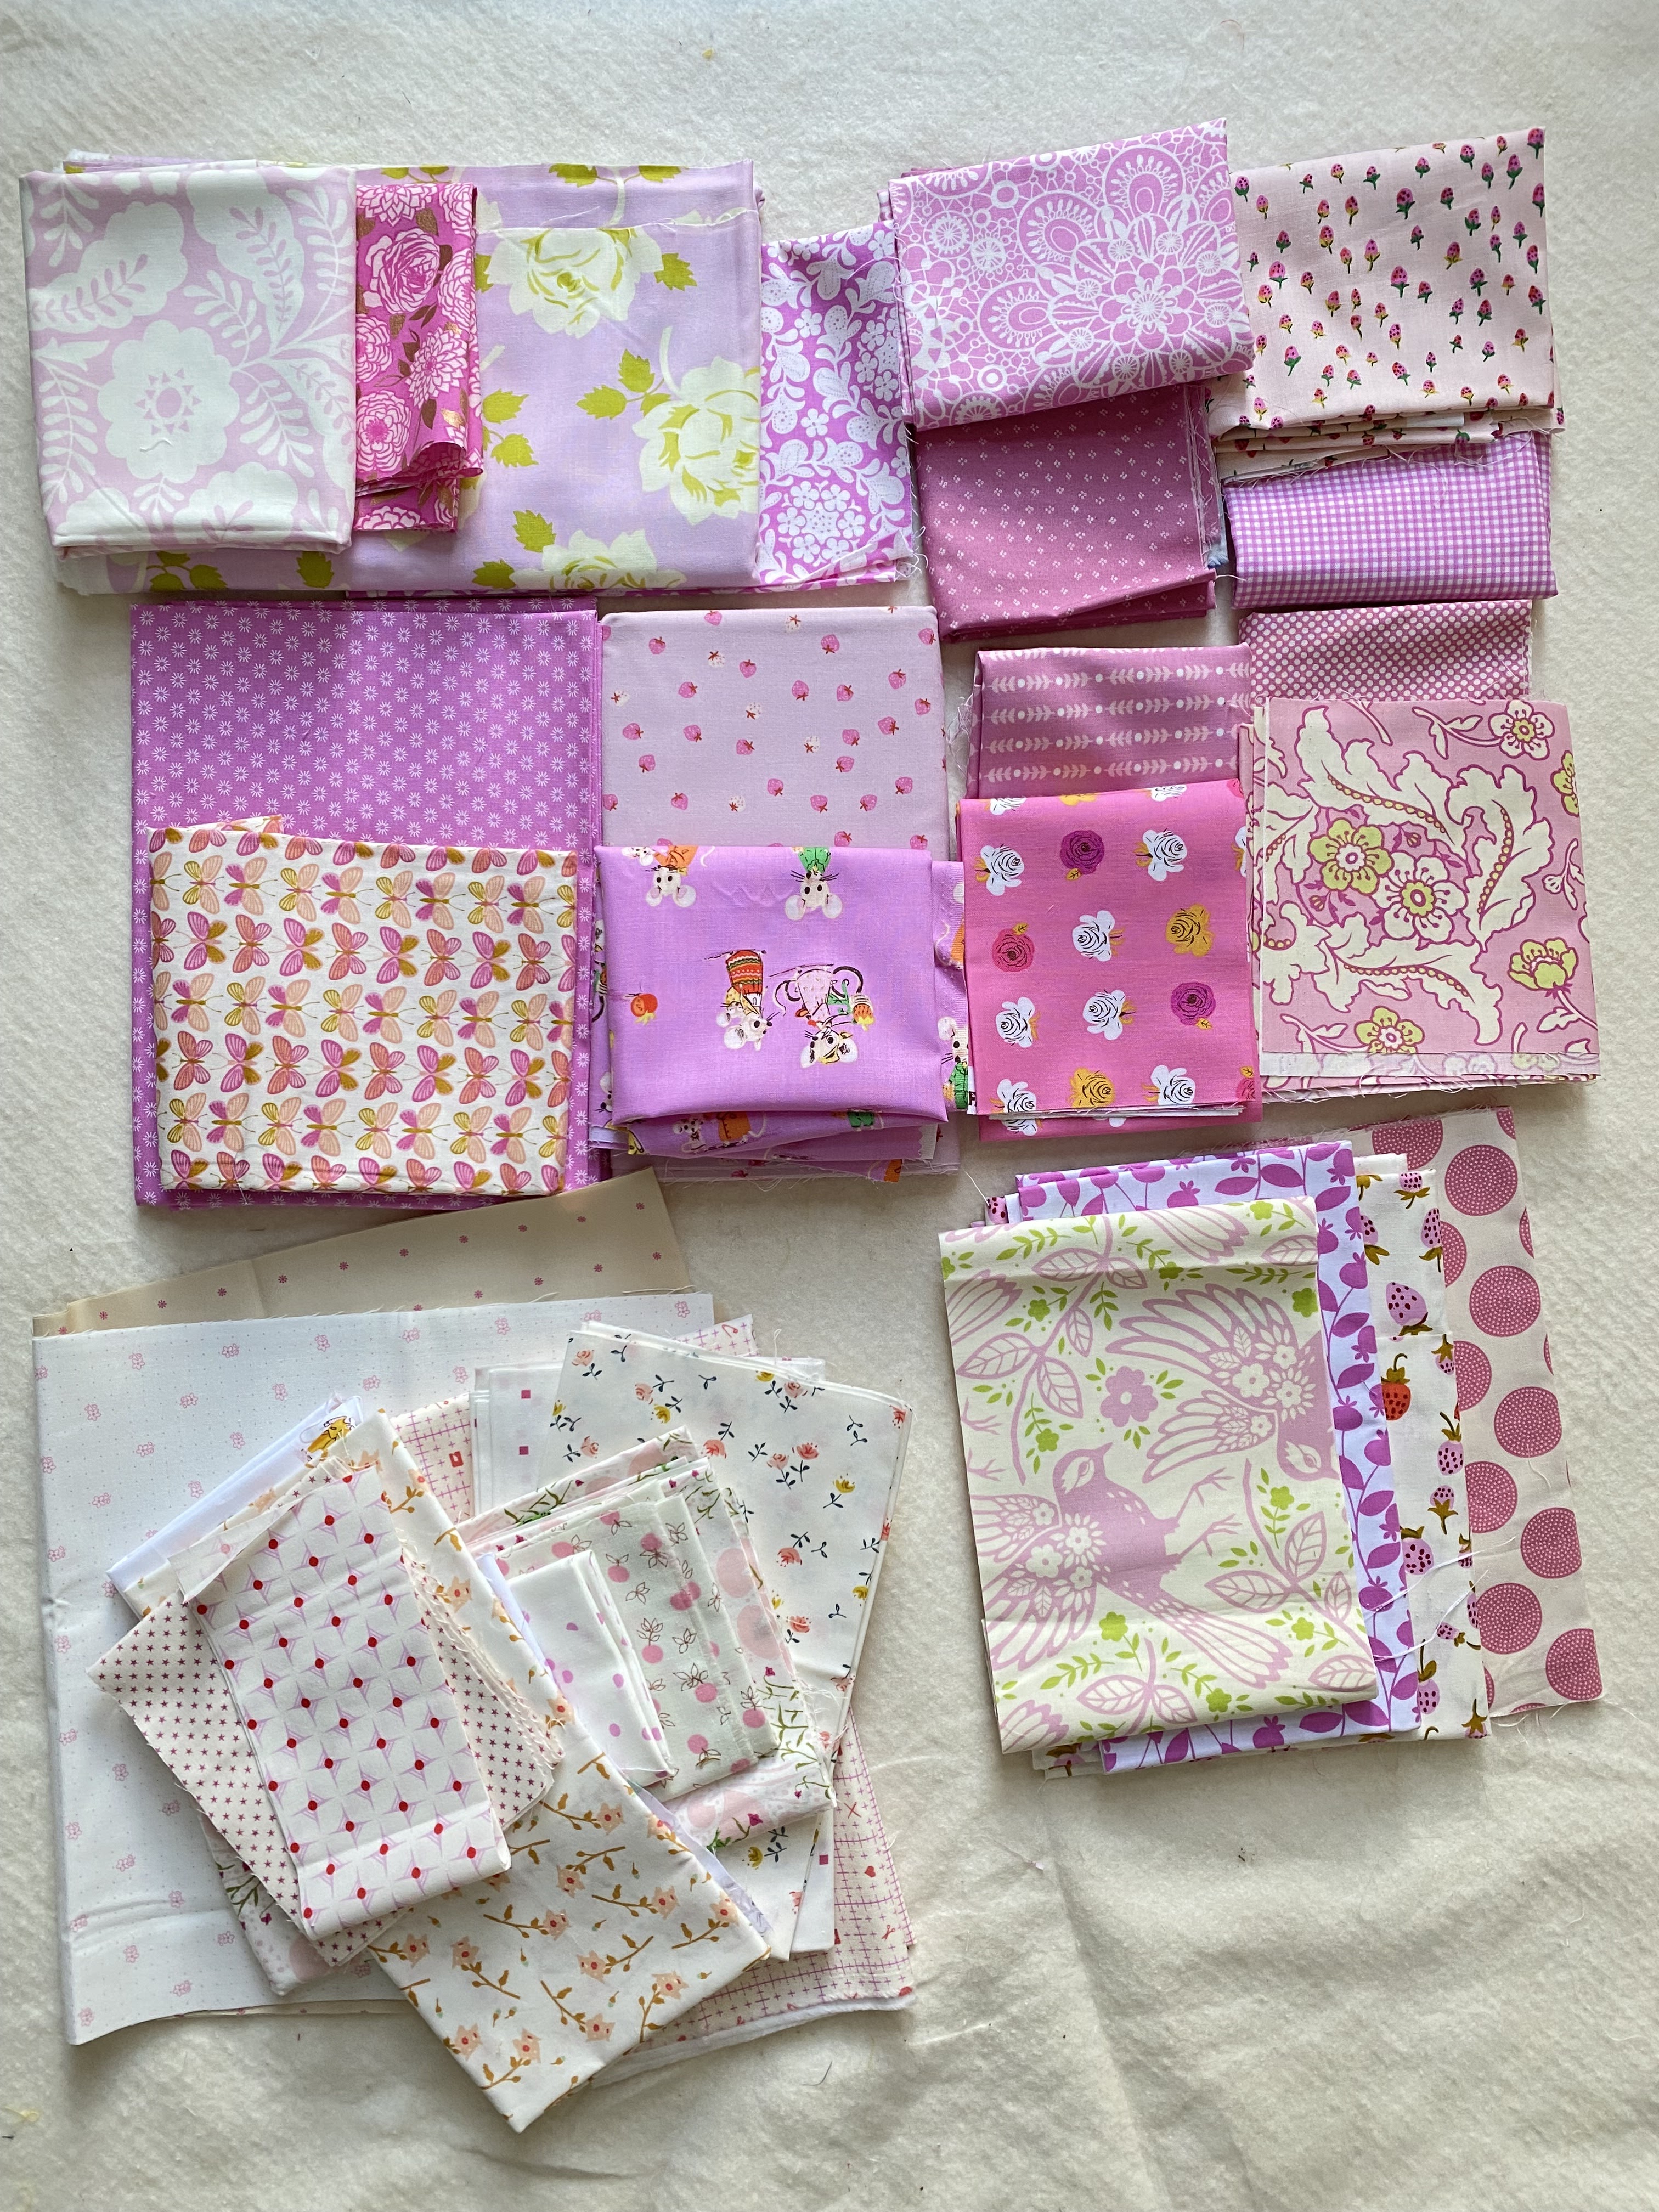
above are my fabric picks for my pinky-purple "edna" quilt. (you can read about my inspiration for the quilt here.) when gathering fabrics for this quilt i went for cool-toned pinks that had a definite purple cast to them, which slid into light purples with a pink overtone. everyone defines colors on the margins differently. my kids and i argue over whether a certain mango color is yellow or orange all the time. so feel free to call these colors whatever you wish! (what would you call them, anyway? i'm curious.)

in this fabric pull, there are a range of pinks and purples in this color-tone family i described, whatever you call them individually. some are more pink and some are definitely light purples. some of the pinks also lean toward bubble gum pink but with that cool tone. i used the photo of amanda's "lyric" quilt as my guide for the range i chose. 

amanda's original pink "lyric"


knowing what to take out of a fabric pull is just as important as what to use in the quilt. these are the fabrics i edited out of the collection. 
  • the top left one is too purple and strong.
  • the adorable desnyse schmidt ditsy print with the pink background had too much of the other colors in it, including the strong blue. in person i don't feel like it reads pink enough. i was sad to leave this one out because i love it so much, but it's not right for the feel of this quilt.
  • i think the two pink monotone prints on the right got cut because i had enough fabrics in that color already and didn't need these two.
  • the two heather bailey prints on the bottom left got culled for their strong secondary color.
  • there were also some low-volumes i culled for similar reasons, but i already put them away 
a square throw "edna" by jennifer jones

"edna" is composed of stars set in a grid of stripes with background squares between. i had to think about which fabrics to use for the stars, whether i wanted to feature them or let them blend in more. i knew the colored prints would be the stripes and the low-volumes would be the background, of course. so what to do about the stars - another color, a solid, what? i didn't have any solids in my stash that were a fit and i wanted to keep the look as close to amanda's quilt as possible.


i decided to use some of the low-volume fabrics that had very strong/large spots of color in them for the stars. there was a whole lot of color in them, so they felt like they'd be too strong for the low-volume sections even though they had white backgrounds. they seemed to be halfway between the other catagories so they would stand out from both sections but still blend with the quilt overall.

there were four fabrics that fell in this category. the rectangle throw has 20 stars, so i'll be using each of these five times.


i came up with 9 sets of the full-colored pinky-purples for the stripes. i'm doing the rectangle throw size (as opposed to the toddler, square throw, twin, full-queen, or king, all of which are included in the pattern), which has four columns and five rows of fabrics. somehow that said to me do 9 sets for the stripes. making them in controlled sets rather than just randomly matching up pairs from the fabrics as i went along seemed easier. and although i want this to look scrappy, i needed a little bit of control in there, too. so sets it is - four for the vertical, five for the horizontal stripes. 

i loosely divided the fabrics into nearly-solid, monotone prints (blenders) and the busier prints, many of which were novelty prints or florals. then i paired them up, trying to have contrast between them (one lighter, one darker - all of which is relative). 


then i paired 16 low-volume fabrics into four sets for my 16 patch background squares. i chose fabrics that had the same range of pinky-purples, but allowed them to be a lot lighter than the colored fabrics and more loosely interpreted. i carefully considered any other secondary colors in the fabrics, too. the country mouse print from heather ross (top left corner) is going to be the loudest block and i'll need to fussy cut for the colors so it's primarily pink showing. i don't have enough of one or two of these fabrics to meet the needs, so i might have to replace them with another fabric entirely or use some of these twice when the need arises. i actually like this so that the quilt won't feel completely matchy-matchy from block-to-block. it's quite common in traditional quilts for the maker to replace a fabric when it runs out, often with something entirely different that was on hand.


i decided to make sets of fabrics for the 16 patches, too, for simplicity. i'm still not sure if i'll assemble all of them exactly the same or not, but putting rows together will be easier than randomly choosing how to place them. i can rotate the rows some if i want to. have some level of pattern when making a scrappy block or quilt really helps production.

to create the row sets, i divided the fabrics into those that had just the one color and those that had other colors, too. that worked out to be about half-and-half. then i put two of each kind in each set, trying to balance the simplest, more graphic prints with the novelty prints. i've already got the bottom set all cut and in assembly. using 42 - 2.5" squares of each fabric is taking up nearly a whole fat quarter per print. that's all i had of the two heather ross novelty prints (butterflies and moons) i'm using for the bottom set, which is why there wasn't any more of them left to photograph with the others. 


there are 42 background squares in the rectangle throw version of "edna." i made a lot more work for myself by choosing to make 42 - 16 patch blocks out of 2.5" squares. that's a whole lot of fabric cutting and patchwork chain piecing coming up!

Wednesday, March 8, 2017

building a c


 quite often when i'm in the middle of a project, i'll take photos of the process as i go, with the intention of making a blog post out of it at some point. and sometimes, much later, i find those photos when i'm looking for something else. such was the case with these photos of when i decided to make letters to spell my son's name for his blue and orange wonky quilt using the letter patterns in denyse schmidt's "proverbial quilt."

the letters could either be patchwork pieced or paper pieced. i chose to trace the pattern and patchwork it together. you can watch my letter "c" quickly come together.


there are 4 pieces to letter "c." i cut apart the paper pattern, then selected a fabric scrap for each component. when i cut the fabric, i added in a 1/4" seam allowance on all sides by pinning the paper the the fabric and using a ruler to gauge 1/4" outside the pattern piece. all the letters in this patter have all straight lines to each piece, so this is quite easy to do.


next i sewed  pieces 2 and 3, the top and bottom segments of the "c," to the center background piece 1. once pressed, there was only one more bit.


piece 4, the long left side of "c" was last to go on.


setting the seam.


then pressing open.


and there you have a letter "c."

this process was very quick and quite enjoyable! i do plan on doing an entire quilt of a favorite quote someday.


next time, i'll just need to make sure i can see the pins so i don't accidentally sew one into the letter.

this quilt is now in the binding phase, by the way. it should be a finish quite shortly!

Friday, February 10, 2017

chain piecing the love

 i've got a few photos and thoughts to share of the progress on my love all around quilt. i'm sticking to the same basic formula i used on the star of the circus quilt: large center sawtooth star composed of 12" blocks, 6" neutral background border on all 4 sides, 6" colored border on upper and lower end, 60" x 72" quilt.

obviously, i chose a different number of colors and color layout for this center star, which gives it a different look and feel. i'm always intrigued by the way small changes like this affect the overall look of any given pattern. before, i had a star with a pinwheel center. now i have a star composed of four hearts.

next, i had to decide on the border treatment. before, i used 6" hsts with specific placement of the light and dark colors to give sort of a wide triangle effect to the border. this time, i wanted to try something different. initially, i was leaning toward using the same shapes i use for the background border (6" corner sqs and 6"x12" rectangles) in the heart colors. it would have been the fastest and simplest way to go. but i decided to echo the heart shapes from the center. this meant i would be varying the pattern slightly, since the heart shapes were composed of 4 hsts, not too. i decided the effect would be worth breaking out of the formula a bit.


this meant lots of hsts for the 20 hearts i would need. if i was making 6" sq heart blocks, i could fit 10 across the top border and 10 across the bottom border. 20 hearts, composed of 4 - 3" hsts. that's 80 hsts, 20 of each of the 4 pinks.

i'm still getting a kick out of the way chain piecing resembles bunting or a swag every time it comes off the machine in one long string of shapes. and i still want to photograph it every time.

this little lady likes to snip things, so i set her to work on the chain piecing. she was in the middle of practicing her rollerblading (christmas present) on all the tile in our downstairs, but she stopped and snipped for me.


i love finding little jobs like this to involve the kids in the process of my quiltmaking. it adds to the story of the quilt. they'll be able to look at it and say, "i helped with that one!" also, it exposes them to the process and teaches them some of the skills involved. i like weaving these things into their childhood memories while passing on the skills.

the hst  is the story of my quilt life these days. i hope this means i'm getting better at them.

although this little batch might attest otherwise. i found a whole new mistake to make: 3 squares pieced together instead of 2. how did that happen? i suspect because kona cottons are slightly thinner than other quilting cottons i've been working with, so i didn't notice that i'd grabbed 2.

and since i cut the light background squares and the colored squares from different size pieces of cloth, i miscalculated the number of light squares i'd cut by 2. hence, the two piles came out even when i layered 3 squares, not once but twice! nothing seemed amiss until i cut through the first set and was amazed to see two colors there. then i had to try to figure out where the 2 missing light squares were. some pondering over my math and cutting configurations eventually brought me round to the correct conclusions. i am no computer, but i usually figure it out in the end, after taking the long way round.


pressing and trimming batch after batch

now i have hearts in four pinks, clockwise from top left: flamingo pink (kona color of the year 2017), pomegranate, candy pink, camellia.

here's a close up that shows the two background colors i'm using: pearl pink and pale flesh. the color difference is very subtle, but in person, you can actually detect it. in photos, they tend to look identical. when my eye catches the difference as it roams over the quilt shapes, it always give me a little surge of delight inside, for some reason.

now to finish those hearts and get the borders on so i can get this quilt to my aunt!

Saturday, January 14, 2017

good habits


sewing isn't all just sitting at the machine and zipping fabrics through.

there are maintenance chores to be done on a sewing machine to keep it in good running order and little clean ups constantly needed to maintain a creative space one can actually move around in.

i have developed at least one good machine maintenance habit: i clean out the lint regularly.

i don't change needles often enough or oil the machine as much as i probably should, but i do have a habit of swiping out all the lint each time i change the bobbin. i keep the lint brush close by and use it whenever i have the bobbin case open.

what are your best and worse habits?
how do you make them part of your sewing routine?

Friday, May 1, 2015

my process for a pieced backing

i have always loved a pieced backing on a quilt. it's one more place to have a little fun with fabric and even an opportunity to play with a more modern, large-scale, improv-pieced scheme than i would normally go for on a quilt top. if you have a beloved fabric you want to feature in a large panel, the back is the perfect place to do so. unless i'm making a baby quilt, i always make a pieced backing. even on my very first quilt, i made a pieced backing. i didn't know much about quilting at all, but i knew i liked pieced backings. so my first backing, for "at last" was a four panel piece which echoed the block pattern used on the front. i remember carefully selecting the four fabrics so the colors and shapes best represented my ideas for the front. it just might be the best part of that quilt. it's definitely one thing i did right when i was struggling with so many aspects of launching a first quilt.

"taite" uses large panels of fabrics from the front interspersed with leftover chain-pieced block strips wherever seams were needed in the panels. my daughter chose the main panel and i chose the two side fabrics. the fabric selections also reflect the pattern i used on the front. this was another backing i carefully designed with the design elements of the front in mind, and also to use up leftover pieces.

not all of my tops are so carefully laid out and designed. there are also those that are improvised and less structured.

a pieced backing can make a great home for leftover or bungled blocks or yardage that were originally for the top. when i made "twirly" i accidentally cut the large fabric panels too short, so they went on the back. because they were oddly sized, i joined them with leftover border blocks in the seam. i also had a few extra blocks and more leftover border strips that went into the back, too. the rest was made up of excess fabrics not used in the blocks. since i usually buy generously for the fabric requirements, i always have leftovers to play with on a backing. in fact, this is one reason i over buy.

knowing i can use pieces on the back makes it less stressful when something doesn't work out or gets miscut. i'll just use it to make the back more interesting. this makes the "what do i do with this now?!" problem solved and i grieve mistakes less, too.

sure, you can always make a backing inexpensively out of a plain muslin or you can sew one or two seams in the same fabric to make one great big piece. but i like to have fun with the back. also, i don't like to pattern match and mismatched patterns bother me. so even if i do use large pieces of fabric for the back, i will put at least a small strip of something in between the panels. my all-time favorite backing is on my "out on a limb" quilt. it's just three 2.5" wide strips sewn together and placed in between two large vertical fabric panels of the same fabric, but i really, really love this one - as much as the front, maybe more. a pieced backing doesn't have to be complicated at all to be effective. 

some other quilters that come to mind when i think of pieced backings are elizabeth hartman of oh, frannson! (especially in her book the practical guide to patchwork), kelly of my quilt infatuation, and rachel hauser of stitched in color (like here and here).

in my experience, a pieced backing can be either a planned design to compliment the front or a place to use up leftovers from the front. or maybe sometimes something in between. as i got ready to make my backing for my latest quilt, "dreaming easy" i decided to document the process in case anyone was interested in trying their hand at a pieced backing but didn't really know where to start.

this backing was unplanned until i saw what was leftover once the front was complete. i did have one feature print in mind for the backing - a 4 yd piece from the main fabric line i used for this quilt ("dream on" by urban chiks for moda). i could have made a backing out of that, but of course didn't want to use just one single fabric. so i pulled out what i had to work with: the 4 yd cut (green floral), a 2 yd cut of another fabric i had used on the top (pink "modern meadow" joel dewberry print), a small piece of "meadow dot" in robin's egg, and a few charm squares that were too low-volume/light for me to use in the checkered arrow blocks on the front. if i didn't have that large piece of pink fabric, i probably would have used the green fabric for both large panels with a strip in between. however, i did have it and liked the variety of prints.

 you can go about the process mathematically, but i prefer to just lay out the top and build organically over that. as long as the back i'm building has a few inches more on each side than the quilt top does, i know i'm good to go. so first step - lay the top out on the floor. really, you could place it face down so it's oriented the way the quilt will actually be put together, but i didn't here. that only matters if you want certain pieces under other pieces. this time that wasn't a concern and i just did it for sizing reference.

 next i lay out my largest pieces across the top to see which way they are going to fit. i could have placed these panels vertically, but the pink print wasn't quite long enough when laid that direction. in order to avoid extra piecing, i turned the pieces horizontally. here i had plenty extra of that lower floral print, so once i decided on the orientation, i cut the excess off with my shears, leaving it a few inches larger than the top. same with the upper pink print.

now i have two large panels and i'll just need to make a strip to put between them in order to use up those charm squares. the top was composed of blocks that included hsts and i could have made some out of the charm squares to echo the design on the front, but i chose a simpler route.

 the charm squares were all very similar in appearance to each other and hardly distinguishable if placed next to each other in a row. i wanted to break them up visually a little, so i cut half charm square pieces (2.5"x5"cut) of the random "meadow dot" piece and placed that between all the charm squares.

i just did this without measuring until i had a strip long enough to cross the width of the quilt top, with the needed excess inches on each side.

 then i attached the two large panels to the pieced charm squares strip and i had a pretty pieced backing. this one was quite simple and came together in no time. if the pieces you are working with are of various sizes or you have blocks to include, you can just play around with fabric placement, sort of like building a puzzle, until you have the back big enough to cover the top. next time i make that sort of backing, i will make sure to take photos so i can walk you through that process, too.

 something else i did on this backing - i included the selvages on the large pieces. i've done this twice before and find it can be a very nice design feature, like when i did it on "paris daydreams." if the print on the selvage is placed right, you can see it well and it's kind of cute, i think, to have it showing.

 the "dream on" panel had it's selvage print mostly well placed and it showed nicely. the "modern meadow" print did not have a good selvage for display purposes, but i was feeling lazy and didn't want to trim it off that long piece of fabric before i sewed the backing together. so i included it, too. lazy, i know.

once you have a back, you are home free to sandwich and baste your quilt! i positioned the top so that the charm square strip fell about 2/3rds the way up the quilt, making the green panel on the lower portion of the back larger than the pink panel on the top portion. if you don't cut off excess backing before sandwiching you can play around with top placement like this.


that ends the tour of piecing a backing splish splash stash style. i hope you found it informative, interesting, or at least entertaining. or maybe you just like looking at the pretty fabrics. that's alright by me.

linking up with kelly at my quilt infatuation's needle and thread thursday.

Thursday, February 12, 2015

paris daydreams: a finish

this quilt is far more traditional than what i normally make. however, i have somewhat eclectic taste and this satisfies the shabby chic francophile in me. like most of my finishes, this one is long overdue. but it's done and the timing is actually pretty good. d5 is just the right size for it now, so all's well that ends well. the photo shoot, however, did not go so well. i tried photographing it indoors in the lovely light of my bedroom, but that only worked so far as i could crop out all the unwanted bedroom clutter. in addition, i had a lot of interested "help." so enjoy the story of this quilt and some crazy outtake photos, too, if you feel so inclined.

this quilt was born in my brain whilst i was pregnant with baby #7, over three years ago. i admired elizabeth hartman's "modern charm squares baby quilt" and was looking for something to make for baby. also, i have a weakness for dreamy french fabrics, like toile and the vintage stuff produced by french general. when the pom pom de paris line came out, with its pretty, soft spring palette, i wanted it for baby. although it's not a modern line, i thought it would go well with ms. hartman's pattern.

(oh, goodness. looking at this photo above, i can see that despite my best efforts to get a bit of randomness to the layout of this quilt, or at least some asymmetry, i pieced it in a pattern after all! how funny and rather pathetic.)

i just love the bird toiles from this line

somehow i got sidetracked and ended up making "expecting blossoms" for baby and not the pom pom de paris charm quilt. about the time baby was a year and a half old, in the early summer of 2013, i decided i still wanted to make the french quilt for her. so i got started. it should have been an easy project, but i started thinking too much and turned it into a french nightmare that got put on the back burner until i tried completing a quilt for each kid for christmas 2013. eventually i got the top done and began the straightline quilting. but it wasn't completed by christmas.

two of my favorite prints are these ditsy florals
 the straightline quilting went ok, but not perfectly. my juki is a fmq champ, but straightline is not so much her thing. i've found out the biggest help with the straightlining is to spray baste. the closed eyelet i chose for sashing wasn't a problem at all, either with piecing or quilting. i love the textured effect it gives.

once i removed all the red prints from this line, i was left with totally dreamy baby girl colors in oyster, pink, butter yellow, and bisque
after i had finished quilting by echo-quilting the long horizontal seams 1/4" on each side, i began thinking how very pretty it would look if i also did vertical straight lines, too. but i'd already taken it off the machine, changed feet, and moved on before that occurred to me. so it didn't happen. when i pulled the quilt out for binding, i thought i'd just knock out that cool quilting. on consideration, however, i realized there were lots of vertical lines in all the piecing that wouldn't be matching up with the quilting and it wouldn't look very good on the front of the quilt after all if i called notice to that. so i just stayed with the horizontal straight lines.


 one of my favorite parts of this quilt is the back. normally, i piece a backing with a variety of prints. on this one, i used only one print but threw in a special feature: the selvage.

 i'm a selvage lover and this one was mighty pretty. by piecing the backing with the selvages meeting up, i was able to include them as a feature strip across the quilt. fortunately for me, this worked out beautifully. the printing was perfectly placed on this fabric so that the 1/4" seam allowance left it showing nicely. i tried this on my penny patch backing and the freespirit selvages did not have the same spacing. pity, because i really adore this effect.

 i also love, love, love this ditsy pink floral print i used for the back. so overall, i adore the back of this quilt. the very last thing to do was bind this baby.

and that's where i got held up again.

there was no perfect print in this line for binding. all the prints, except the reds, were too light for a binding that was going to be drug around by a little girl. i had pulled all the overtly red charm squares to preserve the soft, pastel look in the quilt so adding a red binding on wasn't in keeping with my vision. i was wishing hard the mushroom brown color had been included as a print somewhere. but it wasn't.


by the time i was ready to bind, i had talked myself into just using the red ditsy floral print that was the same as the backing print. although i had purposefully removed the reds from the quilt top, i was pretty desperate to be done and thought it would be fine. not ideal, but fine. i justified to myself, "a binding is so thin and maybe it will be a nice pop of color on the edges."

fortunately i have a quilting buddy who is wiser than i am. when i showed becky the red binding and the quilt, without trashing my idea, she nonchalantly told me, "my thinking is if you've already waited a year to finish this quilt, you might as well wait a little longer and get a binding you like rather than settling for something you don't like so much just to get it done." smart, smart girl.

i was loathe to try finding a binding but i gave it a shot at my local store later in the day.


and came home with something i absolutely love!

this white dot on a mushroom brown crossweave goes so well with the colors and prints in the line. i do think it's probably not very french, but it definitely suits the overall feel of the quilt and it's color palette. i machine bound this one for durability. fortunately, i bound it right after two other machine bound quilts so it turned out pretty well because i was fully practiced by the time i did this one.

 and now little miss has a quilt that fits her bed nicely and is bigger than her baby quilt. she's been dragging her bunny and new quilt around the house everywhere.

when i gave it to her, she said in awe, "it finish?! oh, thank you, Mama!!! it's so bigger!" it's one of the best reactions i've gotten from a kid yet.

that's a wrap.
it's complete and in her hands, all hers to use and love now.
enjoy the last few outtake photos below.

too short to help hold

hey, no peeking! and the bookshelf looks ugly


i'm glad they like being involved with me and the quilt making process. who knows how long it will last?