Monday, August 31, 2015

"cinched" pattern tutorial


this is a simple strip quilt pattern which utilizes a jelly roll and a bit of extra yardage for an accent strip and block across the upper portion of the quilt. it comes together quickly and easily, with a few opportunities to embellish the design for more detail.

in this tutorial, i will give basic instructions for the pattern. for more detailed instructions, please refer to the links to each section of assembly.


fabric requirements

i'm starting with a generous amount of yardage partly because i already have it in my stash and partly because i simply like to work that way. generally i need room for error and i happen to adore scraps, so leftovers are quite welcome. 
  • one jelly roll (or 45 - 2.5" wide x wof  strips, see further options below)
  • fabric a - 1/2 yd for accent block and backing strip a (could be done with 1/4 yd or fat quarter if adjusting measurements slightly - see section on accent block)
  • fabric b - 2/3 yd for accent strip and backing strip b
  • fabric c - 1/2 yd for extra strips and backing strip c
  • fabric d - the equivalent of one jelly strip for strip joining squares (if using)
  • optional fabric e - 1/3 yd for accent block
  • 1/2 yd binding fabric
  • 3 1/4 yds backing fabric, 4 1/4 yd if using a directional print
it's a pretty small list. if you want more variety in the strips, which i do, you can use additional coordinating pieces. 

* note - 1/4" seams used through out and all measurements are for "cut" (seam allowance included) not "final" unless otherwise noted.

make the strip sections

cut the selvages off all jelly roll strips. (for more detailed instructions on preparing the strips, see cinched pattern, part one.)

select 30 jelly strips to be cut in half and used for the upper section. (set the other 10 strips and the 30 half strips aside for the lower section.) arrange these 30 half strips in a row for the upper section. (for a detailed discussion of strip selection and construction options, see cinched pattern, part one.)


layout the lower section with 30 full strips in a row. these full strips include the 10 remaining jelly strips from the jelly roll, your 5 additional full strips cut from fabric c yardage, and 15 full pieced strips constructed from the leftover halves from the upper section.


you can either simply piece the leftover half strips or . . .


you can make pieced strips that include small 2.5" x 2.5" cut joining blocks, for more interest. i did this, varying the placement height of the joining blocks in the strips, and also using three pieced sections and two blocks for some of the strips. (see cinched part one for a discussion on these joining options.)

cut the accent strip and accent block pieces from fabric b and e.

the accent block can be a simple 10.5" square of one feature fabric e or you can create any quilt block of your choice 10.5" in size. in this quilt, i chose to make a courthouse steps block. (for a discussion of block options and how i made my accent block, see cinched pattern, part two.)

join your accent strip pieces to your accent block to make the middle accent strip of the quilt top. there is a little extra length to this piece as cut so you can play with placement of where you want the accent block to fall.

lay all the pieces out either on a design wall, bed, or floor to check the placement of your strips in the upper and lower sections with the accent strip in between them so you can see how you like your layout.

join the strips in each sections together to create two panels, an upper panel and a lower panel. (for more details on joining the sections together, see cinched pattern, part three.)

join the three panels together to complete your quilt top, which is now approximately 70" h x 60"w, once you square it off. (i used 31 strips so my top is actually 62"w.)

next, create a backing. i like to piece my backings and used a three-strip accent stripe for the back of this quilt. (for directions on making this backing, see three strip accent stripe pieced backing.)


sandwich, baste, and quilt.


for the "out on a limb" version of this quilt, i did a simple echo quilt of all the seams. this resulted in lots of straight lines and a flatter, less-crinkly texture.


for "bloom where you are planted," i used a loopy figure eight quilting pattern, which ran along the strips. this quilt has glorious crinkle texture to it, if that is your preference.


in the accent strip, i stipple quilted for some contrast and added interest. the accent block also had some unique quilting in it's sections. (for a discussion of my quilting choices, see "loops and crinkles.")

"bloom" is bound in some lovely olive lottie dot from heather bailey's "lottie da" collection

now you just need to bind your quilt and you are ready to wash and snuggle!
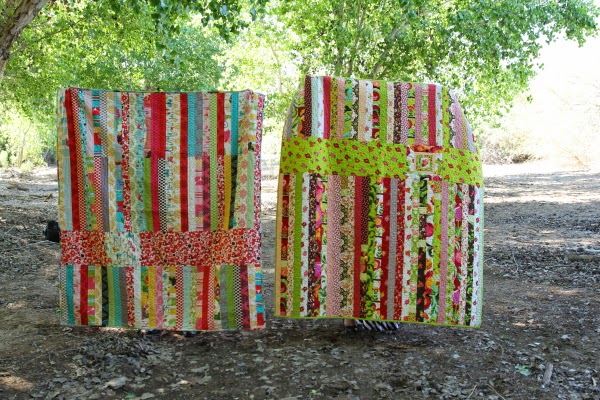
i've completed two versions of this quilt so far, and have the fabric for a third set aside. "limb" lives on our living room couch and is regularly used and greatly loved, despite all it's imperfections, which i don't really notice any more. "bloom" was gifted to my dear friend and quilting buddy, jill, who has moved away. despite the fact that my 16 yr old photographer did not notice "limb" was upside down, you can see the two versions of the quilt here together and how the slight variations affect the look of the quilt.

i've greatly enjoyed this pattern, which is so simple and satisfying. having designed something myself, especially as a new quilter, is very gratifying, indeed. giving the gift of love made tangible in the form of a cuddly quilt is the best part of all.

i hope you enjoy this pattern and would love to see any version of it you create.

happy quilting!

the detailed steps for this tutorial are spread over 6 posts i wrote as i made the "bloom" quilt and worked on the pattern. find the others here:

cinched part one - fabric requirements and strip preparation
cinched part two - the accent strip and block, modifications from the first quilt, joining blocks for the long strips
cinched part three - joining your strips and sections to assemble your top
the three-strip accent stripe pieced backing - how to make the backing
loops and crinkles - quilting choices for "bloom where you are planted"
cinched part four - quilting, binding, and gifting

linking up with friday finishes at crazy mom quilts

Saturday, August 29, 2015

the three-strip accent stripe pieced quilt backing

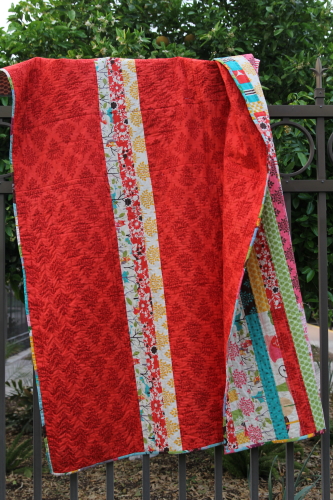
 this is one of my all-time favorite quilt backs, which graces the backside of my "out on a limb" quilt, the first run of my "cinched" pattern. honestly, this back makes me as happy as the front.

i chose to piece this backing because i was leery of trying to match up the strong graphical pattern repeat in the red fabric. and because i just love a pieced backing as an additional design feature for a quilt. i chose to offset the stripe not only for design interest but because it would keep the quilt from having a seam down the middle of the back, where a quilt often gets folded. apparently, this is supposed to stress the seam.

because i was so pleased with this backing and because it's so easy, i've tried to duplicate the back on two other quilts. tried. sure, i was able to use the exact same method for the other two quilts, but somehow it didn't have the same effect. and after looking at the other two, i know why. if you look at the first quilt, you'll see i have a strong feature fabric that has little contrast in it's design (it's a simple, tone-on-tone red print). the contrast comes in to play with the strips i used between the large panels. i chose the three fabrics based on fabrics i featured in the front of the quilt. the blue owl strip was my accent block print, the red bandanna print was from the accent strip, and the low-volume yellow strip was used repeatedly on the front, more times than other strips were. i placed the red strip in between the other two prints so it wouldn't be right up against the red panels. and this is the formula for success.

next, i made a similar backing for "romance in the garden." one change was i used two fabrics from the same line and with the same aqua colored field (background) but of different prints. maybe the two prints are the problem or maybe it's because there is just too much sameness all around, but this back falls kind of flat to me. it just doesn't say "wow!" like the first one did. there is no real volume contrast here. that must be the issue.

when i made the backing for my second "cinched" quilt, "bloom where you are planted," i tried the contrast theory again. i did get contrast, but the large panel fabric is so busy the strips kind of get lost anyway. oh, well. now i know even better for next time what to do.

 to make this backing was quite simple. i used one large 4 yard piece of fabric for the main panels and three strips, 2.5" x 72" cut for the accent stripe.

i cut the main fabric in half, resulting in two panels approximately 72" high x 42" wide when the selvages were removed. the top for this quilt was 70" high, so this didn't give me a lot of wiggle room for shrinkage and shifting when quilting, but i took the risk. a safer length would have been 4 1/4 yards of the main fabric, which would have given me 76" in height.

here, with the three strips sewn to the two panels, i have a backing measuring 72" high x 90" wide, more than ample in width for my 60" wide top. but this gives me room to place my top exactly where i want it in relation to the strips on the back. also, because i was using a directional print, i did not want to piece one of the side panels, which i could have done out of one yard of fabric. if i'd done that, the print would not have been running the same direction on both sides of the stripe.

however, if you are not using a directional print, you could use 3 1/4 yards of fabric. cut one panel at 2 yards and 6" long (78h" x 42w") and cut the remaining 1 yard 3" in half (2 - 19w" x 42h" pieces), which can be pieced together to create a second panel that is 19"w x 84"h. cut it down to 78" high to match the other panel. when these two panels are added to the strip section (78" x 6.5", which you made longer than my 72" strips to match the increased height for these more generous measurements), you will have a backing that is 78"h x 65"w. this doesn't give you exactly the 4" on each side normally recommended for a top to backing ratio, but it's pretty good.

if you use the 4 1/4 yd method, you're going to have some nice scraps leftover from cutting the side down 22". just be happy you have enough of your lovely fabric left to use it again in another quilt! (or if you're using the "cinched" pattern, maybe you used if for your accent strip or additional jelly strips for the front? there's an idea!)

now that your backing is done, it's time to make a yummy quilt sandwich. i always enjoy this phase because it makes the different pieces finally look and feel like a quilt, not just a bunch of parts.

when placing my top and bottom together around the batting, i tried very hard to get the strips to line up as best i could. this can be done by seeing that your backing stripe lines up with the same strips from the quilt top at both the upper and lower edges of the top. also, you might be able to see in the above photo that i could vaguely see the backing stripes through the batting. so i slowly and carefully lined up the seams on the strips with the top as i placed the top on the batting.

this is not essential, but if you are doing some echo or straightline quilting, it will make the back look better.

there you have my favorite pieced backing in a nutshell.
or maybe a few nutshells.
i'm not very brief. ever.

the detailed steps for this quilt's tutorial are spread over 5 posts i wrote as i made the "bloom" quilt and worked on the pattern. find the others here:

cinched part one - fabric requirements and strip preparation
cinched part two - the accent strip and block, modifications from the first quilt, joining blocks for the long strips
cinched part three - joining your strips and sections to assemble your top
loops and crinkles - quilting choices for "bloom where you are planted"
cinched part four - quilting, binding, and gifting
cinched full tutorial

Saturday, July 18, 2015

thimbles and threads

i've done no sewing since the start of summer, but my summer travels and activities have taken me to a few quilting stops along the way, so that's what i've got to share right now. when i was in utah around the time of my birthday earlier this summer, my sweet aunt barbara (who is only 12 years my senior and a lifelong friend) gave me a day of quilt and family history touring. one of the stops we made was at a shop in draper, ut called thimbles and threads. barbara had looked up shops in the area and thought this best suited my tastes. the selection in the two-story shop was pretty extensive, i must say!

this is a look at half the main room just inside the front door. bright and cheery and friendly. this section was heavy on riley blake and moda fabrics, with some surprising mix-ins of cloud 9, tula pink, amy butler true colors, cotton + steel, amh, a little bit of heather bailey, and lots of other fun picks i cant't even recall now. so while i wouldn't call this an ultra modern shop, it did have great variety and offerings on all ends. there are two more rooms of fabric here. lots and lots of fabric. the shop calls itself "modern traditionalist" and i think that's pretty apt.

lori holt's "farm girl vintage" was all over the place and i noticed on the shop's instagram account that she's been there for book signings and events before. i suspect this is her local quilt shop or at least a frequently visited shop. there were longarm services and a classroom in the basement, too.


when we first got there and i was browsing, i had no desire whatsoever to buy fabric despite all the cute pickings. strange, huh? i think it's just because i've been so out of sewing for a while and i have all this fabric sitting at home that is still begging to be used. i couldn't even think of anything i would actually need or recall what i was working on that might benefit from additional fabrics. then i remembered i always want more red. and it's a good idea to stock up on blenders or low volume given the chance. so i managed to find some things and not pass up a good opportunity to shop in person and support a brick-and-mortar.


probably the thing i was most excited about was finding the wonder wheel, an item useful for adding a 1/4" seam allowance to templates, that's recommended in the quilt lovely book. the staff didn't know they had it but i scanned the gadget wall closely and found it. now maybe i can get some of those cabin quilts started. the little moda reference book looked pretty handy, too.

if i ever get back to sewing once summer is over, i'll let you know just how useful my purchases turn out.

in the meantime, i'm working on three separate tutorials for three quilts, which are close to completion once i get to them: my "cinched" pattern, the "arrow check" pattern, and a work up of how to make a 3 block penny patch quilt since rachel's tutorial only covered the 2 block version.

fall will tell all!
see you soon when the weather gets cozy and life settles in again, if not before.

Sunday, June 7, 2015

field trip to craft south


i'm not a girl who gets out much for quilting or sewing events. as much as i'd like to attend a sewing retreat or quilting conference, it's just not practical for me to take the time away from my family for such things at this point in my life. i always admire these events from afar and enjoy them vicariously through others' reports on social media. i try to take in fabric sights when i'm travelling, but i don't travel specifically for my hobby. so imagine my surprise and giddiness when i realized i'd be in nashville, tn on the weekend craft south was opening its doors. i could not believe my luck that i'd be in town the day everyone's fabric design darling, anna maria horner, opened up her lovely, brick and mortar crafters heaven.

vintage record player actually playing vintage vinyls - i wish you could hear it
the space was smaller and more intimate than i'd expected, but it was chock full of goodies, all artfully displayed. i was in town for another event and only had a short time to spare for popping in, so i didn't get to explore very fully. and after i left, i was appalled at the small number of photos i'd taken while there. but i did not leave empty handed.

the whole event was rather low-key. there were refreshments laid out on the table in the fabric section and ms. horner herself was greeting people by the cutting counter. a few of her family members were also wandering around mingling with customers. there wasn't a lot of hype going on, they were letting the beauty of the space and the products speak for themselves, mostly. and from what i could tell most of the customers were local people. it wasn't like being at quilt market or quiltcon with a bunch of super excited fans around. this made me a bit shy, especially with the camera. i felt like i might be the only star-struck fan girl there at the moment. but i played it cool and did not embarrass myself too badly.

the main attraction to me as a quilter was seeing some of amh's recent quilts in person and the fabric section. while there was not a ton of fabric, it was a beautifully curated selection of fine pickings. it almost felt like shopping ms. horner's personal stash of bolts, if that makes any sense. the collection is organized by color family rather than fabric line or designer, which was a new experience for me and makes for some very different shopping. i would see one print from a line and wonder where the others were since that's how i'm used to shopping. not finding them together, i forgot what some of the prints in a range were and didn't look them out. and it wasn't until later that i realized the plaids i had seen mixed in were probably bits of loominous, her latest line. i so wish that line had been presented by itself somewhere!

on the upside, having the fabrics organized by color really helps you not only select based on color but i also found it helped me look at fabrics individually rather than as part of a line or as belonging to a certain designer. you let go of expectations or preconceived notions you had about the designer or line and just see the fabric. it really does help get over the hype factor that comes with some fabrics. once again, i was surprised with how i liked certain fabrics on their own that i hadn't really liked before because i had only viewed them as a line, not as individual prints. really, there is no replacement for seeing fabrics in person.

of course there was plenty of amh on the shelves, as well as fabrics i have never seen on the bolt before - leah duncan, various art gallery designs, heather ross, birch fabrics, and liberty. yes, liberty of london on the bolt. just a few, but all the same, there it was in abundance and in real life. the liberty was on a special shelf of its own behind the cutting counter.

even though everyone else seemed to be mostly browsing i got over my shyness enough to start taking bolts off the shelf for purchasing. the way some people were acting it was like we were supposed to admire and look-but-not-touch because it was all so artfully set out. i decided to indulge in a few quarter yards. as i scanned the shelves with about 7 bolts in my arms, an elderly gentelman and his wife wandered over. "are you going to buy all that?!," he asked? "yes!," i said. "but just pieces of each, of course." i don't think he'd ever seen a fabricholic in shopping action before and he seemed greatly amused.

i picked out some low-volume prints and the dodo bird fabric from liberty's new alice line for my quarter yards, and since i was in house, got some yards of a lovely amh print, "summer totem" from loulouthi, for a backing.

while i was waiting at the fabric counter, mr. horner, canned beverage in hand, casually mosied on by and stopped to comment on my purchases. "you're mr. horner, aren't you?" i asked. "yes, i am. who are you?," he replied, in a friendly and earnest manner, reaching out to shake my hand. just a few minutes before i had seen amh, out of the corner of my eye, greet someone who seemed to be from the industry and i knew there were other people from the community around, so with that in mind i tried to introduce myself as a person-of-the-masses customer, not anyone who he should know. i didn't manage it well at all, getting tongue-tied and a bit confused. "i'm, well, i'm not, i mean, i'm just hydee (last name)," i stammered. holy cow, i was silly! but he was very gracious and pretended he didn't notice at all. we then proceeded to have a pleasant conversation about my fabric purchases, large families (we both have 7 children), and nashville, since he's mostly a native and i lived there in high school. after a few minutes he excused himself to go put a record on the record player.

juliana horner, their eldest daughter and creative genius in her own right, was also there, with colorful, pixie-styled hair, helping customers find things. after chatting with mr. horner, i decided i should just go say hello to The Lady herself once my fabric was all cut. i know she's used to it, so i was even going to ask if i could take a photo with her. to my dismay, shortly before i was ready to go, she disappeared into the back to take a break. my time was up and i wasn't fan girl enough to barge into her break time, so i left without speaking to her.

the whole experience was a little surreal, like walking into a book i've read before, and having it be alive all around you. but at the same time it was very down-to-earth, warm and inviting at the shop. it's located in a lovely neighborhood of nashville i'd never been in before. i believe it's called 12 South. that's the road it's off of anyway. there are several unique shops and eateries all within walking distance. most notable to me was a jeni's splendid ice creams scoop shop, home of the absolute best ice cream i've ever had in my life. seriously. i didn't get back to craft south the rest of the trip, but my travel companions gladly accompanied me to jeni's twice more in the four days we were there. nashville is lucky enough to have three locations.

jeni's nashville 12 south location

 darkest chocolate was my absolute favorite - the best chocolate ice cream i've ever had. i tried most of the flavors because they'll let you sample all of them if you'd like, and thought they were all great but the darkest chocolate and passion fruit were my favorites. jeni is pretty smart and offers mini scoops so you can get a bit of everything if you'd like. on my second visit i got a 4-scoop sampler. delicious!

 the 12 South area has lots of small, charming old homes, some of which have been turned into businesses. it was pleasurable to drive around and look at them. i wish i knew more of their history, time period, or even the name of the architectural style prevalent in the area. even in my ignorance, i could enjoy looking at them, nestled into all the growing greenery as they lined the gently rolling streets.

jeni's round three, two mini scoops, this time with a sugar cone
after my visit to craft south (and jeni's, of course) i was ready to move back to nashville. it's such a nice, quirky town with so much distinct flavor. but since moving is not in the cards for me anytime soon, i'll have to settle for trying to capture this in a quilt somehow. thank goodness for online orders to help me fill in the gaps whenever i need to. like that loominous collection i missed.

Wednesday, May 27, 2015

a little bit of heart and a book review


 a few weeks ago i got a copy of jen kingwell's new book, quilt lovely, and instantly fell in love with 99% of the patterns. in love, as in "i absolutely must stop all other plans and spend all my quilty time for the next few years making these designs." they really are spectacular. as you may know, i've had my qualms with ms. kingwell's pattern writing for gypsy wife so i was a bit leery of a whole book of her patterns, but the absolute gorgeousness of the designs makes up for any weaknesses in pattern clarity. i am in need of several new quilts for our new mountain cabin and i think these will be absolutely perfect for the place.

doesn't this one say "cabin" to you?
the day after my book arrived, i was feeling less than inclined to work on my several wips laying around and picked up quilt lovely to see if there was something i could dabble in. i find taking a break from what i'm working on often helps me clear my head and refreshes my interest in the project which has gone stale. many of the patterns in the new book require templates or other involved processes, so i settled on making just one courthouse steps heart block from one of the pillow patterns, "she loves you." i figured i could make just one and work it into gypsy wife somehow if i didn't want to make any more.

the pieces for this block are so tiny! 1" high each. most quilters will throw something that small away. it reaffirmed to me that i'm not completely crazy for holding onto such small scraps, something i have a propensity to do. i started out by cutting pieces to the sizes needed and lining them up in rows according to size. there is a pile of color and a pile of neutral for each length.

first block - not very heart-ish
 the blocks, made up of four smaller component blocks, finish at 6" square. i love the combination of all the colored scraps in the hearts against the neutrals. i had fun digging through my tiniest scraps to come up with bits for the blocks. i completed one block after a friday morning sewing social with my friend, becky, and another evening session with fellow blogging quilt friend, kate, from quarter mile quilts. (kate and i met through blogging and instagram, and finally got together in person for some sewing, chatting, and chocolate. sew fun!) yes, it took me a whole day to complete one block.

putting together that first block taught me a few things about fabric choices, as well as how to put the blocks together. kate said she was surprised i could talk and work on such an intricate block at the same time. well, really, i couldn't. not very well.

 i made not one but three of the smaller component blocks incorrectly! almost enough for a whole heart. ugh! oh well. they're not wasted, i'll work them into something somewhere. and they are pretty cute all on their own. i might just make one more and put them all together into one jumbled courthouse steps/log cabin block.

anyway, after getting my first block finished, i had learned a few things and wanted to test my ideas out, so i made another block. also, i didn't feel like it looked much like a heart at all. i hoped that by making more than one, side by side they would start looking heart-ish.

 it does help to have more than one to give the effect of a heart. i'm thinking about making a row of them for a quilt, maybe a whole quilt out of the intricate blocks from the pillow patterns in the book. those patterns were written as pillows so you wouldn't have to commit to making a whole quilt out of them. they would be amazing that way but the work involved would be quite extensive. anyway, maybe a row of each kind would make a nice quilt altogether.

so here's what i found while working on these blocks:


1. absolute neutrals or nearly-neutrals were best for the white space parts of the block, the not-heart parts. originally i thought just low-volume was going to be good enough but i could tell immediately that i didn't want any low-volumes with color in them and weeded them out. but even low-volume prints that had an obvious pattern, like the floral or comma print i used (see above) were a little too loud, competed with the eye against seeing the heart shape formed by the colored strips. i had very few nearly-neutral low-volumes as it was so i had to invest in a few more tone-on-tone prints and solid colored neutrals for future blocks. upon closer inspection, the ones used in the book mostly seemed to be various colors of white, cream, ecru, etc. i like the effect of having different colors but the low-volume prints i used were a bit too attention getting.

good options
2. low-contrast, high-volume prints were best for the colored sections. by that i mean it was better if the print didn't have a super busy design or a lot of white/light colors in them, if there was little contrast within the strip's design itself. bold colors were best for if the prints were too light, they didn't show up well against the neutral strips. they sort of got lost and the shape of the heart did, too. if a light colored or high/contrast-busy strip was included, it was better to have it closer to the interior of the heart, not on the outer edges.

not-so-good options
these are all prints i like and prints i even used, but the ones with a lot of contrast between the colors within the print itself, especially with a lot of white, didn't define the shape of the heart very well at all. i tried to make sure that if i did use them, the white sections were facing inward, touching another color rather than turned out against a neutral strip. what really helps the most is to have a lot of contrast between the color strips and the neutral strips, however you do that.

here's a case of where i had a colored print with white in it and when all the seam allowances were hidden, i ended up with mostly white showing! i didn't expect that tiny tip of the heart to come out looking like this. it would have been better if i had used a solid or tone-on-tone print here. that white half of the top pink strip, coupled with the yellow part of the next strip distorts the shape of the heart because they basically disappear.

 in the book, ms. kingwell suggests considering the backside of fabrics as well as the front, for their effect. this worked nicely with some of the neutrals i was using. you can see above, that if you turn them around so the wrong side is showing, you get an even subtler effect of the print.

so now i have two nice little hearts hanging out on my design wall while i get back to work on my other projects. i do find that stepping back from them and viewing them from a distance really helps them look heart-ish. and some day when i have a whole row of them, they will probably look pretty lovely and heart-like together.


daisy do - the cover quilt - which i will eventually need to make. by hand.
there are several things i really like about the book other than the gorgeous patterns. there is some introductory writing about each of the designs. every quilt has a story and i like when the designer shares that story or at least some thoughts about it's inception. also, each quilt is photographed in use as well as fully laid out flat with a complete view of the top. seeing a quilt from different angles gives you different perspectives on it. there are no pictures of the backs, but ms. kingwell does not piece her backings, preferring as few seams on the back as possible, so they aren't relevant here. there are clear, colored assembly diagrams for the blocks as well as the whole quilt for each project. quilting ideas are also included, with basic sketches for some of the projects. in addition, i enjoyed reading ms. kingwell's thoughts in the appendix sections. all quilters have their own techniques, preferences, and reasonings, which can vary widely, so i appreciate hearing her ideas and rationales.

spinning around - composed of three different pinwheel blocks - is the other top contender for my favorite
as for what i think of the pattern writing this time around, i'd say it's improved. the pattern that i followed for this block was pretty good, it had nice color illustrations that helped with assembly. however, it wasn't labeled with where the different sizes of strips went, even though they were numbered in order of placement. with the help of the illustration i could accurately guess which was which and still got the block assembled. a beginner might have more confusion over the process. browsing some of the other patterns i'm interested in i could tell that some of the other instructions were not super detailed, like how to sew the template pieces together. it's just the nature of her writing style and of these types of quilts, meant for more experienced quilters, that there are levels of assumed knowledge. i know and accept that now. if i can't figure out something from written instructions that are rather general and don't include diagrams, i'm sure there are tutorials and videos online that will help. overall, it's a splendid book full of really, really lovely quilt patterns. especially if you love scrappy quilts with dozens of prints per quilt and want challenging projects that will push your skills. which i do.

this book has been read and browsed nearly every day since it got here. even if i only ever just looked at it, it was a worthwhile purchase for all the viewing pleasure it gives!

if you've seen the book, which pattern is your favorite?

linking up with lee's wip wednesday at freshly pieced

Saturday, May 9, 2015

making room

so, the sewing won out. no surprise there! this room is officially becoming a sewing room, no longer a split-personality dining/sewing room. it doesn't look too different yet and there is a lot of work to go, but i've begun the process of transitioning this room into a full-fledged, dedicated sewing room. and begun bringing everything down here from my bawthroom sewing space. if i'm going to have a sewing room, all my stash is going to be in it. so far, i've shortened the dining table (which will be leaving eventually) and turned it around. i moved my low shelves to create a cutting space (on the right). i want to build a new pressing table that's better proportioned to the room and will allow me to store boxes under it, but for now the ironing board is still holding it up. the design walls have been propped up on the actual walls where they will go but still need attaching and some extending. there is still so much to do. this weekend my dad is supposed to put together some more shelves for me to go under that back design wall. this is the tip of the iceberg, but it already feels good to have it started and to know where i'm heading.

something i realized while moving everything around: i have way too much fabric. it's helped curb my buying appetite tremendously to once again rifle through what i already own.

there is another new addition to the room, too: a sewing space for d4, my bestest little sewing buddy.

 last week, we finally got back my old Little (Pink) Brother machine, which i'm giving to her (but still retaining rights to). poor little (pink) brother fell out of the back window of the suburban last fall and has needed repair ever since. frankly, i was surprised and relived it could be salvaged after a four foot fall onto the driveway. but it's all better now and ready for her to sew on. i put a small table and chair in one corner of the room and this is her spot.

she's been enthusiastically trying out lots of different stitches and supposedly practicing sewing a straight line. i have to say that i didn't realize how much i love and value the auto thread cutter and knee lift bar on my juki until i was helping her get set up on this machine. goodness, what a lot of time is spent in those simple functions when you don't have the auto option!

 she picked out a mini charm pack to make into a doll quilt and had so much fun laying it out on the design wall.

i love watching her work and listening to all her humming or funny comments to herself while she plays with fabric.

sharing this space with her makes it that much more enjoyable.