Wednesday, July 30, 2025

girls night in


this photo doesn't do justice to the volume of these pieces d5 sewed together for our "pinky stinky edna" quilt. but isn't it a lovely stack? it brings to mind the layers of a croissant. 


last saturday afternoon she came to me and said, "mom, let's quilt!" i had house design projects (custom drawer inserts) and planning for an upcoming family event that i needed to be doing for deadlines, but i was burnt out and could not resist her siren call to the quilt room. so we had a girls night in together, both piecing away.


so many cute bits of fabric spread out on the sewing table! lots of fun projects going at once, just how i like it.


we both get a kick out of chain piecing "bunting." this was the first string she pulled off. later it stretched across the room and then some.


she worked away quite diligently on piecing the rows of four while i jumped around doing some yellow projects.


this is what i got done:

Monday, July 28, 2025

ducks in rows


 just popping in to say i have all the blocks for “groovy liberty” complete, sashing and all. and one to spare. the rows are in pairs. as soon as i join the pairs together i’ll have a top!

Friday, July 25, 2025

lining up


my last bits of liberty arrived, and while nice, were not what i was fully hoping. but i switched out one print for the pink and brown print i wanted to remove; then got on with finishing the blocks and assembling a quilt top.

i added the grungy crossweave as sashing and am happy with the look. i was thinking as i put the short pieces on the sides of blocks for the vertical sashing that it's so nice how sashing makes it so you don't have to worry about seam matching as you do when the blocks join each other directly.

then, as i began joining up rows with the horizontal sashing in between, i thought how cornerstones are a really good idea for getting the sashing to line up. i was thinking this because i wasn't using any and immediately had issues with the vertical pieces matching up across the horizontal pieces even though i pinned right from the start this time. ugh. i thought they were lining up and everything was going well. but when i pulled the first pair off and opened it up, things did not look good. the photo actually looks pretty good, but it got worse from there the further down the line i went.


i was a bit stumped. i thought i was getting them lined up as i pinned them. i was feeling the seams further away from the sashing where the block and sashing joined together, which felt lined up. but they weren't.

i don't think louise (my quilt mother) every taught me how to line up pieces that have sashing in between. and i haven't seen anyone else talk about it, either. so i had to come up with an idea myself.

this time i marked the horizontal sashing piece with where the vertical piece already attached to it was. i made small pencil marks where the seams were at the outer edge of the sashing that would be sewn to the other blocks. i lined the edge of the ruler up with the seam between block and vertical sashing, then marked down the line from it on the horizontal outer edge. it was the right side of the fabric, so i kept it under a 1/4" where it would be included in the seam allowance and not show.

the pencil marks blended in with the crossweave fabric, but i could see them well enough in person.


then i laid the next row on top, right sides together, lined up the vertical sashing ends with the pencil marks, and pinned at each seam. it worked! whew. i was happy to have that figured out. 


backing up a bit - i did a good job laying out all the blocks in a pattern and sticking with it as i sewed them into rows. i've seen other quilters have a system for stacking the blocks and ways to mark them, but that never works for me. the only (nearly) failproof system for me is to take a photo of the blocks in the order i want; then set the photo up in front of me when i'm sewing and consult it constantly as i sew the blocks together. constantly, as in, for each and every seam i'm sewing i check and double check i have the correct blocks going together and turned the correct direction.

and somehow i still manage to turn one or two overall. but its so much better than when i don't do this!

when putting this top together, i laid out the blocks in rows. first i sewed the short, vertical sashing pieces to the blocks, then sewed the blocks with sashing into a row. next, rows were joined into pairs with the long, horizontal piece of sashing between them.

the above photo is the blocks for one row with the short sashing attached, ready to be sewn into a row. i keep them on my lap and consult that photo propped up in front of me constantly. i put the sashing on two blocks in the first row on the wrong side, so had to unpick those, and put one or two other blocks together the wrong way, and had to unpick that. but for me, this was doing really good!


the lining-up of the short sashing across the long pieces between rows was giving me a bit of a headache, so i had to break out the chocolate for a pick-me-up. it reminded me of a small instagram trend a few friends and i had going once apon a time where we used the hashtag #chocolateonquilts. i'm not sure why it was "on quilts" instead of "and quilts," which makes more sense, but i'm not the one who started it. i just remember we would occasionally share a chocolatey treat photographed with a quilt and mark it with that hashtag. in the good old days before ig ruined hashtags.

Wednesday, July 23, 2025

summer sunnies


one of the summery wips i'm itching to complete is this "sunny yellow crossroads" project. i've been working on a few others, but this has been hovering in the back of my mind, waiting its turn. i cut some low-volume leftovers into pieces for a block, so i got the project box out to put them away. that's all it took. i was curious how far i'd gotten and if i'd gathered enough other fabrics to complete the top.


the box contained 12 complete of the 28 needed blocks sets  and two sets of low-volume pieces cut.


then i pulled down the basket where i've been chucking all the cuts of yellow and low-volume fabrics i might want to use for this quilt. it was literally overflowing with fabric. so much yellow! sadly, way too much yellow. i could easily do another yellow geese quilt or some such thing with all this yellow.

i selected my 16 favorite prints to use and then paired them with low-volumes to make the rest of the block sets. i had one or two already cut from scraps, but needed to complete the set with more scraps. so i went digging through my scrap drawers and baskets searching for a few more scraps of the needed fabrics. instead, i found four other sets of yellow fabrics already cut. oh no! more culling of all the yellows i'd already selected. 

i tried to keep a balance of monochromatic prints and those with some touches of other colors already in the blocks i made first. i also selected which stayed based on keeping a range and balance of the yellow shades. it was a little tough!


eventually, i got my choices narrowed down and settled in to cutting and piecing. i made sets 13, 14, and 15 while d5 and i were having a sewing-and-listening session (we're on to "the emperor's ostrich" by julie berry). she's back to working on the 16-patch blocks for "pinky stinky edna," which i should be able to piece the top for pretty soon.

the next set of 16, 17, and 18 got made the next day. there are some really old pieces from my earliest quilting days in these blocks and one or two brand new ones. because i'm such a fabric nerd, i'm going to talk about them.


the butterfly print is from sandi henderson's "meadowsweet" collection, one of my all-time favorite collections. it's more than a decade old and has been used in a couple of my quilts over the years. it doesn't always work up nicely in large cuts of the fabric because it tends to not be printed perfectly straight. but it works well in this block, which makes me happy.


 the bees are from a newer heather bailey collection called "local honey." i'm working a number of bee prints into this quilt and really like this one. i had this rather odd netting print, low-volume fabric already cut for a block set, but had no idea what to pair it with. it's really rather strange. i think it works nicely with the bees, thank goodness.


this mismatched set breaks some rules and gave me quite a headache figuring out. the sprigged yellow fabric in the "road" pieces is a momo print from the "it's a hoot" collection, a last leftover from nearly the first quilt i ever made. i searched high and low for another morsel of that fabric and couldn't find a bit. i really wanted to use it in this quilt, so i kept looking. i noticed i still have two jelly rolls of the fabric line (??? i already used one, why did i buy that many?), but didn't want to take out the best fabric from the roll (that i have no plans for). but as i couldn't find any scraps anywhere else, i finally pulled the strip of this print out of one jelly roll.

but that strip isn't wide enough to make the background pieces for the block, so i paired the low-volume i used for the sprigged momo print with some pieces of heather ross's "far, far, away 3" moon print to make a set. i already had those moon pieces cut and pairing it as the other half of the momo set meant i didn't have to cut any more of it from what i have left. good enough!

most of my yellow prints for this project are very yellow, with yellow backgrounds, i have a handful like these two prints that are low-volumes with large spots of yellow. it mixes things up a bit, breaks up the hard-and-fast rules i made for the quilt.

another thought to note about cutting for crossroads blocks - if cutting a directional print from yardage, cut the strip the to the wider measurement so the print runs the correct direction. thinking to save a 1" smidge of fabric by going with the shorter cut first, i ended up with a few pieces that are not facing the way i'd like, such as the moon print. that one isn't too bad, but some others would be much more noticeable (to people like me who notice these things). it's something i noted and implemented with later cuttings.


last pair to share for now - one that's gold and bold and a softer, buttery yellow. i especially like the combination of the the sun print juxtaposed to the raindrops low-volume print in the set on the left. that's 19 & 20 of 28 complete. only 8 more to go!

Monday, July 21, 2025

mini crossroads cutting


this is a little process post about how to cut for my mini crossroads blocks (my own modified measurements) and then how i process the rest for scraps.

i've been cutting in sets of three when using fat quarters, but this time happened to be cutting just two since i was using two half yard cuts of these fabrics. the half yards are folded in half, which means i'm cutting through four layers of fabric total and each cut yields twice the pieces of each fabric


each mini crossroads block is composed of:

  • four 2" x 2.5" cut background pieces
  • one 1" center square
  • two 1" x 2.5" vertical "road" strips
  • two 1" x 2" horizontal "road" strips


arranged thusly, sewn with a 1/4" seam allowance, they make a 4" x 5" cut/3.5" x 4.5" finished block.

i am working with mostly half yard cuts of fabric, pressed and folded selvage to selvage, which measures approximately 21" across the wof (width of fabric, from selvage to selvage) in usable fabric, doubled because it has two layers from the folding. if you're using layered cuts of the same width but different length, say quarter yard or a yard, you can cut just like this. 

if you are using fat quarters, you won't have two layers of each fabric, but will have the same width. you would just need to make the initial length cut twice for each width and then cut across the two strips the same way.

this quilt will be laid out 16 blocks x 14 blocks, which equals 224 blocks total. i have 34 green fabrics so am doing sets of six blocks for each green fabric.* that means 3 blocks each of the alternating arrangements per block set. i'll need 12 background pieces, six 2" long road pieces, and six 2.5" long road pieces from each green print. (*if you're doing the maths, 6x34=204, and i need 224 blocks. i'll be making the remaining 20 blocks with the pink "capel" accent pieces i'm adding.)

let's look at how i cut my three sets of each green print for my "lemonade at sixes" mini crossroads blocks.


after pressing both half yard cuts, i lay them out on the cutting table, still folded in half, one on top of the other. i line up the folds at the top, trim the edges square, then make a single wof cut. 

i got a tip from dana knott's book "strip quilt secrets" (one of my recent reads) that when cutting multiple strips of fabric, it helps keep the fabric in alignment and avoid slippage if you overcut the total width for a few strips from the yardage first and then subcut backwards. for this set i wanted one strip 2.5" wide and one 1" wide, so i made my first cut at 3.5" from the yardage.


then i rolled the yardage out of the way to the right (i'm done with it until i put it away) and moved my ruler back an inch to the left to make the subcut to create my 2.5" strip and 1" strip from the larger cut i just made. 

i don't always remember to over cut this way, but i've been trying it and have liked it so far when i remember to do it.


now i'm going to cut the 2" length pieces from both strips. (it's getting confusing with differentiating the widths and lengths of these pieces. i'll try to stick to one name for each measurement. the width is the width of the initial strip i cut, the length will be the next cuts i make.)


i left the wof 1" wide strip and 2.5" wide strip together, so i can cut all pieces of the same lengths together. i first cut 3 sets of background pieces and shorter "road" strips, which will both be 2" long, at the same time. the fabrics are folded in half, so i am getting double the amount of pieces from each cut i make. i need 4 background pieces for each block x 3 blocks, which means i need to make this cut 6 times for the backgrounds. i need half as many for the "road" pieces, so i'll be pulling that fabric away after the first 3 cuts.


after the first 3 cuts at 2" long, i separate the two strips widths because they will now be cut differently. i need 3 pairs of 1" x 2.5" "road" pieces for the blocks, so i cut those from the 1" strip.


i still need 3 more pairs of the 2" x 2.5" background pieces, so i cut them from the 2.5" wide strip. 


now i have all the pieces i need for 3 mini crossroads blocks in each setting for my 6 block set.

i still have fabric left! let's make usable scraps

i always begin cutting from strips at the cut end vs. the folded edge. this way i have one continuous piece of fabric left at the end instead of two identical smaller pieces. i just find the longer piece to be more versatile than two short ones (unless they're going to be exactly a useful size). once i'm done with all the needed cutting, i unfold and press open the leftovers at the end.

i had about 3" left of the 1" wide piece, which went straight into the 1" colored print scrap drawer.

there was approximately 10.5" remaining of the 2.5" wide strip.


from that i cut 2 - 2.5"x4.5" pieces of both fabrics for my scrappy "bonnie lass" project. i opened up what was left at the end, which i trimmed a smidge to a 2.5" square of each fabric.


these are my cuts from the 2.5" and 1" wide wof strips:

  • 3 sets of background pieces for mini crossroads blocks
  • 3 sets of "road" pieces for mini crossroads blocks
  • 1 each ~3"x1" scrap
  • 2 each 2.5"x4.5" bonnie lass pieces


the pieces for the large "bonnie lass" blocks go in that project's basket, conveniently sitting next to my cutting table.


the 2.5" squares go in the 2.5" colored prints scrap drawer, also conveniently next to my cutting table.

that's my cutting wrapped! time to get some blocks pieced now. i already cut several dozen blocks' worth of the pink center squares and the limeade pieces for mini crossroads blocks, so as soon as i cut new printed fabrics, i am able to sit down and get sewing.


i keep all the cut pieces next to the machine with the grey thread on it and if i'm not piecing this project specifically, i use them for leaders-and-enders on my other projects. 

since i like having multiple projects on the go at once, and i like scrap quilts, all this cutting with bonus scraps and pre-prepped pieces for block construction or leaders-and-enders fits right into my preferred mode of operation, which is to have lots of options for whatever whim i get when it's my sewing time. 

one stitch at a time all these pieces will become quilts.

Saturday, July 19, 2025

busy bee


my early morning sewing sessions are becoming a necessary, non-negotiable part of my day. as unpleasant as the summer heat is, being home with my people and my projects is making me happy. i'm enjoying all the sewing immensely, and having multiple projects to pick and choose from each morning is another pleasure in itself.

each day when i walk into the room i have the fun of selecting what to work on. i also take time to declutter, clean, and organize most days. sometimes i just fold fabric for an hour. my decision is made based on what appeals to me at the moment or what will make my space better. there's no slogging through just one project until it's finished. i get to decide what looks fun now or which set of fabrics i want to spend time with today. i realize there are pros and cons to this approach, just as there are pros and cons to sticking to one project, start to finish. but my method appeals to me and fits my personality best.

i have several projects i'm itching to move beyond the piecing phase, some very old and some brand new. my sunny yellow crossroads project is one of them. this morning i noticed a large scrap piece of a low-volume fabric sitting next to my pressing board. i decided to cut it for scraps, starting with my crossroads project. i wasn't sure if i'd already used it for that one or not, so i pulled out my project box to see. nope, not used yet, so i cut the needed pieces and added them to the box. while in there, i took stock of the project. it needs 16 more pairs of blocks for a top. good to know; i'll be getting to that soon.

the leftovers were just the right size for cutting into pieces for my two "bonnie lass" projects, which i did next. thanks to my new scrap system, they got filed away in the right spots immediately. 


the smaller set lives in this clear bin that stays next to my cutting table or sits next to the sewing machine when i want to use it for leaders-and-enders. there's a lot of pieces here already. it could likely be a whole top soon.

that little bit of processing done, i decided my main project for today would be making binding for my liberty courthouse steps quilt that's for my friend. i got that all quilted up this spring and want to finish it off so i can finally gift it.


making the binding roll went smoothly. my normal hour was about up and i was going to leave the room when i decided to go ahead and press the next set of fabrics for "lemonade at sixes." the iron was on and hot, so i'd just quickly press the fabrics and move on with my day.


but i ended up cutting the set once it was pressed. and then i processed the leftovers for scraps. i actually only did two of the fabrics that were both half yard cuts because the third fabric in the set was a long skinny piece from the ds patchwork panel 6 and couldn't be cut with the other two. i made photo notes of my cutting process for the pieces and the scraps, which i'll share in another post.


aaaaand, i also decided to cut the "capel" pieces i want to use for random pink touches in "lemonade at sixes," as well. i was on a bit of a cutting and pressing roll, so i just did it. i had similarly-sized, generously cut quarter yards of these 3 colors, so was able to cut them together.

i still don't know how i'm working them into the project, exactly, but i was thinking of using them as the skinny "road" pieces in a few spots of the mini crossroads blocks. those all measure 1" x 2" or 2.5", and i only need a few pieces of each. it felt wasteful to cut 1" wide strips of each color, so i cut standard 2.5" wide strips and will cut off 1" pieces from there as needed.

each of the fabric pieces was at least 10" x wof, so i went ahead and cut them all into 2.5" strips because i will use that size for other liberty + chambray projects. i filed them away in the liberty scrap drawers once cut. it feels like i've got a head start on whatever future project i use them in.

Wednesday, July 16, 2025

my hst child


my early-morning, post-vacation sewing time after my pinwheels stalled out has been mostly joining up my hsts for this "gypsy child hst quilt," which is taking a bit of time. i laid out these pieces for the 4th row of 16-patch blocks (how i've chosen to join the bajillion little hsts i've made for this project) months ago. last week i got the urge to start piecing them. it makes for some pretty simple piecing, but it's not mindless in the least. i have to pay close attention to what i'm doing.

i went to the trouble of laying them out in an elaborate fabric sudoku session, so i'm trying hard to keep everything in place. this is all a bit overboard for such a scrappy quilt, but that's me all over.

i've been taking the photo on my phone with me to my machine and setting it up in front of me by the pieces. then i refer to it as i sew, always double checking myself. of course i've managed to flip one or two bits, but in general i've done quite well at following my placement.
 

i have pieces for "lemonade at sixes" just next to the machine, which i'm using as leaders-and-enders for the hst blocks. the hsts are sitting above the machine in their rows and my phone, open to the photo, is placed just to the left of them on the cutting mat, propped against the other machine. the last pieces for "groovy liberty" pinwheels are also nearby (waiting on one more fabric to arrive). so many pretty pieces around make me happy and brighten the sewing space for me.

i have all the 16-patch blocks put together now and need to join them to complete the row. thank goodness i detailed my process for how i was laying out the pieces in january because it's time to do the next row. this one puts me more than halfway there. i want this done!

although i must admit i'm second-guessing the project a little. it's based off a single 16-patch block i made for my gypsy wife quilt, which i thought would make a good whole quilt. but now i'm wondering if it's a bit boring, all the millions of hsts set in a basic patchwork layout? like, maybe i should have done a diamond pattern with them or something more dynamic? i don't know. i love all the pieces in here; they make me so happy together. but will i like the sea of them laid out this way in the end? only the finish will tell, i guess. and then i'll know one more thing about me as a quilter and about my tastes.

in the meantime, looking at the individual pieces is quite pleasurable as i go.

Monday, July 14, 2025

pinwheels in process


when i nixed my original idea for a black "capel" sashing for "groovy liberty," i needed to come up with an alternative. i dug around in my stash and found this awful grunge (moda cross weave woven) i am using for a different, old stalled project called "emilia's sampler trip," or something. it's from my "instagram-not-blogging" era, so it's probably not even on the blog anywhere. anyways, this grunge fabric is here in my stash because of that project. 

i tried some of the other chambrays i have on hand as a sashing, but didn't like the effect with any of them. my eye fell on this grunge because it's light and neutral. i think it will blend well enough and not call too much attention to itself.


this is a look at the grunge as sashing. i want sashing to slightly enlarge the quilt and to separate the blocks so the pinwheels don't get lost in the secondary pattern when they're laid next to each other.

i really do think this fabric is horrible on its own, but it works for some things. it has a retro vibe to it that i think works nicely with the groovy prints i picked for this quilt. it just goes to show you can dislike a fabric in general but it has its place. some fabrics spark joy all on their own, and some are useful to make others shine.


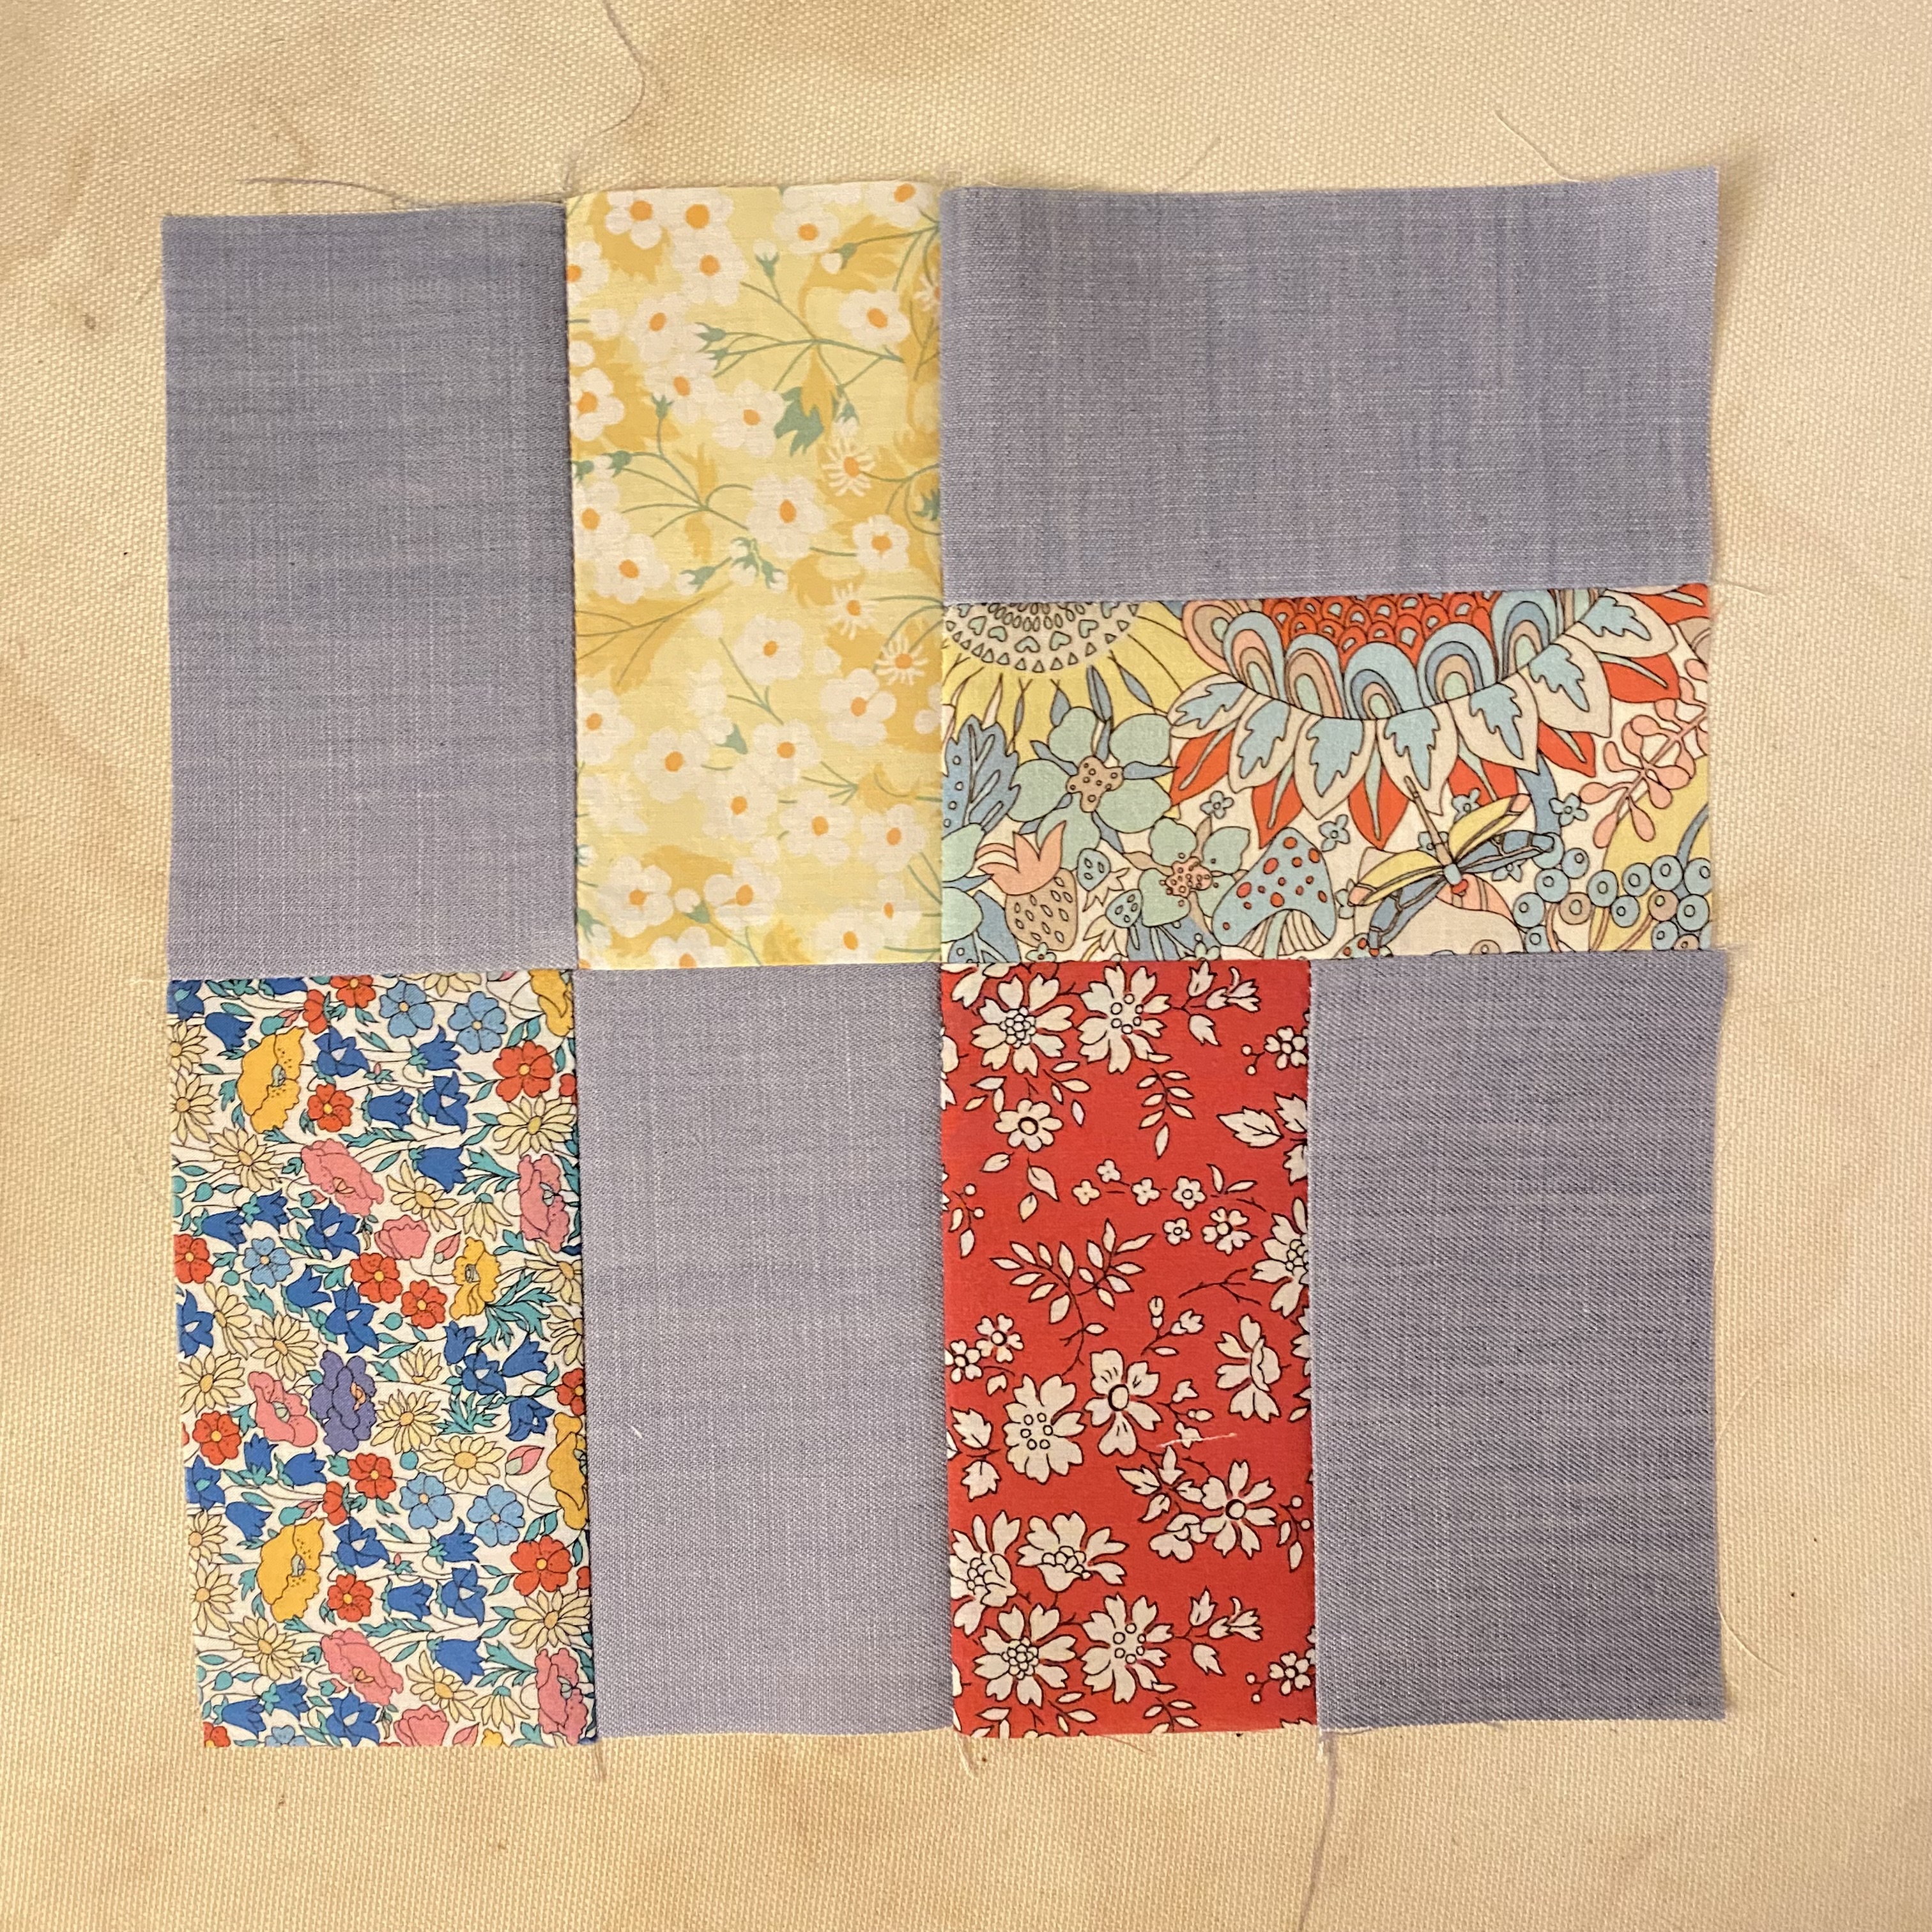
these are the blocks togther. which is fine, just not what i want. i want to see my pinwheels as pinwheels this time.


something i have completed for this project - the next two sets of blocks. i got all the ones i turned around fixed and then put these next two sets together. i am really happy with both of these. they definitely have the vibe i wanted for my "groovy liberty."

somewhere along the way i realized i had my maths wrong. how many times have i said that recently? this time was extra bad - apparently i can't even do the most basic math anymore. i was making 8 blocks each of the 6 sets. when you need 42 blocks in 6 different sets, that's SEVEN blocks of each type, not 8. maybe i was originally going for 48 blocks before i realized i didn't have enough chambray for that? i don't know. all i do know is it took me way too long to recognize my mistake, resulting in me unpicking one block of each set so i could make my last sets.


here's a look at my selections for this wild and groovy tana lawn (can't remember the name at the moment). it's mostly pastel with red mixed in. i got more than enough pieces i needed from one wof x 2.5" strip i cut from my liberty piece, so i was able to be choosy about which to use. i picked the pieces ith the most red in them, the ones with the large flower pieces in them (on the left). you can see they have a slightly different impact and feel than the more tame pieces to the right. the extras go in the scrap bins for the next project.


this is a crummy studio lighting photo taken in the early morning before the sun came up, but i was having a blissful moment with the yellow "mitsi" pieces and had to snap this. "mitsi" was the first liberty print i warmed up to. (yes, i didn't always like liberty.) the yellow, which i originally used in "beauty for ashes," is unusual for liberty and such a pretty piece. that was my sunshine on this morning before the sunshine came along. 


once i have all the 2-piece units together and know my layout for the pinwheel, i can zip through piecing the blocks pretty quickly. i lay them out on the side of my machine table and put them together in order, chain piecing the whole set.

it's simple - flip the piece on the right over on top of the piece on the left, stitch. do the same for the bottom set of the block.


i clip the pairs apart when they're all done, and i have sets like this. i press the top open tot he right and the bottom set open to the left, which gives me a nesting pair. no need to clip the joining string between them.


somehow i still managed to do this once. oh, boy. i guess i wouldn't be me if i didn't. thank heavens for unpicking (aka: sewing repentance). it can be fixed.


i was really excited to get the last set of (7, not 8) blocks done. all i had left to do before joining the blocks was cut this piece of liberty "over the hills." this is one of those pieces that looked a little different when i came than i was expecting. the scale was a lot larger than i thought, so the pattern doesn't show up much in these 2.5" x 4.5" cut pieces. it 100% has the right look and i can live with the scale.

the problem was the colors (which were as i expected). i decided i could use some pastels even though i really wanted brights. but this piece has brown in it, which i haven't used anywhere else in the quilt. i thought it was okay. i went through the process of cutting and selecting the best pieces.


i liked the pieces with the stripey bits in them the best. but all the brown was a problem.

if you look at my sample pieces in the top photos of all the blocks laid out on the sashing fabric, you're probably thinking, "this looks fine? what are you worried about?" and in the photo (now) it does look pretty alright. but those browns, especially, were catching my eye in a bad way. the print style was right, the colors just weren't. the block in general was just too light and pastel. it needs something to balance the red more.

so i went on yet another internet hunt just once more. this time i went international and found some pieces i like from alice caroline across the pond. when they arrive, i should finally get this one squared away! i actually found more than one print in the right style and colors that looks like it will work. it makes me rethink the very first blocks set i did that has more traditional/less groovy pieces in it. 

but that would be so much more unpicking and i'm not into unnecessary unpicking for the sake of unpicking. that would probably be overboard. we'll make that decision when the fabric arrives and i decide i can't live without one or i can.