welcome to the 500th post on splish splash stash sewing blog!
i've been meaning to make a tutorial for my stella grande quilt pattern for ages now. i began it last november when i made my 13th stella grande quilt and have finally found time to finish it, realizing as i published it that this is my 500th post. what a way to celebrate 500 posts!
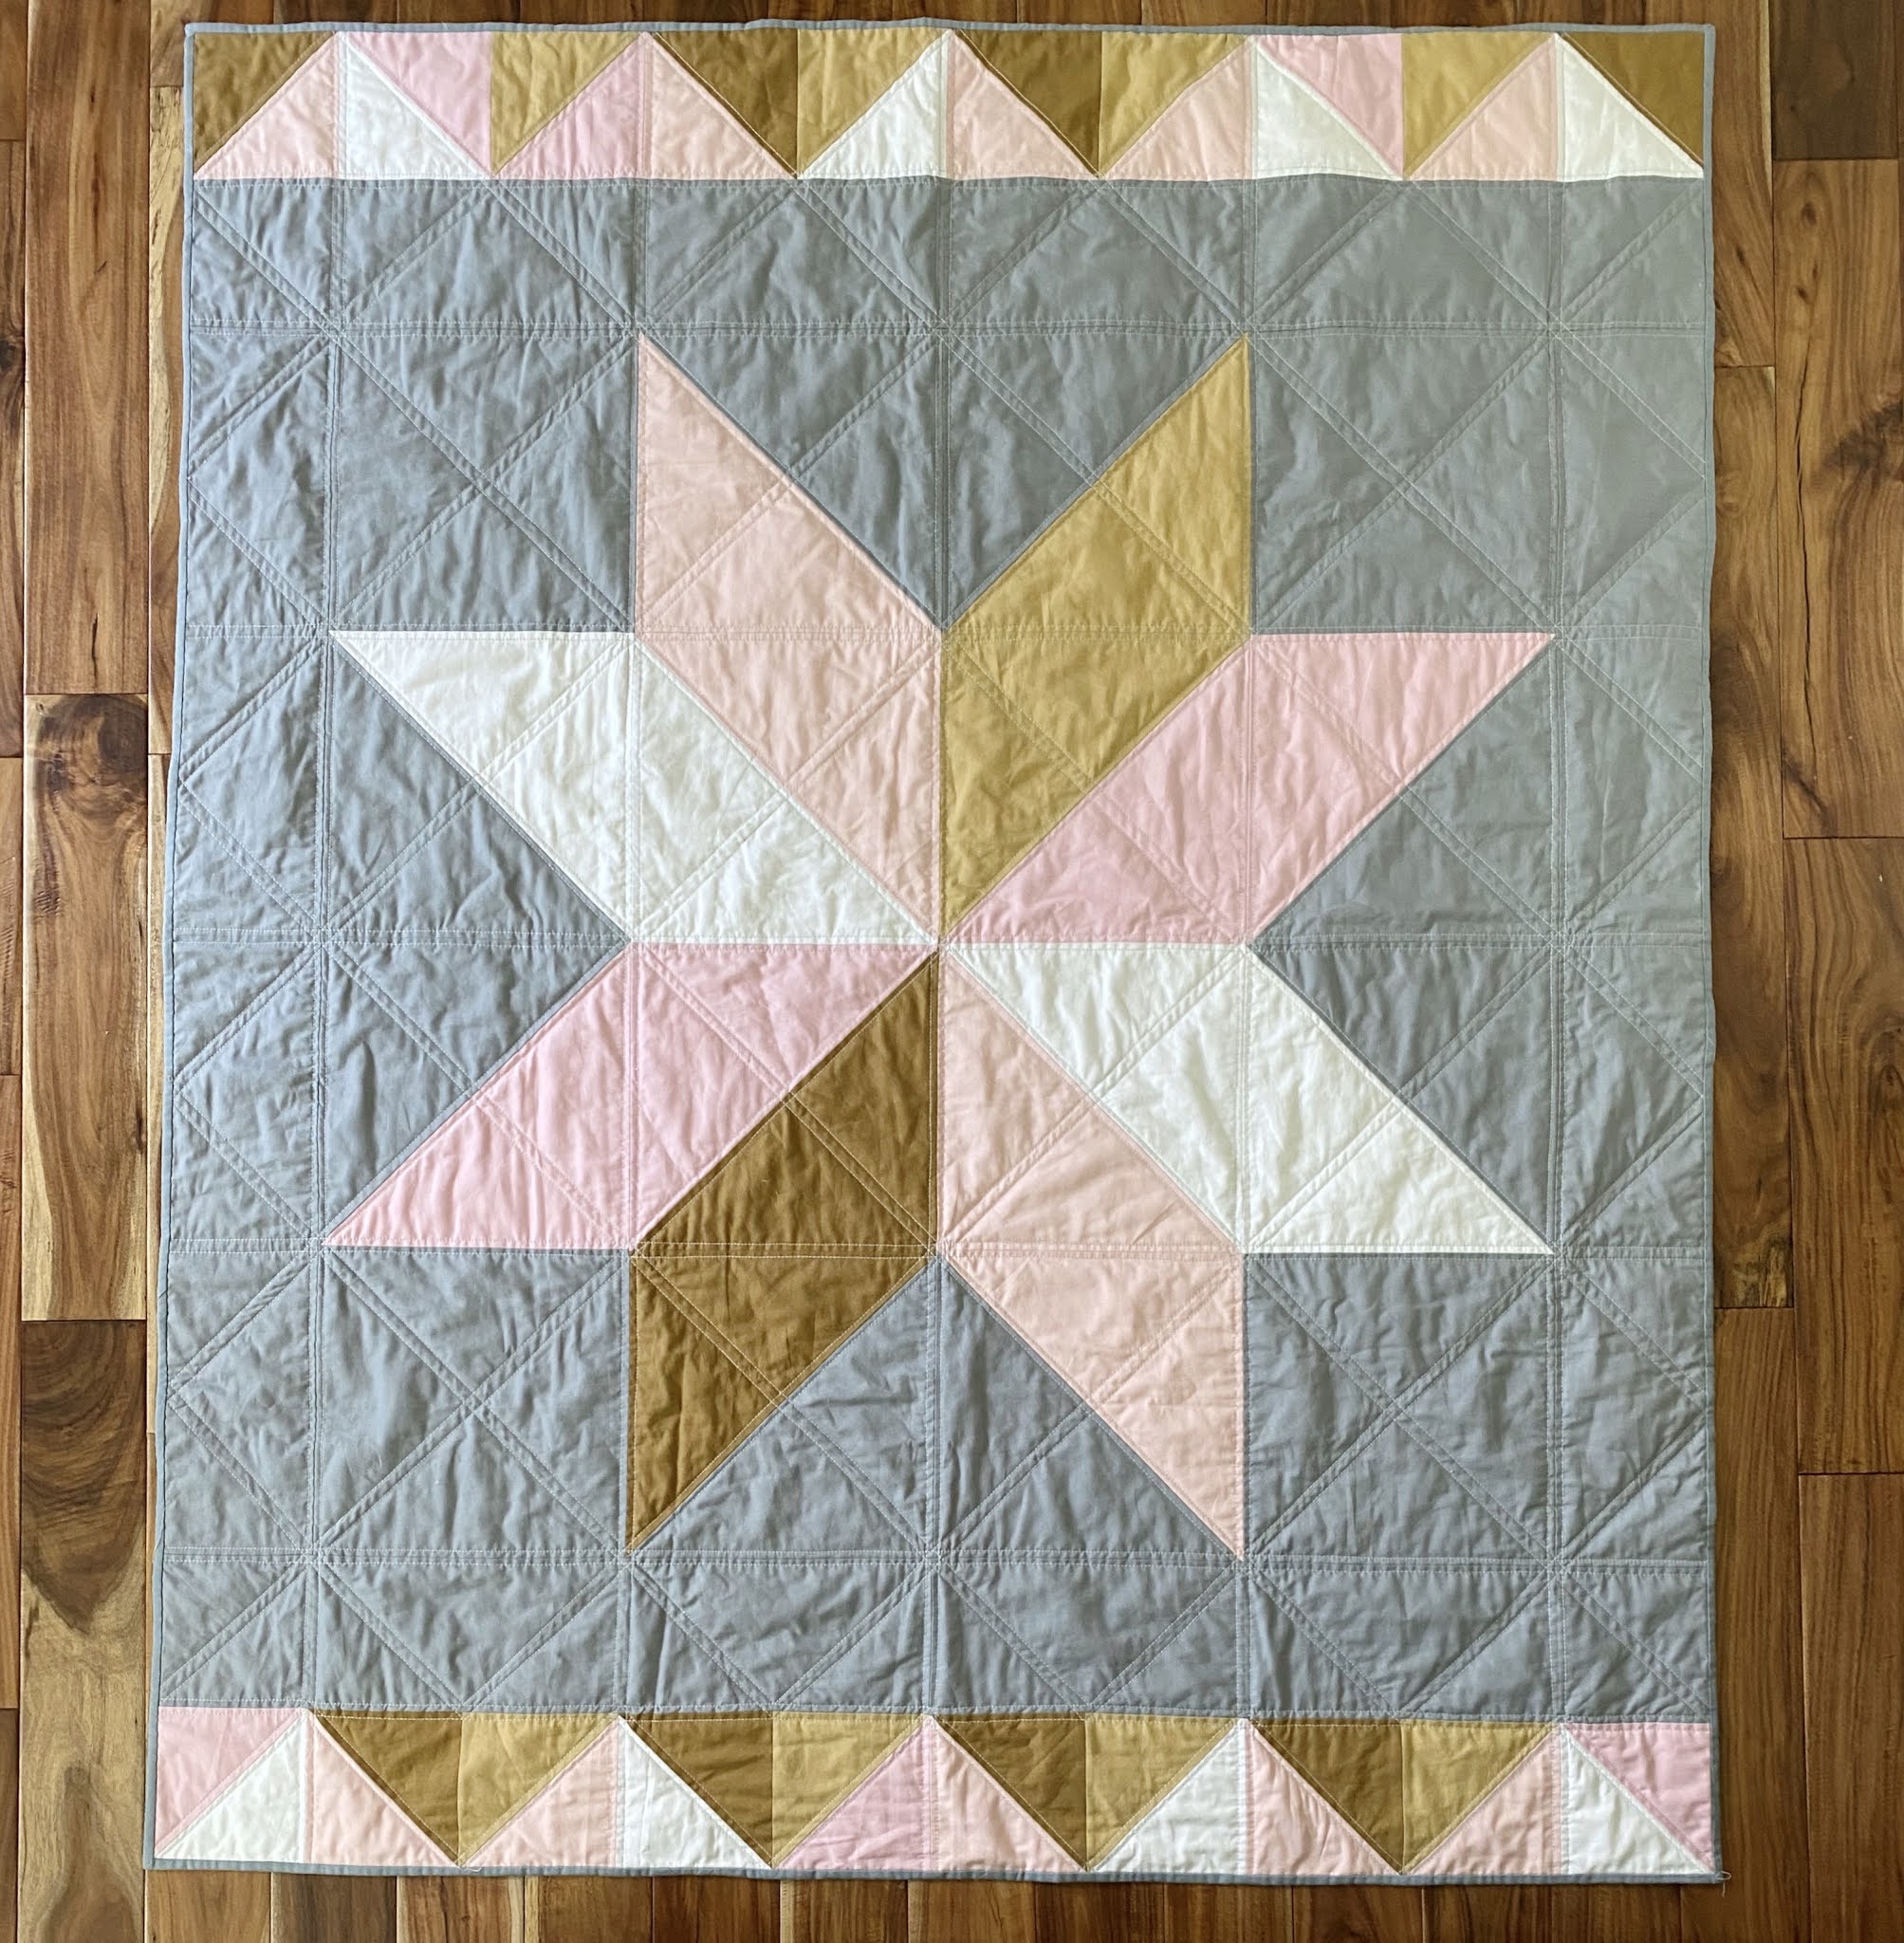
a stella grande (large star) quilt is essentially one giant, 8-point star on a colored field (background) with pieced borders on top and bottom. it measured 60"x72" for a generous lap sized quilt.
- one, two, or more background colors;
- two, four, six, eight, or more star colors;
- all solid fabrics, all printed fabrics, or a combination;
- pinwheel format(s), blade format, heart(ish)/ribbon format, random format;
- there are accents like strips and extra points that can be added to the star;
- and the border treatments are endless: hst (orderly or mixed), squares, flying geese, strips, combinations, etc.
it's truly quite versatile.
i've personally now made
13 versions and each is distinct.
this particular stella is going to be called "frosted forest star" as the palette evokes the feel of winter greens, snow, and frosty skies. this will be a single background, four color star version of the quilt in a "blade" format layout with a mixed hst border.
dimensions
this is a 60" w x 72" h generously-sized lap quilt, composed of:
- a central medallion star made of 16 - 12" finished blocks (8 hsts and 4 solid background)
- a 6" finished background border surrounding the central medallion
- a 6" finished high by 60" finished wide border on top and bottom
*note - finished measurements are after a block is sewn to its neighboring pieces and how it appears in the quilt. the unfinished/cut size of any block will always be 1/2" larger in width and height. for example: a 6.5" unfinished/cut block will be 6" finished.
a four color star can be arranged in several ways, not just in the blade format. any of these arrangements can be achieved from the following fabric requirements and the same hsts.
fabric requirements
this version of the quilt top features:
- one background color
- four star colors
- 6" hst border of the four star colors
other versions of the quilt will naturally require different amounts of fabric to cut from. (i hope to someday work those up, too, but this is the base to work from for now.) if you're handy with quilt math, here's a hint: you will need a minimum of 14" x
wof for each color you pick. a two color star would require more yardage, but for anything that's six colors or more, i know i can get what i need out of 1/2 yard for each star color, which is what i usually purchase to be on the safe side. a fat quarter (18"x21") would accommodate only 1 - 13.25" square for making the star
hsts and a few 7" squares for the borders. i talk some about how i cut and assembled the
hsts for an eight color quilt in this post
here.
the following fabric requirements are for a 4-color version and the quilt top only. you will need more for the quilt backing (approximately 4.5 yards) and binding (half yard).
yardage for each color:
- background (kona aqua 1005) - 2 yards
- four star colors (kona gecko 1843, avocado 1451, white 1387, lighthouse 1847) - 21" x width of fabric (wof) each
*note - 21" is not a standard width cut, so when purchasing you will need at least a 3/4yd cut, if you can get it, or a full yard if not. there will be scraps. (yay! i love scraps - pieces for the backing, inspiration for another project, or supplements to the scrap basket for who knows what.)
cutting
from your yardage, you will cut the following:
background:
- 4 - 13.25" squares for hsts
- 4 - 12.5" squares for medallion corners
- 5 - 6.5" x wof strips for background border
- 2 - 6.5" x 12.5" strips for background border
each star color:
- 2 - 13.25" squares for star hsts
- 5 - 7" squares for border hsts
if you are an experienced quilter, you can skip the details. you beginners, read on.
when making
hsts, especially large ones, which tend to be more fiddly, i prefer to overcut and trim. normally, the unfinished squares i start with measure 1"sq larger than the finished
hst i desire. that's why the squares for the 6" finished border
hst units are cut at 7" here. however, i find that with the large
hsts i need just a little more wiggle room, so i add 1.25" to the desired finish size when cutting the squares. therefore, to make 12" finished
hsts, i am cutting my squares at 13.25". just an 1/8th of an inch would do, but i don't like cutting by 1/8ths. adjust if you'd like.
there are two ways to cut the star colors. choose one based on the size of scraps you might prefer to have leftover. they are really quite similar.
for both versions, start by pressing your fabrics flat, then folding in half by matching the selvages together and squaring up the fabric. (tutorial for squaring up fabric
here.)
when squared, remove selvages. you should have about 21" from fold to selvage edge after cutting off the selvage, giving you 42" usable wof. with these solids, i cut my selvage quite closely, so i ended up with 22" from selvage to fold, 44" usable wof.
**note - i have been saying width of fabric (wof) to indicate the selvage to selvage/vertical length of the fabric as oriented if you are standing with the selvage edge in front of you. do not get confused because i am now going to start calling the other edge-to-edge/horizontal length the "width" when telling you to cut the fabric perpendicular to the fold. just follow the photos and you should be fine!
since you are cutting fabric folded selvage to selvage, you will be getting two pieces of each cut you make (except when you are instructed to unfold for only one piece).
star pieces
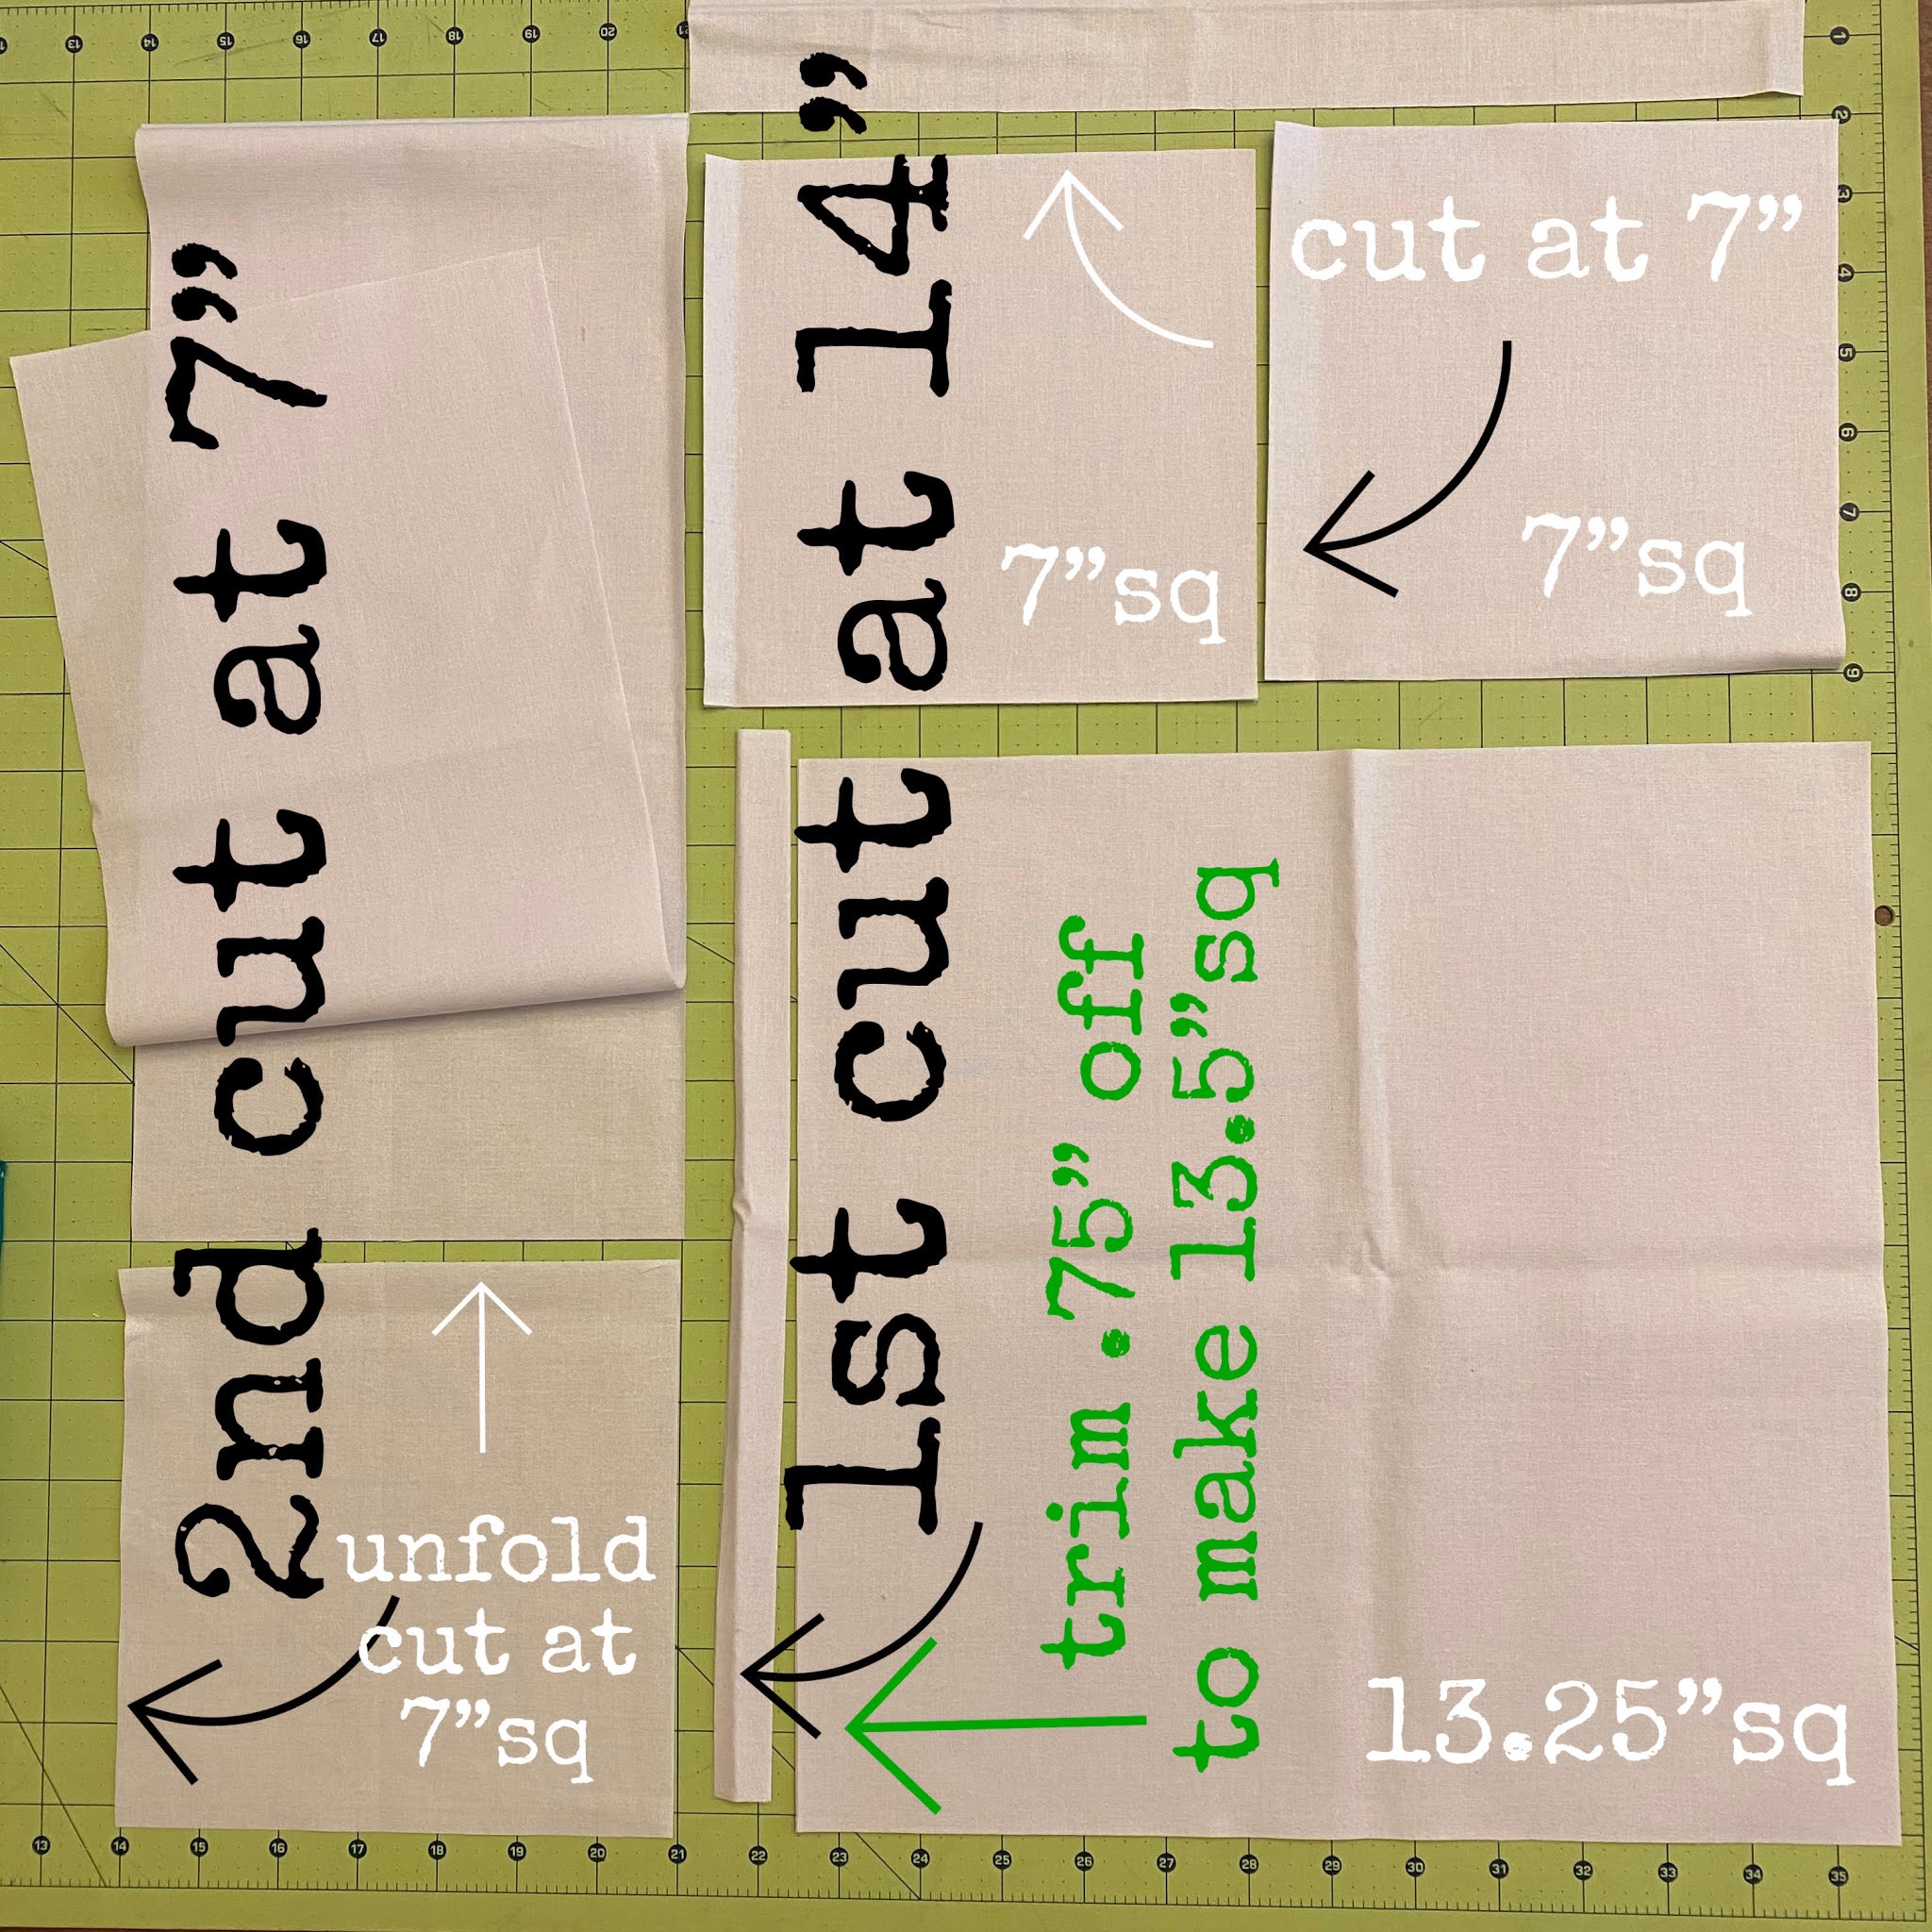
cutting method 1 - gives you leftovers of one large 13.5" by 16"ish piece and an approximately 7"x9" piece
- cut from selvage to fold/vertically, 13.25" wide** (see note above)
- make the next cut along the vertical length at 7" and remove any excess fabric
- from the 13.25" wide strip, cut horizontally at 13.25" long to create a 13.25" square (two, actually, because there are two layers, remember?) for star hsts
- with the 7" wide strip still folded, cut two sets of 7"squares for border hsts from the lower end
- unfold the remaining 7'' strip and cut one more 7" square (for a total of 5) for border hsts
- scrap the two remaining pieces
cutting method 2 - gives you leftovers of a longer 7" strip, one small throw away .75" piece, and a little 13.25" piece
- make a 14" vertical cut from fold to selvage edge
- make a 7" vertical cut from fold to selvage, remove leftovers
- on the 14" wide strip, make a 13.25" horizontal cut
- trim .75" off the the resulting piece, creating your two 13.25" squares for star hsts
- make another horizontal cut at 7", creating a 14"x7" rectangle
- cut the rectangle in two, creating 4 - 7" squares for border hsts
- scrap the piece left at the top
- on the 7" x wof piece, unfold and cut one 7" square for border hsts
border pieces
i do not enjoy cutting from pieces that are longer than my cutting space, but most every piece of this 2 yard cut is going to be used, so just manage the best you can. i found i had to keep shifting over the fabric into my available space and resquare a little each time i did. i'll be working in batches here because of the available space on my cutting mat. it is a yard long, but i've got several other projects sitting on about 1/3 of the left side. #toomanywips
press, square, and remove selvages from the available fabric that fits on the cutting space.
batch 1, cut 3 - 13.25" squares
- make a vertical cut from selvage edge to fold at 13.25" wide
- cut on the horizontal axis at 13.25", creating two 13.25" squares for the star hsts
- unfold the top piece and create another 13.25" square for the star hsts
- scrap the excess
batch 2, cut 1 - 13.25" square and 2 - 12.5" squares
we're going to start with a little bit of overcutting again because it's just the easiest way to go sometimes, especially when trying to maximize getting several different sizes out of one piece.
- start by cutting at the 13.25" vertical mark
- cut at the 13.25" horizontal mark, creating 2 - 13.25" squares
- place one with the other three for star hsts, and trim the 2nd square to 12.5" for a medallion corner
- unfold and make another 12.5" square for medallion corners
- discard trim pieces, scrap 4.5" x 12.5" leftover strip
, cut 2 - 12.5" squares and 2 - 6.5" x 12.5" strips
- make the vertical cut at 12.5"
- cut at 12.5" on the horizontal, creating 2 - 12.5" squares for medallion corners
- cut at 6.5" on the horizontal, creating 2 - 12.5" x 6.5" for background border strips
batch 4, cut 5 strips 6.5" wide by the entire width of fabric, from selvage to fold. these are for your background borders around the star medallion.
piecing hsts
divide the squares and make pairs for your
hsts. you will need:
- one of each star color paired with a background square (these make the star points)
- four sets of star colors paired together (these make the center of the star)
- all 7" border squares paired
the star colors you pair together will be next to each other in the center of the star and in the border. i chose to pair mine with one dark and one light color per pair so they would alternate this way in my star and border.
line the pairs up, right sides together. (when using solid fabrics, the right side is arbitrary. but if you are using a print, this is important.)
now, time to make our hsts
these can be made in batches by doing each step for all pairs at once.
variation note - if you are using more than 4 colors, you will have to cut the triangles before you piece some of the hsts. figure out which color combinations you might need two identical hsts for and use thie follwoing method for those. if you only want one hst of a certain combination, you will need to cut the triangles from the square before you sew.
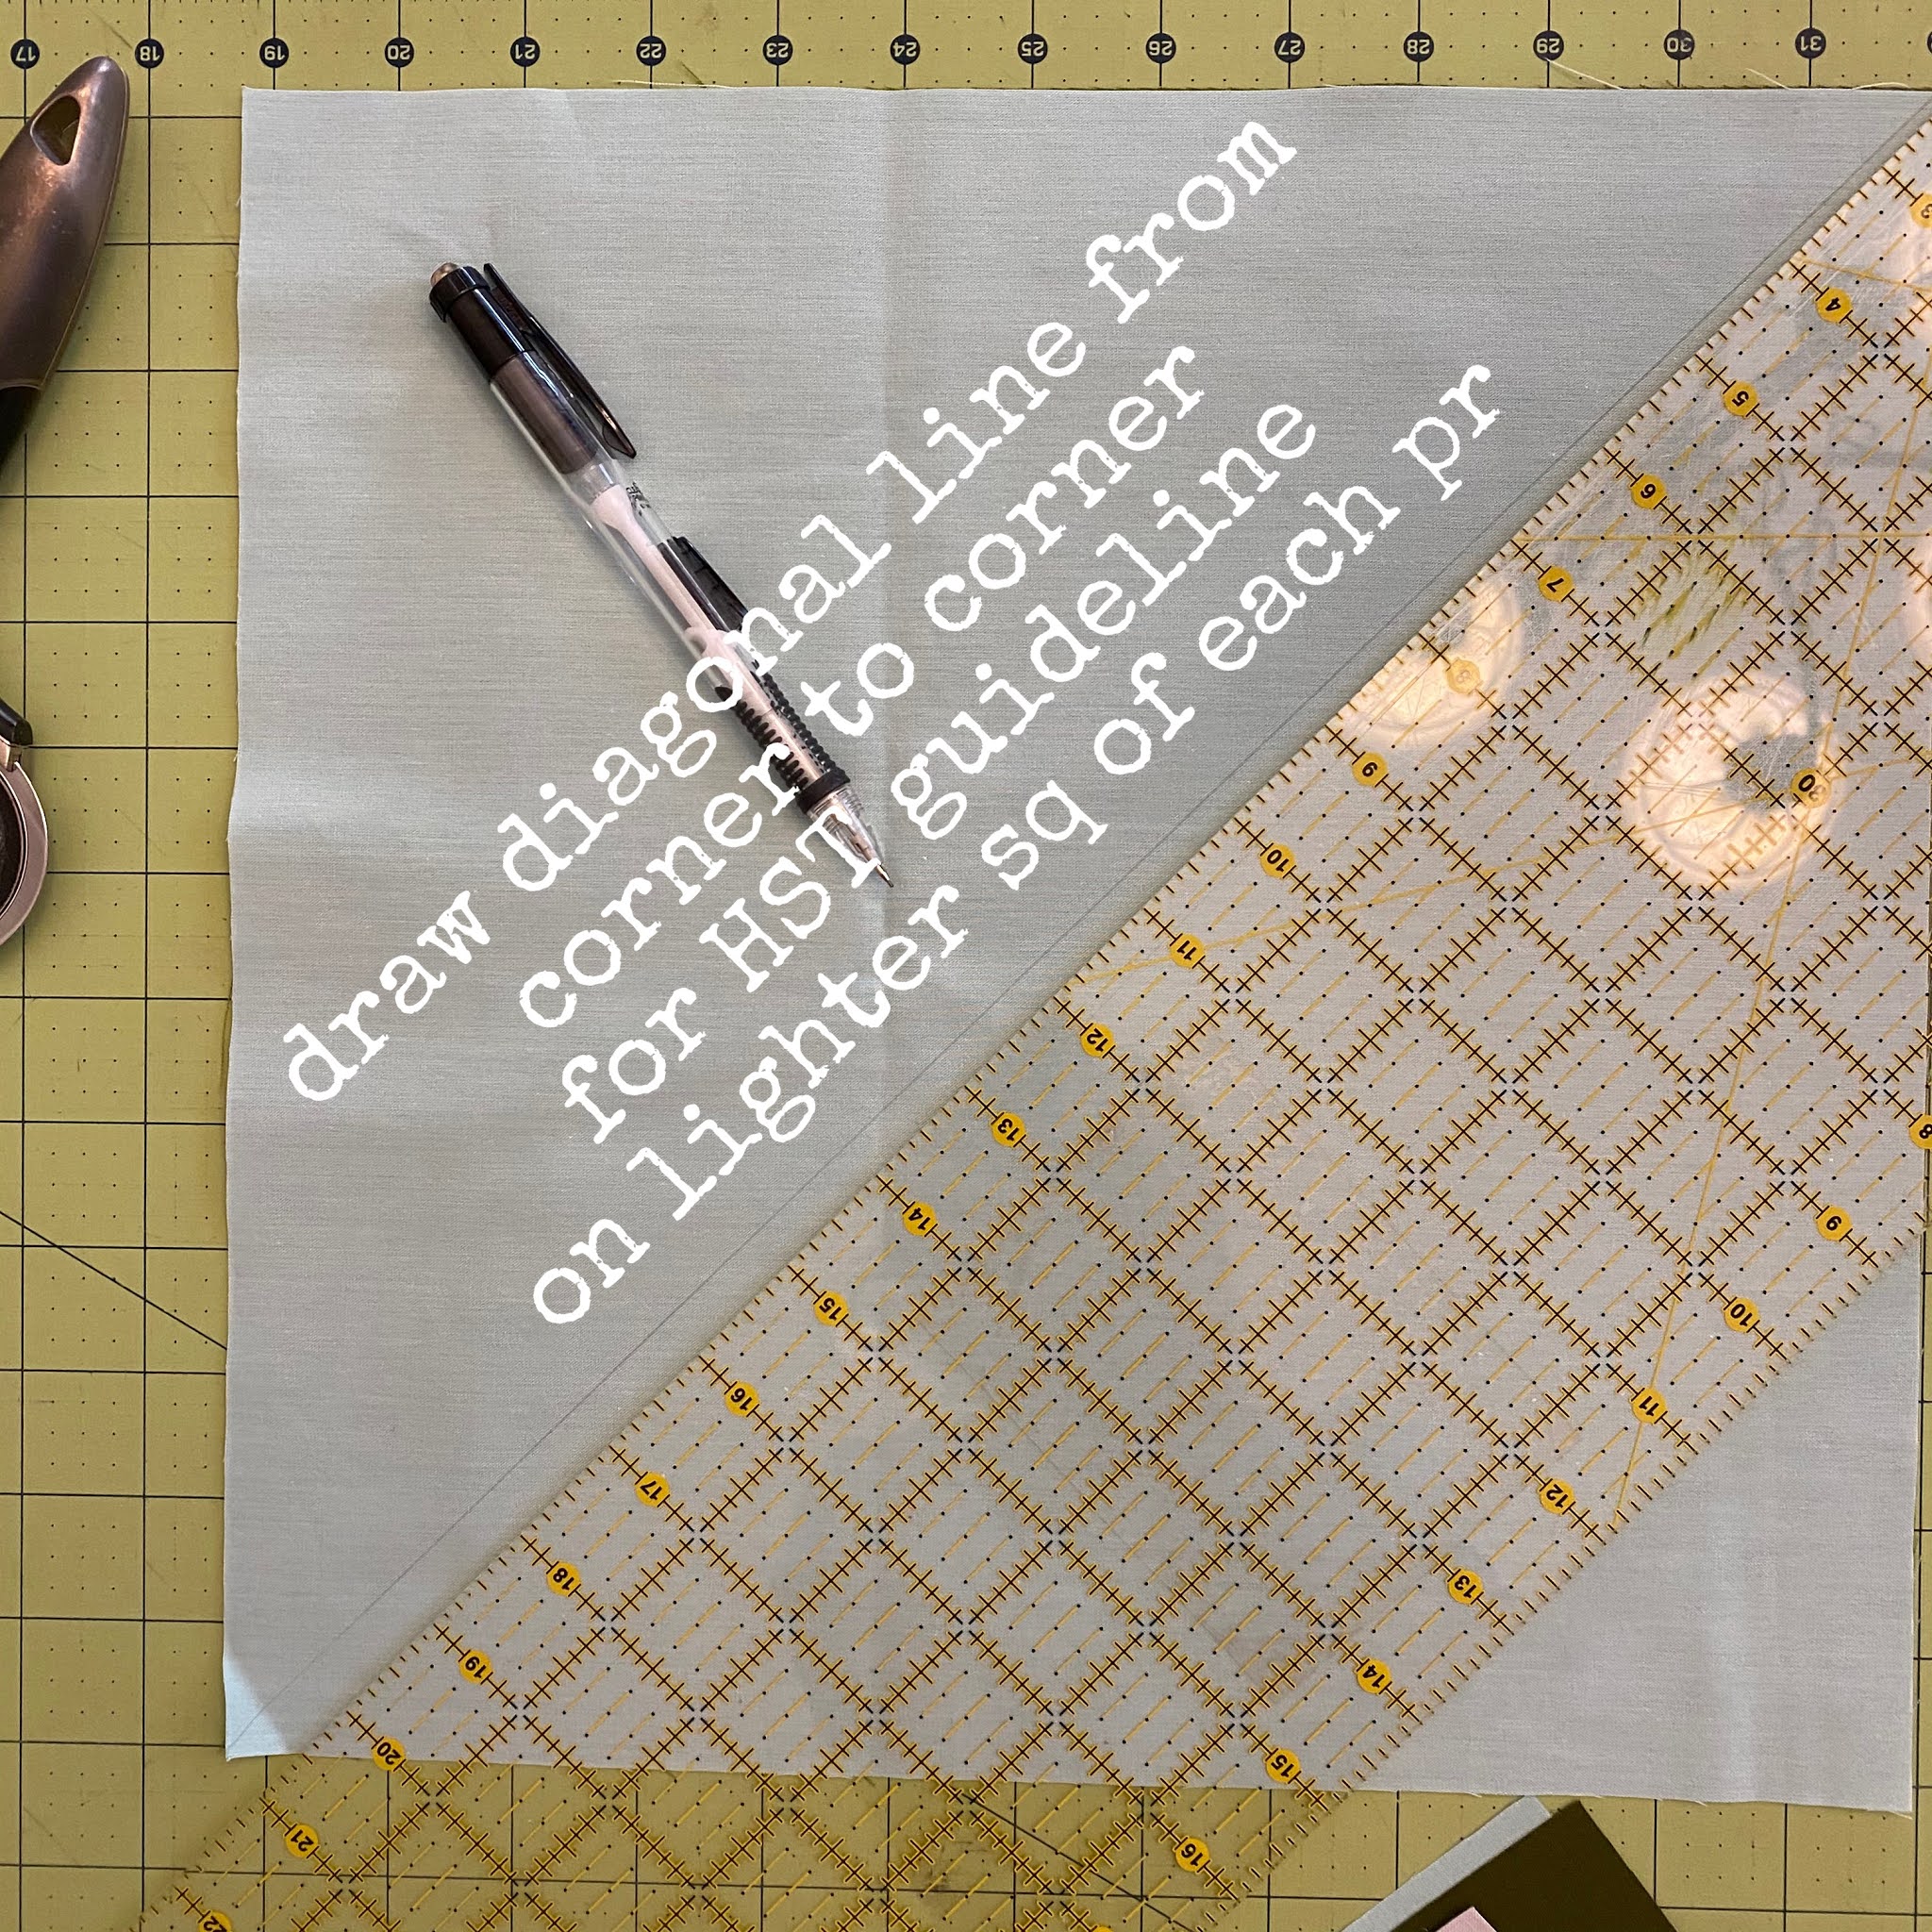
begin by marking the backside of the lighter square from the pair. draw a diagonal line from one corner to the opposite corner using your favorite marking medium. (i like just a regular graphite mechanical pencil. if there's no chance of the mark being seen, this works just fine. it gets cut here anyway.)
mark all pairs so you can chain piece them at one time.
sew 1/4" seam down the left side of the marked diagonal line. making a few stitches after you complete one square, put the next square in place and sew it without cutting thread in between. this is chain piecing, which will use less thread and save time. once all the squares are sewn, cut the thread and snip the pairs apart.
now flip the squares around and make an identical 1/4" seam along the other side of the marked diagonal line. chain piece all squares as you did the first time, and snip apart.
give each square a quick press to flatten it them before you cut apart.
if you check your seams under rulers, you should see them 1/4" away from the center marked diagonal line on each side.
line up the ruler to be 1/4" over the seam on the left side and cut your
hsts apart.
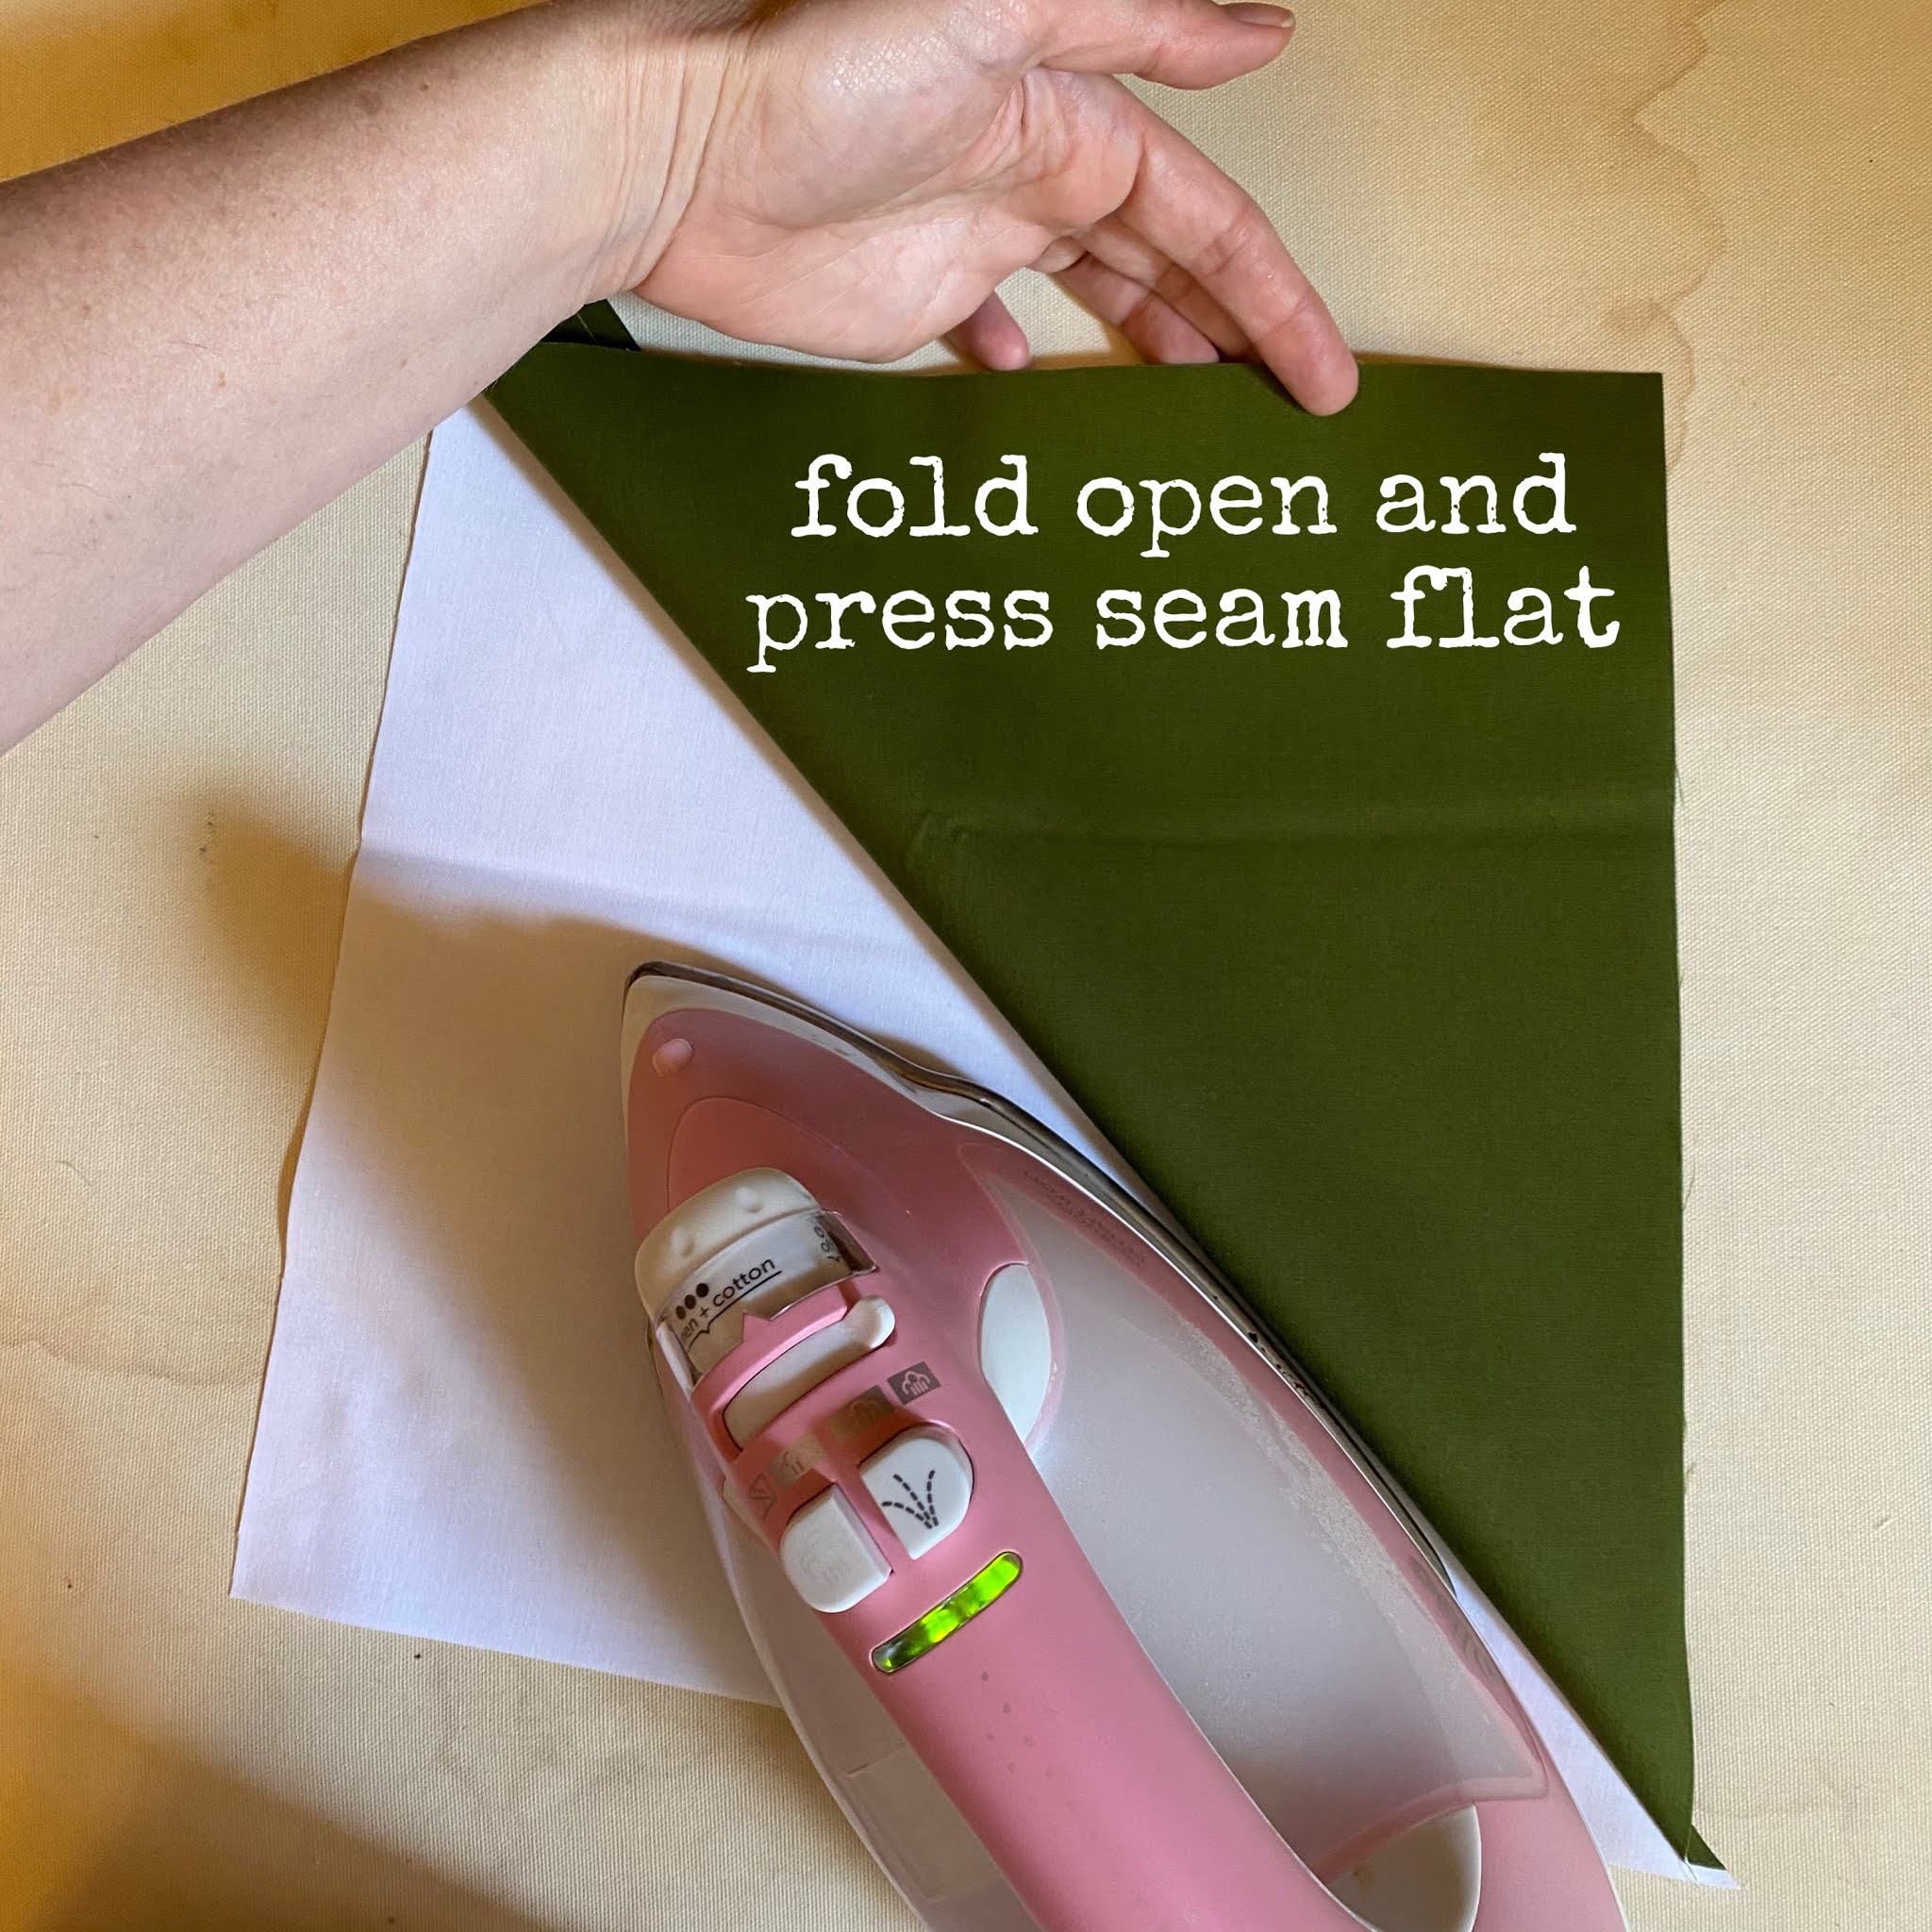
once all squares are cut apart, turn the darker fabric to the top side for pressing your
hsts open.
start by warming the seam for a few seconds with the iron.
fold the top triangle up, opening the block, and press the seam open.
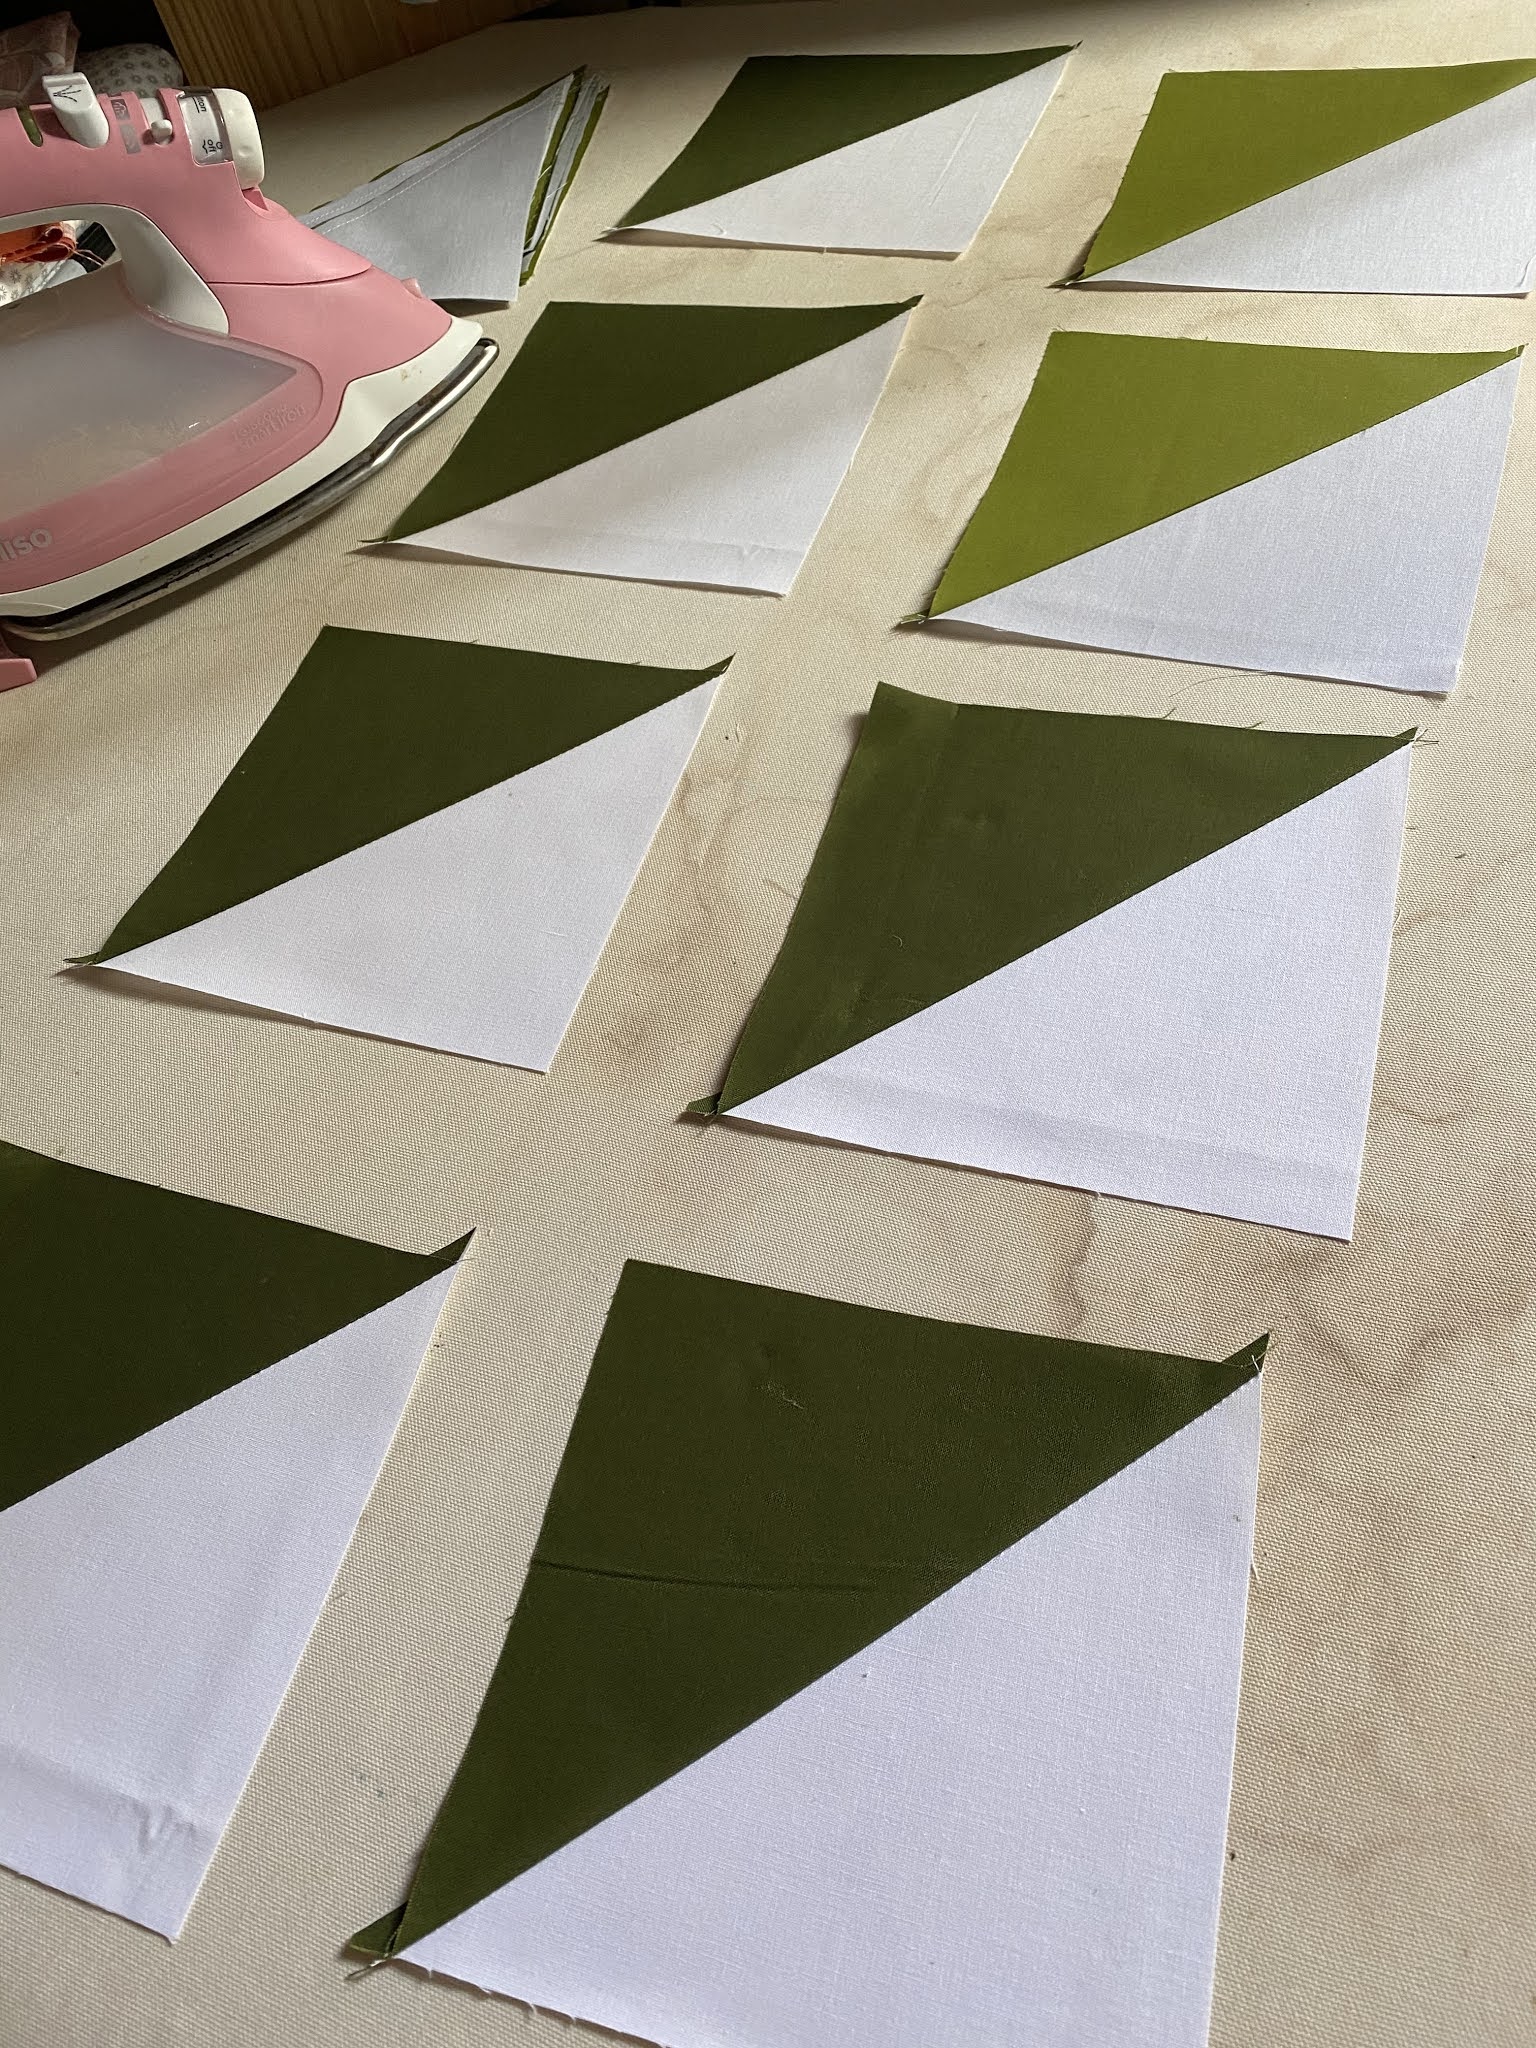
if you have a 12.5" square ruler, you can use it to trim the blocks to size. otherwise, use your rectangle ruler used for cutting your strips and make the blocks 12.5" sq.
do the same for the 7" squares, cutting them down to 6.5" blocks.
all nice and tidy now.
piecing the top
when all the hsts are pieced and trimmed, it's time to put them together into a star. there are lots of options for how to configure your pieces into a star.
here are several configurations i came up with by shifting the
hsts around.
once you decide on a layout, it's time to begin piecing it together.

you can either attach your
hsts together by row or by quadrant. i chose to work in quadrants.
when working by quadrant, attach the top two hsts together and the bottom two together, then attach the new pairs together into one square.
you are going to place the right square on top of the left square, face down, so that the right sides are together. then sew a 1/4" seam along the right side of the pair and press open.
if you press one open to the left and one open to the right, then you can nest your seams when attaching the two sets together.
the block set that's underneath here was pressed to the right and the the one on top was pressed to the left. this makes a tiny little lip or ridge on each piece that you can use to line those seams up. you'll be able to feel them abutting each other. get them nice and close.
then carefully pin along either side of the seam, making sure to keep them lined up.
now sew a 1/4" seam to attach the blocks and press open.
some quilters prefer to press their seams open. i've found with this large piece pattern that i've had some difficulty with seams staying closed at the edges during construction when i press open. it's completely personal preference, in my opinion. as a beginner, you just have to try various methods and decided what you like.
there are also ways of keeping track of the pattern for pressing to the right or left so you can nest seams. i don't pursue this too carefully myself. i just eyeball it as i go along. you can still sew seams together even if they don't nest! i do try to do this where points are involved, but don't stress about it. if you've got a method you like, use it. if not, just get your blocks sewn together - as you gain experience, you'll know better what you like to do.
join the quadrants together, pinning at the seams when joining, to complete your center star medallion.
once you have your center star medallion complete, add the 6.5" background borders around the medallion square.
i used those 6.5"x wof strips and the 6.5"x12.5" pieces to make the background border around the star medallion. i had to piece those together to get 4 strips long enough to create the border. those few seams for joining will disappear into the background once it's all pieced and you quilt it.
i do like to start by attaching two outer background pieces to two of the opposite sides (such as top and bottom) first, then add the longer pieces to the other two sides. looking at the photo here, i didn't quite do that and i have no idea why. i may have been using leftover pieces from another top where i used this color. i'm not at all sure but it doesn't matter. obviously, i still got it done and there is more than one way to do it.
before adding the borders, your medallion should be measuring about 48.5" on each end. if you are going to do two opposite ends first, measure to be sure in case you need to adjust slightly. then use those long 6.5" wide strips to make the size piece you need. (i had strips that were 44" long - so close! - so i only needed to add 4.5" to them to get the first border strips.
once the first strips are added, your top now measures about 48.5" x 60.5", so the next two border pieces will need to be 6.5" x 60.5" long.
when attaching your background border pieces, pin at all the seams. then sew on with a 1/4" seam and press open.
the last step for the top is to make your
hst border on the top and bottom of the quilt. i chose this design element not only because i like the look, but because i'm not overly fond of square quilts and wanted a visually pleasing way to elongate my pattern. a 6" border on each end does the trick for me.
if you didn't already make your 6.5" hsts from the 7" squares you cut, do it now.
and don't forget to trim them up, which gets rid of the little ears on the corners and makes them easier to sew together in formation.
decide how you want to layout your hsts in your border. sometimes i chose a pattern, other times i go for random. this time i went for random placement of the colors, but there is still a method to the directionality of how i placed them. if you follow the diagonal line, you can see i made a zigzag pattern, which results in alternating triangles.
look at my other stella grande quilts for other ideas and even other border treatments.
once you have decided how to arrange your border, attatch the hsts together and attach the border strips to the top and bottom of your star medallion.
congratulations! you have a stella grande quilt top.
to complete your quilt, you now need to make a backing, baste the quilt sandwich together, quilt, and bind. it is outside the scope of this tutorial to explain these proceedings. fortunately, there are lots of resources available to show you how to complete those steps. for example, click
here for a video series by melanie ham that will show you how to do these steps.
here are some thoughts for how i have approached these elements in my stella grande quilts.
backings
my tops use almost exclusively solid fabrics, so i like to add a fun touch on the back with printed fabrics that complement the colors of the top. in fact, some of my quilt top color combinations were inspired by backing fabrics i wanted to use. i love piecing backings, so that is usually what i do.
quilting
i have machine quilted all my stella grande quilts with a lovely chunky auriful 12wt thread in a contrasting color. this is thicker than the normal 50wt used for piecing and gives a nice, almost handquilted touch to these quilts. i echo quilt all the major seams of the quilt top 1/4" out on each side of the seam.
i don't want the quilting to be dense on these quilts when using the 12wt thread, but i also need to make sure my quilt holds together. so i make sure to pass through each 12" square of the top in at least one, if not both, diagonal directions. you can see i did most but not all diagonals here in star of the field:
for neapolitan sundae in pewter i did all the diagonal lines across the entire quilt:
for the most part, there are seams to follow, but i do have to do a bit of marking in a few places where there are not. this is easily done with a hera marker and ruler.
binding
in keeping with the use of a solid colored fabric for the top, i use a solid colored, 2.5" folded binding on my stella grande quilts.
happy quilting, all!
if you have any questions, please contact me through comments. these days i find that many, many commenters are "no-reply bloggers" and i'm unable to return an email response directly. if that is the case, i will answer your question in comments and you'll just need to check back there.


