Monday, August 31, 2015

"cinched" pattern tutorial


this is a simple strip quilt pattern which utilizes a jelly roll and a bit of extra yardage for an accent strip and block across the upper portion of the quilt. it comes together quickly and easily, with a few opportunities to embellish the design for more detail.

in this tutorial, i will give basic instructions for the pattern. for more detailed instructions, please refer to the links to each section of assembly.


fabric requirements

i'm starting with a generous amount of yardage partly because i already have it in my stash and partly because i simply like to work that way. generally i need room for error and i happen to adore scraps, so leftovers are quite welcome. 
  • one jelly roll (or 45 - 2.5" wide x wof  strips, see further options below)
  • fabric a - 1/2 yd for accent block and backing strip a (could be done with 1/4 yd or fat quarter if adjusting measurements slightly - see section on accent block)
  • fabric b - 2/3 yd for accent strip and backing strip b
  • fabric c - 1/2 yd for extra strips and backing strip c
  • fabric d - the equivalent of one jelly strip for strip joining squares (if using)
  • optional fabric e - 1/3 yd for accent block
  • 1/2 yd binding fabric
  • 3 1/4 yds backing fabric, 4 1/4 yd if using a directional print
it's a pretty small list. if you want more variety in the strips, which i do, you can use additional coordinating pieces. 

* note - 1/4" seams used through out and all measurements are for "cut" (seam allowance included) not "final" unless otherwise noted.

make the strip sections

cut the selvages off all jelly roll strips. (for more detailed instructions on preparing the strips, see cinched pattern, part one.)

select 30 jelly strips to be cut in half and used for the upper section. (set the other 10 strips and the 30 half strips aside for the lower section.) arrange these 30 half strips in a row for the upper section. (for a detailed discussion of strip selection and construction options, see cinched pattern, part one.)


layout the lower section with 30 full strips in a row. these full strips include the 10 remaining jelly strips from the jelly roll, your 5 additional full strips cut from fabric c yardage, and 15 full pieced strips constructed from the leftover halves from the upper section.


you can either simply piece the leftover half strips or . . .


you can make pieced strips that include small 2.5" x 2.5" cut joining blocks, for more interest. i did this, varying the placement height of the joining blocks in the strips, and also using three pieced sections and two blocks for some of the strips. (see cinched part one for a discussion on these joining options.)

cut the accent strip and accent block pieces from fabric b and e.

the accent block can be a simple 10.5" square of one feature fabric e or you can create any quilt block of your choice 10.5" in size. in this quilt, i chose to make a courthouse steps block. (for a discussion of block options and how i made my accent block, see cinched pattern, part two.)

join your accent strip pieces to your accent block to make the middle accent strip of the quilt top. there is a little extra length to this piece as cut so you can play with placement of where you want the accent block to fall.

lay all the pieces out either on a design wall, bed, or floor to check the placement of your strips in the upper and lower sections with the accent strip in between them so you can see how you like your layout.

join the strips in each sections together to create two panels, an upper panel and a lower panel. (for more details on joining the sections together, see cinched pattern, part three.)

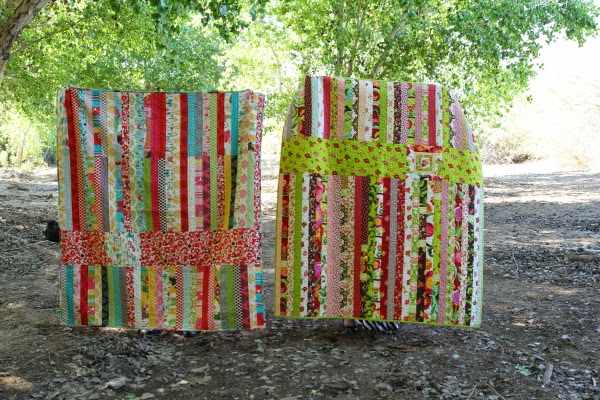
join the three panels together to complete your quilt top, which is now approximately 70" h x 60"w, once you square it off. (i used 31 strips so my top is actually 62"w.)

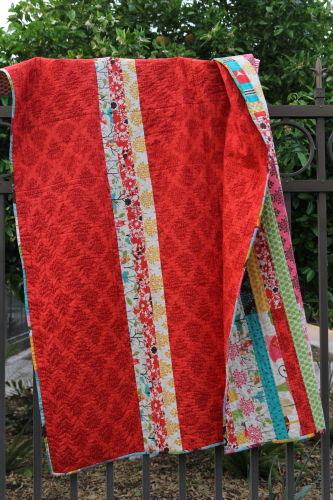
next, create a backing. i like to piece my backings and used a three-strip accent stripe for the back of this quilt. (for directions on making this backing, see three strip accent stripe pieced backing.)


sandwich, baste, and quilt.


for the "out on a limb" version of this quilt, i did a simple echo quilt of all the seams. this resulted in lots of straight lines and a flatter, less-crinkly texture.


for "bloom where you are planted," i used a loopy figure eight quilting pattern, which ran along the strips. this quilt has glorious crinkle texture to it, if that is your preference.


in the accent strip, i stipple quilted for some contrast and added interest. the accent block also had some unique quilting in it's sections. (for a discussion of my quilting choices, see "loops and crinkles.")

"bloom" is bound in some lovely olive lottie dot from heather bailey's "lottie da" collection

now you just need to bind your quilt and you are ready to wash and snuggle!

i've completed two versions of this quilt so far, and have the fabric for a third set aside. "limb" lives on our living room couch and is regularly used and greatly loved, despite all it's imperfections, which i don't really notice any more. "bloom" was gifted to my dear friend and quilting buddy, jill, who has moved away. despite the fact that my 16 yr old photographer did not notice "limb" was upside down, you can see the two versions of the quilt here together and how the slight variations affect the look of the quilt.

i've greatly enjoyed this pattern, which is so simple and satisfying. having designed something myself, especially as a new quilter, is very gratifying, indeed. giving the gift of love made tangible in the form of a cuddly quilt is the best part of all.

i hope you enjoy this pattern and would love to see any version of it you create.

happy quilting!

the detailed steps for this tutorial are spread over 6 posts i wrote as i made the "bloom" quilt and worked on the pattern. find the others here:

cinched part one - fabric requirements and strip preparation
cinched part two - the accent strip and block, modifications from the first quilt, joining blocks for the long strips
cinched part three - joining your strips and sections to assemble your top
the three-strip accent stripe pieced backing - how to make the backing
loops and crinkles - quilting choices for "bloom where you are planted"
cinched part four - quilting, binding, and gifting

linking up with friday finishes at crazy mom quilts

Saturday, August 29, 2015

the three-strip accent stripe pieced quilt backing

 this is one of my all-time favorite quilt backs, which graces the backside of my "out on a limb" quilt, the first run of my "cinched" pattern. honestly, this back makes me as happy as the front.

i chose to piece this backing because i was leery of trying to match up the strong graphical pattern repeat in the red fabric. and because i just love a pieced backing as an additional design feature for a quilt. i chose to offset the stripe not only for design interest but because it would keep the quilt from having a seam down the middle of the back, where a quilt often gets folded. apparently, this is supposed to stress the seam.

because i was so pleased with this backing and because it's so easy, i've tried to duplicate the back on two other quilts. tried. sure, i was able to use the exact same method for the other two quilts, but somehow it didn't have the same effect. and after looking at the other two, i know why. if you look at the first quilt, you'll see i have a strong feature fabric that has little contrast in it's design (it's a simple, tone-on-tone red print). the contrast comes in to play with the strips i used between the large panels. i chose the three fabrics based on fabrics i featured in the front of the quilt. the blue owl strip was my accent block print, the red bandanna print was from the accent strip, and the low-volume yellow strip was used repeatedly on the front, more times than other strips were. i placed the red strip in between the other two prints so it wouldn't be right up against the red panels. and this is the formula for success.

next, i made a similar backing for "romance in the garden." one change was i used two fabrics from the same line and with the same aqua colored field (background) but of different prints. maybe the two prints are the problem or maybe it's because there is just too much sameness all around, but this back falls kind of flat to me. it just doesn't say "wow!" like the first one did. there is no real volume contrast here. that must be the issue.

when i made the backing for my second "cinched" quilt, "bloom where you are planted," i tried the contrast theory again. i did get contrast, but the large panel fabric is so busy the strips kind of get lost anyway. oh, well. now i know even better for next time what to do.

 to make this backing was quite simple. i used one large 4 yard piece of fabric for the main panels and three strips, 2.5" x 72" cut for the accent stripe.

i cut the main fabric in half, resulting in two panels approximately 72" high x 42" wide when the selvages were removed. the top for this quilt was 70" high, so this didn't give me a lot of wiggle room for shrinkage and shifting when quilting, but i took the risk. a safer length would have been 4 1/4 yards of the main fabric, which would have given me 76" in height.

here, with the three strips sewn to the two panels, i have a backing measuring 72" high x 90" wide, more than ample in width for my 60" wide top. but this gives me room to place my top exactly where i want it in relation to the strips on the back. also, because i was using a directional print, i did not want to piece one of the side panels, which i could have done out of one yard of fabric. if i'd done that, the print would not have been running the same direction on both sides of the stripe.

however, if you are not using a directional print, you could use 3 1/4 yards of fabric. cut one panel at 2 yards and 6" long (78h" x 42w") and cut the remaining 1 yard 3" in half (2 - 19w" x 42h" pieces), which can be pieced together to create a second panel that is 19"w x 84"h. cut it down to 78" high to match the other panel. when these two panels are added to the strip section (78" x 6.5", which you made longer than my 72" strips to match the increased height for these more generous measurements), you will have a backing that is 78"h x 65"w. this doesn't give you exactly the 4" on each side normally recommended for a top to backing ratio, but it's pretty good.

if you use the 4 1/4 yd method, you're going to have some nice scraps leftover from cutting the side down 22". just be happy you have enough of your lovely fabric left to use it again in another quilt! (or if you're using the "cinched" pattern, maybe you used if for your accent strip or additional jelly strips for the front? there's an idea!)

now that your backing is done, it's time to make a yummy quilt sandwich. i always enjoy this phase because it makes the different pieces finally look and feel like a quilt, not just a bunch of parts.

when placing my top and bottom together around the batting, i tried very hard to get the strips to line up as best i could. this can be done by seeing that your backing stripe lines up with the same strips from the quilt top at both the upper and lower edges of the top. also, you might be able to see in the above photo that i could vaguely see the backing stripes through the batting. so i slowly and carefully lined up the seams on the strips with the top as i placed the top on the batting.

this is not essential, but if you are doing some echo or straightline quilting, it will make the back look better.

there you have my favorite pieced backing in a nutshell.
or maybe a few nutshells.
i'm not very brief. ever.

the detailed steps for this quilt's tutorial are spread over 5 posts i wrote as i made the "bloom" quilt and worked on the pattern. find the others here:

cinched part one - fabric requirements and strip preparation
cinched part two - the accent strip and block, modifications from the first quilt, joining blocks for the long strips
cinched part three - joining your strips and sections to assemble your top
loops and crinkles - quilting choices for "bloom where you are planted"
cinched part four - quilting, binding, and gifting
cinched full tutorial