Saturday, March 31, 2012

securing corners when blanketstitching

i've never had trouble with corners slipping on the blankets i've made as far as i know. no one's complained or mentioned it happening. but still, i've begun taking the extra precaution of tacking down the corner stitch when i edge my 4sq blankets. it's simple.

when making the stitch around the corner, i make sure to grab a bit of the corner with my needle by going under just a few threads before catching the thread.

then bring the needle up under the thread as you normally would

and pull tight, as usual when completing a stitch

then loop back around to where the thread entered the fabric and insert the needle again
pull the thread snug and continue stitching down the next side of the blanket

your corner is secured in place

when done carefully, the tacking stitch is not noticeable.

Thursday, March 29, 2012

six and one half dozen quilt pattern


my mom had a saying that went "that's six and one half dozen of the other." it took me a few years to figure out that what she was saying was "they're both the same" or "that's two ways of saying/doing the same thing." because, you see, "six" is the same as "half a dozen."

it stuck and i use it all the time (along with other family expressions that have been passed on for generations now: "no, no, fluffy," "the bus is leaving," "for cryin' out loud," etc.) when i started a second quilt after the same pattern i created for star cookie, which uses 6 fat quarters, mom's expression kept coming to mind, which is why i think i'll name this pattern "six and one half dozen". it does, after all, consist of 6 fat quarters cut in half, placed in two rows, so you actually have six on one side and . . . a half dozen on the other.

this quilt top is about as absolutely simple as they get. i've decided to share basic instructions for how to make it. it's beyond the scope of this tutorial to give detailed instructions on quilting basics like how to square off fabric or bind a quilt. the good news is, those topics have been covered thoroughly and extensively elsewhere, many times over, in books and online.

what you'll need:
6 fat quarters (or just 6 regular skinny quarters, doesn't actually matter) for the top
1.5 yards for the backing
1/2 yard for binding
batting, slightly larger than 1.5 yards x width of fabric
thread


start by squaring off your fabric quarters and removing the selvages. then cut them into two 9x21'' rectangles. (this is why you can use fat or skinny quarters - you're just cutting them in half either along the length or the width depending on how your quarter was cut.)

arrange your rectangles in two rows in a pleasing manner


begin pinning them together by folding the bottom left hand rectangle on top of the adjoining rectangle, right sides together, and pin along the seam. do the same with the next two rectangles and the final two in the row.

***tip - this is where i found it helpful to have photographed my layout because no matter how well i mark placement or think i'll remember even a simple one as this, i always get something turned around. so having a reference photo was super helpful.

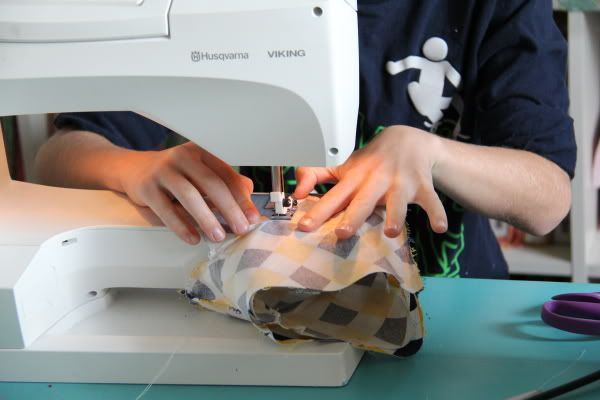
go sew and press your seams
square off you fabrics if you need to. i only removed the selvages and measured the 9" across the width so my lengths were slightly different. i just square up after each seam to get them even.


now you will have three squares, side by side. fold the left hand square over the middle square, right sides together, pin and sew like you did the rectangles. press open the seam. put the final square, right sides together, on the middle square, pinning along the seam. sew the final square and press your seam. trim if you have any sections longer than the others along either length.

your first row is complete.


stop and drink a glass of water. seriously, we all need to stay hydrated!

repeat the above steps for the other six rectangles in your second row.


when you have two rows of six rectangles adjoined, put one on top of the other, right sides facing.


you'll want to line up your seams between the rectangles with the ones across from them to create nice intersecting seams on your top. start with pinning at the very middle seam.


to pin, line up the seams and pin on each side, with one pin in the pressed seam allowance to keep it flat, which i didn't do here so you could see how the seams are together. but do pin down your seams. it makes it much easier. (you can't tell where they're placed very well from this picture because my pins blend with the fabric - sorry. look closely and maybe you can make out the ivory colored, flat, round pin heads and pins on either side of the seams.)

after you've pinned the middle seam together, pin the seams to the left and right next, working your way out toward the edges. then go back and pin twice between each seam.

you may have a little slack between seams if your cutting or seam allowances weren't precise. pinning them first will allow you to have clean intersections and make up that slack. just keep your pins in place as long as you can and watch that your seams don't shift.

now simply sew that baby from top to bottom, being careful when you approach the seam intersections. press open.

you've got a completed top!

i did all of this in one afternoon nap session (the baby's, not mine - ha), which was probably between two and three hours. easy-peasy.

sandwich, baste, quilt, bind.
there's your quilt.


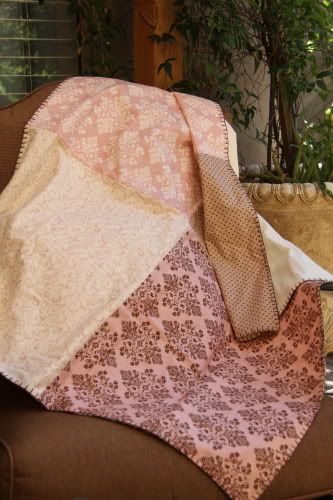
you can see more about my completed version, named "expecting blossoms," here.

variations:


 when i made star cookie i only used 5 different fabrics. i used the main fabric, my daughter's favorite which was also the backing, twice (or for four rectangles) on the top so it was more dominant and noticeable. so i purchased 4 fat quarters and 2 yards (one half for the 4 rectangles on top and 1.5 for the backing).

i'm considering turning some of the squares on their sides so it looks like six large blocks rather than two rows, but will have to change the dimensions so the squares are actually square.

Wednesday, March 28, 2012

wip wednesday

it must be crafting spring fever because it's always this time of year that seems to get me in a frantic mood to make stuff. with baby four months old and somewhat close to a schedule or at least to the point where i'm not consumed by her needs every minute of the day, i found the time to do some blanket stitching to finish up that gift blanket. it got me back in the saddle, so to speak. i promised myself i was going to make time each week for at least some small bit of sewing.

when my husband announced two weekends ago that he was going to take several of the children on a two day camping trip, i got all excited for a big block of sewing time. then, we found out there was finally going to be snow at our closest ski resort and decided to do a spontaneous trip to a cabin for four days so the mr. and older kids could ski. i figured cabin time was the perfect opportunity to do a bunch of handwork - how cozy!
unfortunately, we were so spontaneous i had no time to prepare any handwork to take with me. i was dying over the missed opportunity. when we got home late thursday and the girls had sewing class friday morning, i thought to myself, "no sense trying to have school today. i'll just declare this a bonus spring break week. and if the girls are going to sew today, so am i!" i vowed never to be without handwork at the ready for any chances that might come along.

i completely amazed myself by knocking out two 4sq tops and then a small quilt top by dinner time. now i actually have a wip report for this week:

completed:
-4sq blanket #10

under construction:
- ollie's 4sq, back attached and edging started
- hailey's 4 sq, top sewn
-oopsy daisy baby quilt, top completed, sandwiched, and pin basted

in the wings:
-lanee's 4sq
-charity's baby girl's 4sq
-ladybug softie for daughter #3
-taite
-at last's top embellishment

trips to the store:
- one to joann for flannel and floss for 4sqs (and a book or two. hee,hee) discovered mollie makes british craft mag - very cool

online purchases:
-barnes and noble book order (for more new ideas and to read while nursing)
-fabricworm, some monsterz, woodland tails, and saddle up to celebrate the fabric i used up this week (and because i couldn't resist the coupon i got in my email.)

tutorials:
-securing corners for blanket stitching
- six and half dozen quilt pattern

i'm raring to go on the three projects. can't wait to start the hand quilting, especially. in the hour i sat at my kids riding lesson today, i was able to complete half of ollie's blanket stitching. almost there! maybe i can even get lanee's (my newest niece) blanket done this week before she comes.

Tuesday, March 27, 2012

kelly's at christmas

long past the season, but i wanted to share this. our sewing teacher, kelly hendrickson, had her studio decked out for the holidays and some really fun christmas projects available. i ducked in with my camera long enough to snap some of her inspiring decor and the kids at work.

kelly, on the left, and a few other students

even the dress dummy was festive
daughter #1 at the ironing board
there are several project options hanging from the shelf in front of her
not holiday decor, but more cute project displays
daughter #1 is going to make that bear soon


the boy at work


he was really crazy about this "elf" stocking. his fabric selections gave it a very jester-type look, i think. pretty loud and wild, just like his crazy-fun personality. he also made an apron for his dad so dad could stop wearing the frilly "girly" yellow apron he usually cooks sunday waffles in. i kinda think the mr. is cute in that apron, but like that our son made him one, too.

my girls also made a few gifts during december sewing classes: pj pants and luxury drawstring bags for siblings. sewing class and gifts all in one swoop, that was something i really liked. i didn't enforce a mandatory handmade christmas this year because of the new baby and all, but i didn't really have to because many of their ideas were things to sew for each other anyway. it's definitely catching on. they often refer to our handmade gift giving in 2010 with fondness and seem to be naturally gravitating in that direction the more experience they get with crafting.

one last bit of creative holiday decor i discovered at home:
someone made an angel for the kids tinsel tree out of american girl mini josephina in her night shift with a baubble in her hand and a shiny ball around her neck, taped to the top of the tree. love, love, love!

Saturday, March 24, 2012

custom baby carrier cover


awhile back i was shopping at the fabric/scrapbook store with my daughter when i ran into another shopper with the cutest customized baby carrier seat i've ever seen. its been popular for a few years now to purchase boutique carseat covers to replace the run-of-the-mill and often tasteless covers that come with carseats, but i've never taken the leap. as much as i admired everyone elses, it wasn't high on my priority list of purchases, especially when told they often cost more than the carseat itself.
i looked at the amazing cover and thought, "she only has one or two kids tops. moms with lots of kids never have time to do that." i complimented the mother on her creation and asked how many kids she had. "She's number six" was the reply. well, there went my theory and my self-esteem shot down into my shoes. to myself i said, "why is it everyone else on the planet can manage so much better than i can and finds the time to be mommy and creative? dang it! i want to do something cool like that, too." then we got talking about life with so many kids, how challenging but worthwhile it is. my new friend was pretty beat down and weary at the moment, actually, and our conversation lifted both of us. i love talking to other moms in the trenches and being reminded how important and fleeting the work we do with our children really is. they'll be gone so soon - all seven of them. the oldest will be out the door in just a handful of years. chin up and carry on! the sewing can wait or be skipped altogether. being there for my kids is what's really important, not making cute stuff for them.
check out the shade cover. don't you just love it?! wow.
she told me she isn't much of a sewer and freehanded the whole thing by simply "tracing the original pieces." when i kept oohing over it, she said "it really wasn't that well done, don't look too closely." heck, who cares how perfect her stitching is or how precisely it fits? look what she did all on her own! quite impressive and inspiring. i was so overcome by it's shabby chicness i didn't even notice the imperfections she was apologizing for. she was good enough to allow me to photograph her work right there in the paper isles.

a few weeks after i saw this cover, i noticed another one at church. it was simpler, but done up in designer fabrics, too. this other mom told me she did the same thing: no pattern, just sorta laid out the original cover, squashing it as flat as she could to trace, and went for it. geesh!

i've thought about the process they described over and over, but every time i look at my own carrier, i get completely intimidated. no way i can do it. but now that i think about it, i bet there are tutorials all over cyber craft space, don't you? i'm gonna look them up right now. and maybe, just maybe, my baby will get a more stylish ride.

Friday, March 23, 2012

4 sqr #10 & a scrap book

i'm pretty sure this blanket was on hold longer than any i've made thus far: bought the fabric last spring, completed the top in late summer, my mom sewed on the flannel back for me in the fall while i bedrested, and i completed the border stitching for it this month in a few short sessions. whew! done, wrapped and ready to hand over to baby charlotte, who is now 6+ months old.
i have to say she is one of my favorites for a few reasons.
1. i adore the lily and will fabrics from bunny hill designs for moda. very feminine, baby, soft, vintage and classic but in that more modern color combo of pink and brown. i've gotten lots of compliments on these fabrics whenever i've been seen working on the blanket. love of fabric is one of the reasons i started sewing so you better bet i'm gonna gush a bit over designs i love. i am especially tickled by all the sweet bunnies worked into the designs of this line.

2. i really like how the brown stitching contrasted with the ivory flannel on the backing.

3. on this blanket i upgraded my technique for the blanket stitching in 3 new ways.
*i was having problems with getting my thread knots to pop in and out of the fabric. sometimes it worked perfectly and other times i had difficulties galore. finally i realized i could just put my hand and needle in the opening i left for turning the blanket. i did this to plant the thread whenever i started a new section of floss.
*i started anchoring the corner stitches (more on that when i upgrade the tute).
*i quit popping the knot in when i tied off a section and began tying off right on the stitch. this is not as hidden of a techinique, but easier, quicker, and more secure. i'll upgrade this section, too.


so long, pink lily and will bunny blanket!
i still have some of this fabric to use for myself but no plans yet. maybe i'll just put it away for use on a scrap project from the newest quilt book i bought, sunday morning quilts.

this book has some great projects for using up your scraps, as well as tips on how to store and sort them. looking over it last night, i'd say the book is for sewers/quilters with some experience because there was a lot of assumed knowledge. but if you have enough scraps to create entire quilts, then you have probably been sewing a while. fair enough. i especially liked having ideas for using my strings and the little triangle corners i cut off projects because i save the all, every last bit. even selvages. at $10+ a yard and rising, designer fabrics are precious to the last thread.

Monday, March 12, 2012

even in the nicu

needless to say, i've been gone a while. the reason is this teeny tiny, humongously engrossing project i've been absorbed with for four months now:

a long story with many details, all I really need to say is that she is here and despite coming over four weeks early and staying in the nicu 12 days, she is healthy and the light of our lives. life really does revolve around her in our home right now. God has blessed us tremendously with the challenges and growth she has brought us and with numerous happy, joyful moments, too. there were oh so many reasons not to do this thing, not bring her in to our family, but in the balance of it we got our "bonus package" and she was surely worth it. i post the above photo taken on her second day of life because i actually look decent despite the hospital gown (oh, the vanity of me) and because of that wonderfully crazy hat made by a kind-hearted volunteer. i thought it was appropriate for a sewing/crafty type blog. i don't know who does the hats, but someone makes and donates tiny knitted hats to the nicu and the nurses put a new one on her almost every day. we got each of them for keeps. the older siblings loved to pick out which hat to put on her when they came in for a visit. i called this one the "sponge bob" hat because of the colors and that big hot pink flower reminds me of that starfish character (patrick?). someone was trying hard to do some good for people in a stressful situation and i thank them for that even if it's something i never would have made or selected on my own. most definitely the thought counts and i am grateful.

you might think sewing and quilting were the furthest things from my mind with a baby in the nicu for over a week, but i actually got a daily dose of them whenever i passed this collection of mini quilts in the hallway:

several times i stopped to look at the colors, the fabric choices, the pattern design and think about something other than my little girl and her struggles. it was a mini break amidst all that was going on. forgive the terrible photos but i snapped them quickly in passing on one of the last days simply so i could remember them. these were placed at a corner and i often navigated the confusing maze of corridors by them.

a closer look at the ones i could reach with my camera:
a little heather bailey in there as well as a few other patterns i recognized.

so there you have it, quilting on my brain even in the nicu. not that i've been able to touch needle or thread in the past several months, at least until last week. so many things i once dreamed of sewing for a baby if i ever dared have another and now not a moment to do it in. i've made all those 4 squares for other peoples babies, but not my own. i did finally pick up #10 (the fabric for which i purchased this time last year and the sewing for which i did in october) and work on the blanket stitching this last week. that was all it was waiting for - the blanket stitching. but i couldn't even get to that. the baby it was intended for is 6 months old, for heaven's sake! so maybe i'm emerging now and will re-enter the sewing world. but probably not the blog world. in the time i've posted this, i probably could have completed that last bit of blanket stitching! there just isn't time to do both. i have 4 squares to do for two new nieces and a nephew. we'll see if i get them done.


"star cookie" has been hanging out in the family room for over a week and i've been putting baby on it. the sister to which it belongs shares it rather begrudingly. i said, "i really just need to make one of her own for her." (the fabric for that's been sitting, pressed, on my table for four months). sister #2 overheard and replied, "what! you need to finish my quilt first!" you know, "taite", which i started last may. sigh. that's going to take many more an hour whereas a small baby quilt made from a few fat quarters cut in half would be relatively quick. but even that seems a dream the way my days run now.  honestly, isn't there just some way to make the time? i've actually tried on a few saturdays when everyoene seems involved elsewhere and something always comes up. so be it. this just isn't my season for sewing. it's baby's turn for now.