Wednesday, May 27, 2015

a little bit of heart and a book review


 a few weeks ago i got a copy of jen kingwell's new book, quilt lovely, and instantly fell in love with 99% of the patterns. in love, as in "i absolutely must stop all other plans and spend all my quilty time for the next few years making these designs." they really are spectacular. as you may know, i've had my qualms with ms. kingwell's pattern writing for gypsy wife so i was a bit leery of a whole book of her patterns, but the absolute gorgeousness of the designs makes up for any weaknesses in pattern clarity. i am in need of several new quilts for our new mountain cabin and i think these will be absolutely perfect for the place.

doesn't this one say "cabin" to you?
the day after my book arrived, i was feeling less than inclined to work on my several wips laying around and picked up quilt lovely to see if there was something i could dabble in. i find taking a break from what i'm working on often helps me clear my head and refreshes my interest in the project which has gone stale. many of the patterns in the new book require templates or other involved processes, so i settled on making just one courthouse steps heart block from one of the pillow patterns, "she loves you." i figured i could make just one and work it into gypsy wife somehow if i didn't want to make any more.

the pieces for this block are so tiny! 1" high each. most quilters will throw something that small away. it reaffirmed to me that i'm not completely crazy for holding onto such small scraps, something i have a propensity to do. i started out by cutting pieces to the sizes needed and lining them up in rows according to size. there is a pile of color and a pile of neutral for each length.

first block - not very heart-ish
 the blocks, made up of four smaller component blocks, finish at 6" square. i love the combination of all the colored scraps in the hearts against the neutrals. i had fun digging through my tiniest scraps to come up with bits for the blocks. i completed one block after a friday morning sewing social with my friend, becky, and another evening session with fellow blogging quilt friend, kate, from quarter mile quilts. (kate and i met through blogging and instagram, and finally got together in person for some sewing, chatting, and chocolate. sew fun!) yes, it took me a whole day to complete one block.

putting together that first block taught me a few things about fabric choices, as well as how to put the blocks together. kate said she was surprised i could talk and work on such an intricate block at the same time. well, really, i couldn't. not very well.

 i made not one but three of the smaller component blocks incorrectly! almost enough for a whole heart. ugh! oh well. they're not wasted, i'll work them into something somewhere. and they are pretty cute all on their own. i might just make one more and put them all together into one jumbled courthouse steps/log cabin block.

anyway, after getting my first block finished, i had learned a few things and wanted to test my ideas out, so i made another block. also, i didn't feel like it looked much like a heart at all. i hoped that by making more than one, side by side they would start looking heart-ish.

 it does help to have more than one to give the effect of a heart. i'm thinking about making a row of them for a quilt, maybe a whole quilt out of the intricate blocks from the pillow patterns in the book. those patterns were written as pillows so you wouldn't have to commit to making a whole quilt out of them. they would be amazing that way but the work involved would be quite extensive. anyway, maybe a row of each kind would make a nice quilt altogether.

so here's what i found while working on these blocks:


1. absolute neutrals or nearly-neutrals were best for the white space parts of the block, the not-heart parts. originally i thought just low-volume was going to be good enough but i could tell immediately that i didn't want any low-volumes with color in them and weeded them out. but even low-volume prints that had an obvious pattern, like the floral or comma print i used (see above) were a little too loud, competed with the eye against seeing the heart shape formed by the colored strips. i had very few nearly-neutral low-volumes as it was so i had to invest in a few more tone-on-tone prints and solid colored neutrals for future blocks. upon closer inspection, the ones used in the book mostly seemed to be various colors of white, cream, ecru, etc. i like the effect of having different colors but the low-volume prints i used were a bit too attention getting.

good options
2. low-contrast, high-volume prints were best for the colored sections. by that i mean it was better if the print didn't have a super busy design or a lot of white/light colors in them, if there was little contrast within the strip's design itself. bold colors were best for if the prints were too light, they didn't show up well against the neutral strips. they sort of got lost and the shape of the heart did, too. if a light colored or high/contrast-busy strip was included, it was better to have it closer to the interior of the heart, not on the outer edges.

not-so-good options
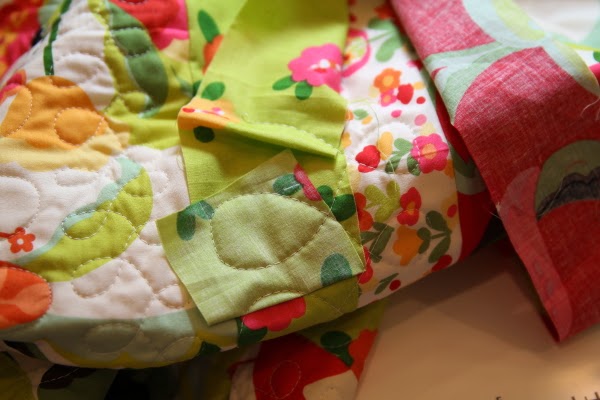
these are all prints i like and prints i even used, but the ones with a lot of contrast between the colors within the print itself, especially with a lot of white, didn't define the shape of the heart very well at all. i tried to make sure that if i did use them, the white sections were facing inward, touching another color rather than turned out against a neutral strip. what really helps the most is to have a lot of contrast between the color strips and the neutral strips, however you do that.

here's a case of where i had a colored print with white in it and when all the seam allowances were hidden, i ended up with mostly white showing! i didn't expect that tiny tip of the heart to come out looking like this. it would have been better if i had used a solid or tone-on-tone print here. that white half of the top pink strip, coupled with the yellow part of the next strip distorts the shape of the heart because they basically disappear.

 in the book, ms. kingwell suggests considering the backside of fabrics as well as the front, for their effect. this worked nicely with some of the neutrals i was using. you can see above, that if you turn them around so the wrong side is showing, you get an even subtler effect of the print.

so now i have two nice little hearts hanging out on my design wall while i get back to work on my other projects. i do find that stepping back from them and viewing them from a distance really helps them look heart-ish. and some day when i have a whole row of them, they will probably look pretty lovely and heart-like together.


daisy do - the cover quilt - which i will eventually need to make. by hand.
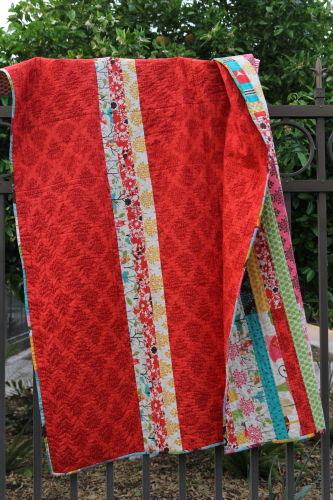
there are several things i really like about the book other than the gorgeous patterns. there is some introductory writing about each of the designs. every quilt has a story and i like when the designer shares that story or at least some thoughts about it's inception. also, each quilt is photographed in use as well as fully laid out flat with a complete view of the top. seeing a quilt from different angles gives you different perspectives on it. there are no pictures of the backs, but ms. kingwell does not piece her backings, preferring as few seams on the back as possible, so they aren't relevant here. there are clear, colored assembly diagrams for the blocks as well as the whole quilt for each project. quilting ideas are also included, with basic sketches for some of the projects. in addition, i enjoyed reading ms. kingwell's thoughts in the appendix sections. all quilters have their own techniques, preferences, and reasonings, which can vary widely, so i appreciate hearing her ideas and rationales.

spinning around - composed of three different pinwheel blocks - is the other top contender for my favorite
as for what i think of the pattern writing this time around, i'd say it's improved. the pattern that i followed for this block was pretty good, it had nice color illustrations that helped with assembly. however, it wasn't labeled with where the different sizes of strips went, even though they were numbered in order of placement. with the help of the illustration i could accurately guess which was which and still got the block assembled. a beginner might have more confusion over the process. browsing some of the other patterns i'm interested in i could tell that some of the other instructions were not super detailed, like how to sew the template pieces together. it's just the nature of her writing style and of these types of quilts, meant for more experienced quilters, that there are levels of assumed knowledge. i know and accept that now. if i can't figure out something from written instructions that are rather general and don't include diagrams, i'm sure there are tutorials and videos online that will help. overall, it's a splendid book full of really, really lovely quilt patterns. especially if you love scrappy quilts with dozens of prints per quilt and want challenging projects that will push your skills. which i do.

this book has been read and browsed nearly every day since it got here. even if i only ever just looked at it, it was a worthwhile purchase for all the viewing pleasure it gives!

if you've seen the book, which pattern is your favorite?

linking up with lee's wip wednesday at freshly pieced

Saturday, May 9, 2015

making room

so, the sewing won out. no surprise there! this room is officially becoming a sewing room, no longer a split-personality dining/sewing room. it doesn't look too different yet and there is a lot of work to go, but i've begun the process of transitioning this room into a full-fledged, dedicated sewing room. and begun bringing everything down here from my bawthroom sewing space. if i'm going to have a sewing room, all my stash is going to be in it. so far, i've shortened the dining table (which will be leaving eventually) and turned it around. i moved my low shelves to create a cutting space (on the right). i want to build a new pressing table that's better proportioned to the room and will allow me to store boxes under it, but for now the ironing board is still holding it up. the design walls have been propped up on the actual walls where they will go but still need attaching and some extending. there is still so much to do. this weekend my dad is supposed to put together some more shelves for me to go under that back design wall. this is the tip of the iceberg, but it already feels good to have it started and to know where i'm heading.

something i realized while moving everything around: i have way too much fabric. it's helped curb my buying appetite tremendously to once again rifle through what i already own.

there is another new addition to the room, too: a sewing space for d4, my bestest little sewing buddy.

 last week, we finally got back my old Little (Pink) Brother machine, which i'm giving to her (but still retaining rights to). poor little (pink) brother fell out of the back window of the suburban last fall and has needed repair ever since. frankly, i was surprised and relived it could be salvaged after a four foot fall onto the driveway. but it's all better now and ready for her to sew on. i put a small table and chair in one corner of the room and this is her spot.

she's been enthusiastically trying out lots of different stitches and supposedly practicing sewing a straight line. i have to say that i didn't realize how much i love and value the auto thread cutter and knee lift bar on my juki until i was helping her get set up on this machine. goodness, what a lot of time is spent in those simple functions when you don't have the auto option!

 she picked out a mini charm pack to make into a doll quilt and had so much fun laying it out on the design wall.

i love watching her work and listening to all her humming or funny comments to herself while she plays with fabric.

sharing this space with her makes it that much more enjoyable.

Wednesday, May 6, 2015

home ec highlights

what's wrong with this picture?
 i've had several people tell me they enjoy when i share all my sewing debacles, or what i call "home ec moments." apparently it's amusing and maybe even comforting to see things go wrong for someone else. i like to keep things real and honest here, which is why i share the mishaps. no way am i a quilting expert who turns out flawless finishes. my quilting experience is a study in mistakes! but i think i am living proof you can continually make mistakes and still turn out usable, maybe even likable, quilts.

here are a few gems from when i quilted "bloom where you are planted" over the course of a weekend. i'm still not sure if i had an unusual number of problems occurring or if it just seemed that way because i sewed a lot more in a shorter space of time. i documented them as i was going on instagram, much to the amusement of several friends.

here are photos i took with the real camera as i went along:

somehow i managed to move my fmq foot under the thread of a very large stitch and then sew over that thread, by one stitch, before i stopped. in effect, i sewed my foot to the quilt top. genius! if this was a required technique, i'm sure i'd never manage it.

in a fmq craftsy class i took from leah day, she said if your stitch wasn't big enough to catch your toe in and trip on, then you should leave it. i wonder if being able to fit your sewing foot under it counts as big enough for catching your toe?

don't you just loathe when you barely get started quilting and then your bobbin thread runs out?! right after i had fixed a messed up spot, i got moving again only to have my thread run out three loops into the row. and when i wound the bobbin, i accidentally wound the thread under the bobbin on the spindle rather than on the bobbin. that was a big mess and further delay, too. (the photo didn't turn out so you'll just have to imagine it.)

my biggest trick i pulled off may have been sewing my foot to the quilt but sewing this tail of fabric to the back of the quilt took a lot of untapped talent, too. see, the backing had three vertical strips sewn into it and one of them was about a foot longer than the rest. i was too lazy to cut it off before i started quilting. this is a reminder why you should always trim the back properly before attempting fmq.

well, that particular loop there was looking flat on the top anyway so it was a good excuse to have to unpick and resew that portion. i considered leaving it on the back for a "design feature," a sort of raw-edge ruffle on the back, but decided that loop really needed to be redone. so out it went. and the tail got trimmed immediately.

looking back at these photos, it doesn't seem like much at all. in the grand scheme of things, it wasn't. that's the point. it took me some extra time, but everything got fixed and the quilt got finished, even on deadline to be delivered to it's owner.

so when you mess up, just fix it and keep moving on.
think of me and laugh a little, too.

Friday, May 1, 2015

my process for a pieced backing

i have always loved a pieced backing on a quilt. it's one more place to have a little fun with fabric and even an opportunity to play with a more modern, large-scale, improv-pieced scheme than i would normally go for on a quilt top. if you have a beloved fabric you want to feature in a large panel, the back is the perfect place to do so. unless i'm making a baby quilt, i always make a pieced backing. even on my very first quilt, i made a pieced backing. i didn't know much about quilting at all, but i knew i liked pieced backings. so my first backing, for "at last" was a four panel piece which echoed the block pattern used on the front. i remember carefully selecting the four fabrics so the colors and shapes best represented my ideas for the front. it just might be the best part of that quilt. it's definitely one thing i did right when i was struggling with so many aspects of launching a first quilt.

"taite" uses large panels of fabrics from the front interspersed with leftover chain-pieced block strips wherever seams were needed in the panels. my daughter chose the main panel and i chose the two side fabrics. the fabric selections also reflect the pattern i used on the front. this was another backing i carefully designed with the design elements of the front in mind, and also to use up leftover pieces.

not all of my tops are so carefully laid out and designed. there are also those that are improvised and less structured.

a pieced backing can make a great home for leftover or bungled blocks or yardage that were originally for the top. when i made "twirly" i accidentally cut the large fabric panels too short, so they went on the back. because they were oddly sized, i joined them with leftover border blocks in the seam. i also had a few extra blocks and more leftover border strips that went into the back, too. the rest was made up of excess fabrics not used in the blocks. since i usually buy generously for the fabric requirements, i always have leftovers to play with on a backing. in fact, this is one reason i over buy.

knowing i can use pieces on the back makes it less stressful when something doesn't work out or gets miscut. i'll just use it to make the back more interesting. this makes the "what do i do with this now?!" problem solved and i grieve mistakes less, too.

sure, you can always make a backing inexpensively out of a plain muslin or you can sew one or two seams in the same fabric to make one great big piece. but i like to have fun with the back. also, i don't like to pattern match and mismatched patterns bother me. so even if i do use large pieces of fabric for the back, i will put at least a small strip of something in between the panels. my all-time favorite backing is on my "out on a limb" quilt. it's just three 2.5" wide strips sewn together and placed in between two large vertical fabric panels of the same fabric, but i really, really love this one - as much as the front, maybe more. a pieced backing doesn't have to be complicated at all to be effective. 

some other quilters that come to mind when i think of pieced backings are elizabeth hartman of oh, frannson! (especially in her book the practical guide to patchwork), kelly of my quilt infatuation, and rachel hauser of stitched in color (like here and here).

in my experience, a pieced backing can be either a planned design to compliment the front or a place to use up leftovers from the front. or maybe sometimes something in between. as i got ready to make my backing for my latest quilt, "dreaming easy" i decided to document the process in case anyone was interested in trying their hand at a pieced backing but didn't really know where to start.

this backing was unplanned until i saw what was leftover once the front was complete. i did have one feature print in mind for the backing - a 4 yd piece from the main fabric line i used for this quilt ("dream on" by urban chiks for moda). i could have made a backing out of that, but of course didn't want to use just one single fabric. so i pulled out what i had to work with: the 4 yd cut (green floral), a 2 yd cut of another fabric i had used on the top (pink "modern meadow" joel dewberry print), a small piece of "meadow dot" in robin's egg, and a few charm squares that were too low-volume/light for me to use in the checkered arrow blocks on the front. if i didn't have that large piece of pink fabric, i probably would have used the green fabric for both large panels with a strip in between. however, i did have it and liked the variety of prints.

 you can go about the process mathematically, but i prefer to just lay out the top and build organically over that. as long as the back i'm building has a few inches more on each side than the quilt top does, i know i'm good to go. so first step - lay the top out on the floor. really, you could place it face down so it's oriented the way the quilt will actually be put together, but i didn't here. that only matters if you want certain pieces under other pieces. this time that wasn't a concern and i just did it for sizing reference.

 next i lay out my largest pieces across the top to see which way they are going to fit. i could have placed these panels vertically, but the pink print wasn't quite long enough when laid that direction. in order to avoid extra piecing, i turned the pieces horizontally. here i had plenty extra of that lower floral print, so once i decided on the orientation, i cut the excess off with my shears, leaving it a few inches larger than the top. same with the upper pink print.

now i have two large panels and i'll just need to make a strip to put between them in order to use up those charm squares. the top was composed of blocks that included hsts and i could have made some out of the charm squares to echo the design on the front, but i chose a simpler route.

 the charm squares were all very similar in appearance to each other and hardly distinguishable if placed next to each other in a row. i wanted to break them up visually a little, so i cut half charm square pieces (2.5"x5"cut) of the random "meadow dot" piece and placed that between all the charm squares.

i just did this without measuring until i had a strip long enough to cross the width of the quilt top, with the needed excess inches on each side.

 then i attached the two large panels to the pieced charm squares strip and i had a pretty pieced backing. this one was quite simple and came together in no time. if the pieces you are working with are of various sizes or you have blocks to include, you can just play around with fabric placement, sort of like building a puzzle, until you have the back big enough to cover the top. next time i make that sort of backing, i will make sure to take photos so i can walk you through that process, too.

 something else i did on this backing - i included the selvages on the large pieces. i've done this twice before and find it can be a very nice design feature, like when i did it on "paris daydreams." if the print on the selvage is placed right, you can see it well and it's kind of cute, i think, to have it showing.

 the "dream on" panel had it's selvage print mostly well placed and it showed nicely. the "modern meadow" print did not have a good selvage for display purposes, but i was feeling lazy and didn't want to trim it off that long piece of fabric before i sewed the backing together. so i included it, too. lazy, i know.

once you have a back, you are home free to sandwich and baste your quilt! i positioned the top so that the charm square strip fell about 2/3rds the way up the quilt, making the green panel on the lower portion of the back larger than the pink panel on the top portion. if you don't cut off excess backing before sandwiching you can play around with top placement like this.


that ends the tour of piecing a backing splish splash stash style. i hope you found it informative, interesting, or at least entertaining. or maybe you just like looking at the pretty fabrics. that's alright by me.

linking up with kelly at my quilt infatuation's needle and thread thursday.