Monday, December 31, 2018

rubix star quilt, a finish, and some snow


rubix star, my third stella grande quilt that i gave to my children for christmas 2017 is now complete, as of christmas holidays 2018. it's funny how it took me waaaay longer to quilt and bind them all than it took me to make the tops and assemble the quilt sandwiches in time for christmas gifting. there was just too much going on this year for it to be otherwise. only four more to go.

this quilt goes to my older son, second child, a new adult (18!) and college freshman/junior in biochemical engineering this year. (yes, you can be freshman and a junior all at once if you go to community college for 64 credits as a homeschooler and have to count it as concurrent enrollment at the university.)


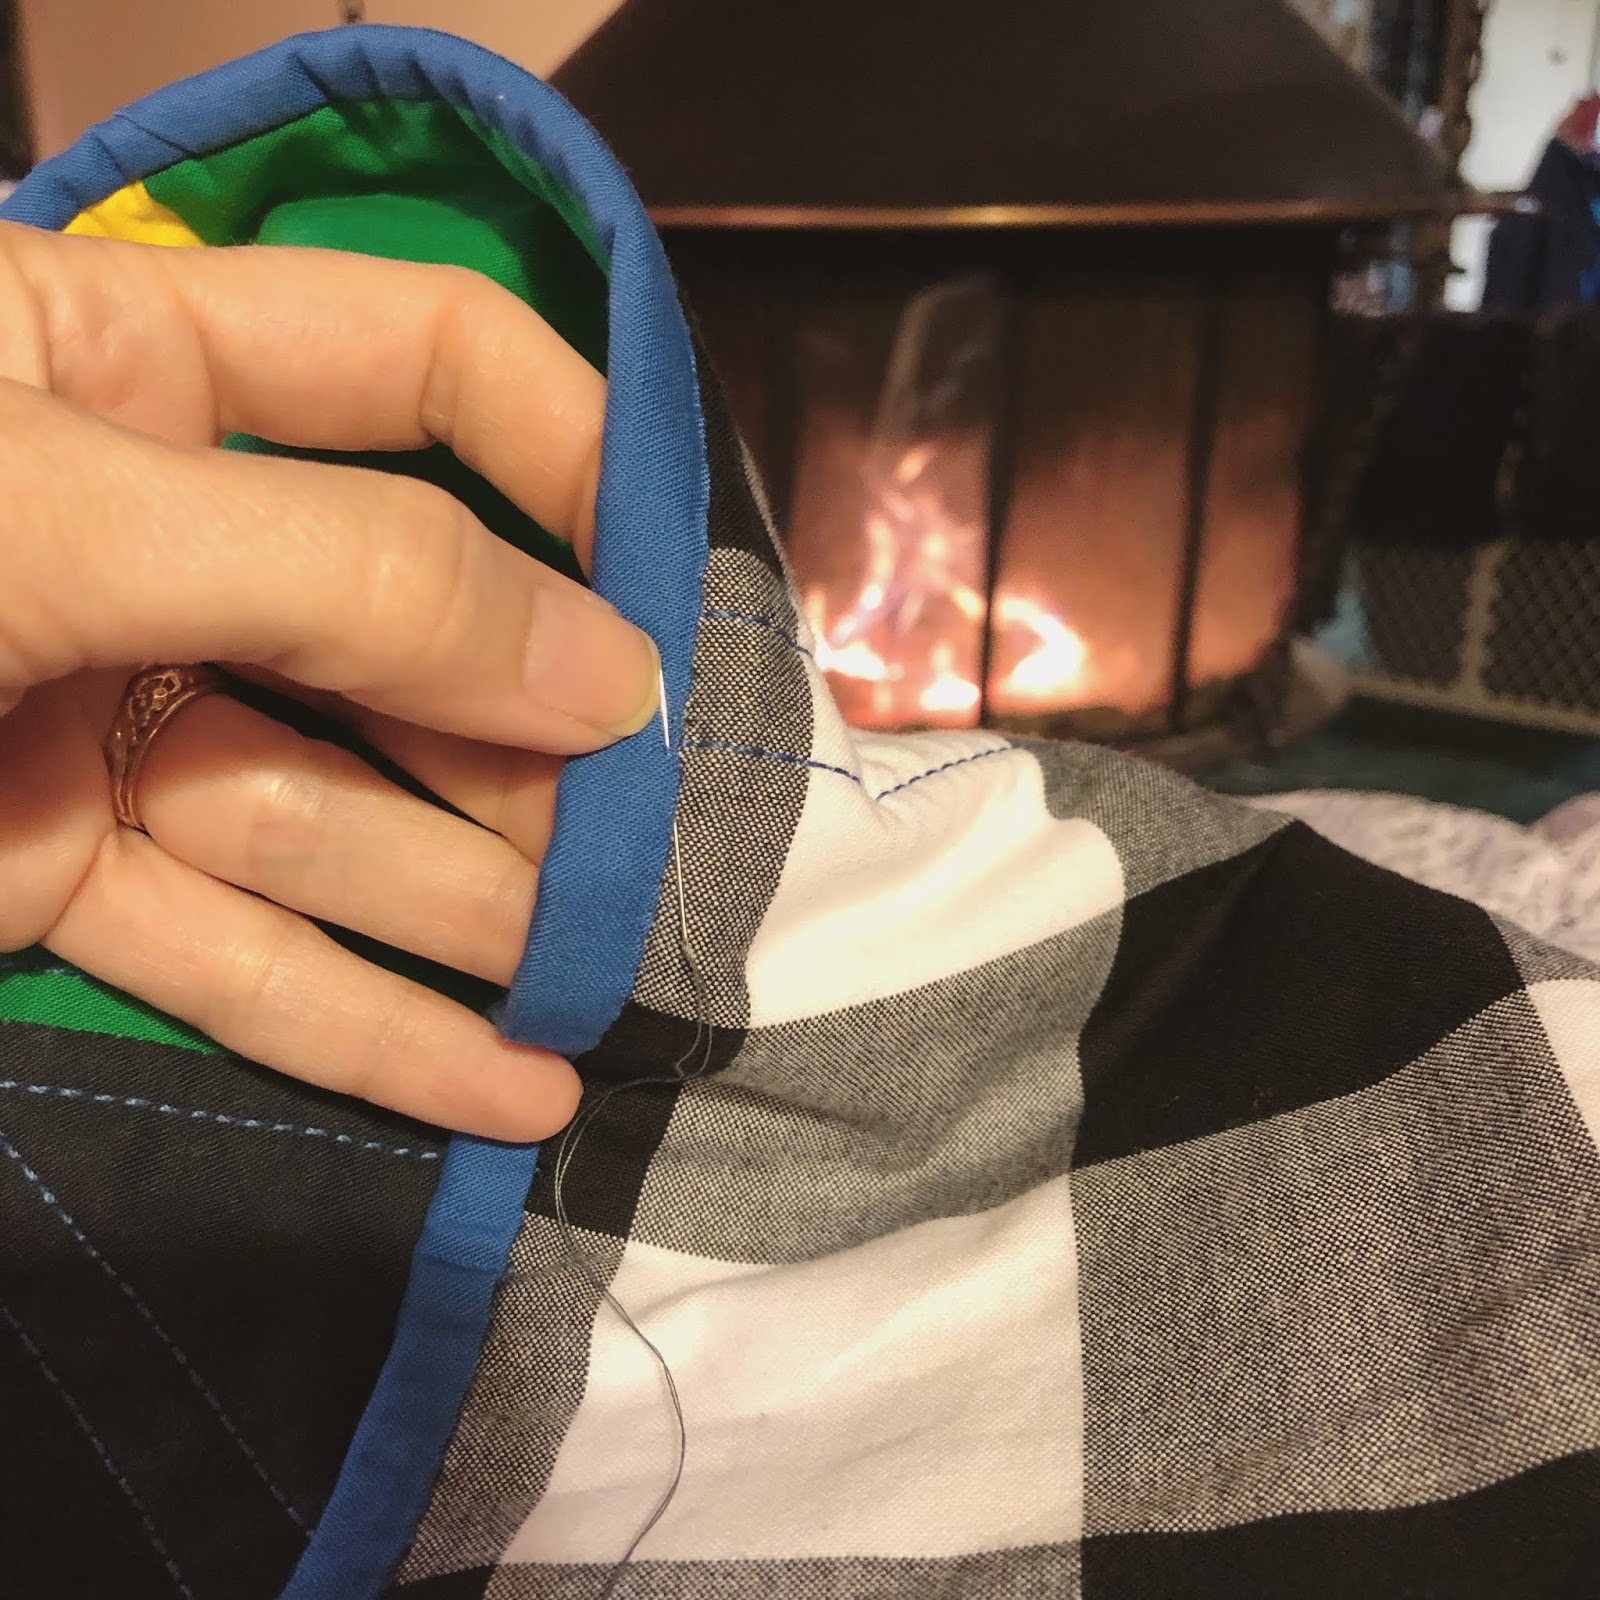
this kid of mine has always been brainy in math and science, which is why i picked the two text prints that back this quilt. the black and white carolina gingham was to keep with the black and white theme on the back and because it's cubes. (you can see the fabrics closer in subsequent photos.)


my son is one of those brilliant people who can solve a rubix cube in a matter of minutes, therefore the quilt top is an allusion to the rubix cube in my stella grande giant sawtooth star format. it's supposed to look like the rubix puzzle is in process of being unscrambled. having only one orange hst in the star was an accident on my part, but i think it goes with the concept of the mixed-up rubix quite well.

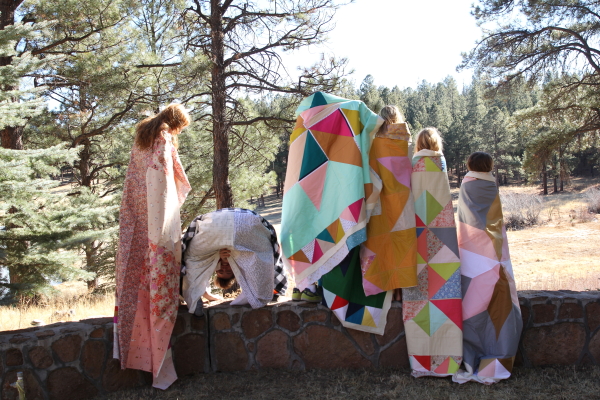
for the border on this stella grande variation, i chose 6" squares to, of course, resemble the cubes of the rubix puzzle. color placement is random, with a few spots where two of the same color cubes meet up, as if the puzzle is being solved.


i got the quilt binding machine-attached to the quilt body just in time to take it with us to our mountain cabin for the winter break. we got dumped on with snow just enough to look amazing yet not be too dangerous, and to make it perfect to sit inside under a quilt.


usually, i sit in the sun room in a gliding rocker to do my stitching, but this time i sat in the main space by the fireplace with the windows to my left looking over the beautiful landscape. it was a bit too cold to sit in the sun room in such snowy conditions.


i did venture outside a time or two to track down children and to take some photos. it was simply breathtaking out there! i know people live in snow all the time, to the point of being sick of it. we get to enjoy it for a week or two each year, just long enough to relish it and then leave.


have you ever seen snow look like glitter when it comes down? one morning the conditions were just right and it looked like a glitter shower was going on in the meadow across from our cabin. all those white flakes you can see were sparkling, shiny and shimmery, but the photos don't capture the glitter effect.


they did, however, capture the huge snowflakes that were already in place that morning. i've never seen them so large that you can actually discern the individual crystals with the naked eye!


but back to the quilt.

i finished off the binding late on the last evening of our trip, cozied up in front of our unique hanging fireplace. it's on the list of things to update in the cabin, but that won't be for quite a while. in the meantime, it's certainly warm and cheery even if it's funky looking.


i had big plans for a photo shoot in all the fresh powder everywhere on the morning before we left, but since it was hovering just above 0*f, that did not happen. it was going to look so good with the red railings on the cabin porches. didn't happen. i did get one questionable photo with red doors and roof of the shed in the background before my son was ready to hold the quilt and we had to move on.


my son and i managed a couple of snaps before we and the quilt froze into ice cubes and then got on our way home.

i guess you could have called us a couple of rubix ice cubes.

Friday, October 19, 2018

some stellas

life has been in the fast lane this year and quilting hasn't been along for the ride much. i've completed 2 "stella grande" kids' christmas quilts and finished quilting 3 more. that's all there is to tell for an update.


d1 got her completed "mary, mary star contrary" quilt just days before she left for an 18-month stint as a service volunteer in eastern europe. we got some fun photos on the road that should be shared in their own post someday.


that same weekend (the first of april) while at our cabin, i almost finished off "radiant suzy", d3's stella grande quilt, too. but i had to leave about a foot or two undone.


in june, i took "radiant suzy" along with us on a trip to the iconic biltmore mansion in ashville, nc, and finished it there on d3's 12th birthday. that turned out to be pretty special and made for a good photo shoot location for the quilt. maybe someday that will become a post of its own, too.


between june and september, i didn't lay a stitch to anything, anywhere. then i got to work on some more quilting on my juki. there are now 3 quilts quilted and one on the machine. yay! my pile of flatlay quilts on the piano room floor has been reduced by half and i've created a new pile of folded quilts that need binding on a chair in the same room.


once again, i've used chunky 12wt aurifil thread for some nice contrast and a handstitched feel. it works so well with the simple straightline quilting of this pattern.

they sure feel like quilts now! just a few binding sessions and they will be free to be loved and snuggled by their recipients. unfortunately, when i got all the fabric for the quilt tops i didn't also get binding yardage. i'll be needing to make a trip to the store for that soon.

time at my machine and a trip to the fabric store? i might still be a quilter after all.

home renovations have been the main cause for the quilting hiatus. phase one should be done by the end of the year, so maybe, just maybe, i'll be doing some different projects before too long. at least until its time for phase two.

Monday, October 1, 2018

liberty makes do quilt, a finish


last april, i did something completely crazy/brave/reckless - i cut into my precious liberty of london tana lawn stash without much more than a very loose idea of what i was doing. liberty fabric is something i had been collecting in small bits and pieces over the years, but i had yet to come across the perfect project worthy of my liberty stash.


then i saw this strips quilt made by ashley at film in the fridge and thought it might be a way to get me feet wet at using liberty without investing too much of any one fabric, a simple way to showcase some liberty pieces alongside some crossweave (chambray). i decided i wanted it to look as if it was made of vintage clothing scraps, so i would use randomly sized pieces to make up the strips. and i would use three printed pieces per strip rather than two.


i chose two heights for the fabric blocks: 3.5" cut and 4.5" cut, then cut those strips at various lengths from 5" to 13". some moda crossweave in blue chambray was added to each end to achieve the final finished length of each strip.

the color palette is mostly reds, blues, yellows, and pinks. honestly, there are a few prints i'm not partial to included here. i don't love liberty just for the sake of it's being liberty. there are plenty of prints i don't like. a few made it into my collection because i ordered them online and they appear differently on screen than in person. once again i've learned that if i don't like a print, it won't be disguised when mixed in with prints i do like. it devalues the appearance to me. some people can look at fabrics as colors alone. i can't. prints matter to me.


its a nice lap quilt size at 51" x 63". i used 22 strips in all and kept its width small enough that i could use two yards of liberty (54" wide x 36" each) pieced together on the back (with room to spare).


the backing is made of mitsi valeria in red and capel in blue (i think it's capel in C).

i had the immense pleasure of handquilting it at my leisure with some white auriful 12wt thread. originally, i quilted down the center of each strip. this makes for a very soft and snuggly quilt. i've decided to go back and add some more quilting in the seams (ditch) for a little more stability. and for the pleasure of handquilting, of course.


overall, i like the quilt. it has a lovely vintage feel that continues to grow on me. all the different fabric contrasts make it a yummy tactile experience. my girls are all drawn to cuddling with it. on sundays, it's the favorite quilt to take to church with us to keep warm. for some reason, because we live in the desert, it's always kept rather cold in the church building. but we're not going to complain about an excuse to bring some pretty quilts with us.

the name? "quilters make do" is a concept i've always liked, the idea that quilters of old were using up clothing scraps or whatever they had to make something beautiful. since i wanted this to resemble one of those vintage, "make do" quilts, and because i used my liberty finally, that's the name.

this is the first liberty + crossweave quilt i've made, but it won't be the last. for one thing, i cut way more strips than i needed at the onset. that's what happens when you just go at something without doing any math first. but as it didn't use much of any one fabric, i'm not complaining. i look forward to making more variations on this theme.

Saturday, January 27, 2018

sewing room scenes


caught in the act!

d5 was playing with my phone whilst i was playing with fabric, and she took a photo of me at work.
you can probably tell i'm asking for my phone back. like most women, i wasn't feeling ready for a photo at the moment, but it actually turned out alright, so i kept it. you can't be too picky over 40.

i take little photos of bits and pieces in my sewing room that please me all the time, but as 1) i'm usually sewing at night, and 2) even in the day there is so little natural light in my sewing room since we installed the doors, the quality in the photos is always lacking. but i still like them! they aren't instagram post worthy, but they please me. so i thought i'd share a few on the old blog, here.


at the end of last year, once i'd gotten all those "stella grande" quilts to the point of basting, and then gifted for christmas, i didn't want to look at a star again for just a bit. so i broke into my stack of fabric for my "gypsy child" quilt and cut like mad. once i got chain piecing, that pretty thing where the squares start folding up and making waves and ripples out of the back of the machine was making me smile a whole lot, as were all the little piles of fabric pairings all over my sewing table. so i snapped some pics.


and another fun sewing room photo - 3 generations of sewers. my mom stopped by whilst d5 and i were playing with liberty and crossweave scraps, leftover from my "liberty makes do" quilt. more chain piecing, which d5 always cuts for me. i managed to get all 3 of us in one photo. you can see me, right?

what you can also see is how much my sewing room needs a good clean up and some rearranging. plans are in the making for that, but its always slow. first, construction on some built-ins for the master bedroom have to be completed so i can get loads of stuff out of this room. then, some storage needs to be built for this room. until then, i'll inch my way around and squeeze through stuff and take crummy pictures in this overstuffed space.

Wednesday, January 24, 2018

mastering geese for a swoon


so, i started something new a little while ago. no surprise there! when i get the urge or the itch, i just dive into something. this time i decided to join the IG #swoonalong. in celebration of her 10th year anniversary in the quilting business, camille rosskelly started a quilt along of her most popular pattern, swoon. i've had the pattern as part of her craftsy.com class i purchased a few years back, and it's been on my "to do" list for ages. it's on everyone's "to do" list because it's so awesome. when the swoonalong came up, i resisted for a little while before being sucked in.

i'm eyeball deep in projects, so i wanted a quick version of swoon. i decided to make a swoon variation of my stella grande quilt pattern: one giant swoon block with a top and bottom border. i'm using heather bailey's floral picnic bouquet in gold as my main fabric, sandi henderson's meadowdot in mint as the secondary fabric, and essex linen from robert kauffman as my background.

i decided if i'm going to make the ultimate quilt, one of the fabrics better be my ultimate favorite: meadowdot, of course. i picked the floral to compiliment it. and i've always wanted to try linen. it seemed a good time to do that, too.

i started cutting away on the floral. and did it wrong. the swoon pattern i have is for a 24"block, but i wanted a 60" block. so i had to do some math. and i did some wrong. then i decided after reading up on quilting with linen that i should use a 1/2" seam allowance rather than the standard 1/4". so i did some more math and re-cut my floral center square.


at this point i realized i was not going to have enough of the floral for the quilt, even before i made my cutting error. so i had to visit etsy and ebay to hunt down that out-of-print fabric i was committed to using in my quilt. lucky me, i found 3 yards of it, so i'm safely stocked again.

and then i ran out of essex linen in flax. i went to my new local shop and go more, but thought it seemed to look a little different than the piece i had picked up earlier in the week. after washing it was still a different color! i talked to the shop owener and found out it was the wrong one. stalled again. whew!

while i was waiting on fabrics, i was also following the #swoonalong progress on instagram. i noticed some of the pieces in the pattern that were originally composed of hsts (like the pattern i have) were being made with flying geese instead. that makes for less seams and a more composed look, so i decided to just figure that out, too.

basically, i've rewritten the entire pattern myself.

i'd love to share all of it here, but that would be giving away a copyrighted pattern. sorry. can't do it.

i had to experiment with the geese to figure out the technique and math for those, too. with some trial and error, i got it down. i had some extra squares of linen not yet used that i paired with some solid scraps,

  the upper left-hand corner of linen is a failed attempt at getting the corner the right size. i tried just cutting a triangle and sewing it on. it came out wrong. i don't even remember what size it was. i think i probably used the leftover piece cut off some of the other bits i'd already done.

i read up on making geese a little and decided to go with stitch-and-flip rather than trying to just sew a corner on.

the geese i need are 12.5" x 6.5" unfinished. i think what i used was a 7" square for the corners.


after stitching both a 1/2" and a 1/4" seam allowance (for reinforcement), i clipped the corners off, per the flip-and-stitch method.


 the linen doesn't behave exactly the same as cotton, so i found i needed to sew a scanter seam so it would reach where it needed to be to line up with the block.


in the end, i completely nailed my tip for my flying goose (singular). it's exactly perfect. which is what i'm going for with this quilt. i've found that when working with large scale patterns, all the little flaws are much more noticeable. since there aren't that many pieces for this quilt top, i think it's worth the time and effort to get them right.

i now have most of the geese units completed, so it's on to the corner units. only i've turned back to the other projects i had going. my grande swoon is in the wip pile for the moment. when i do get back to it, i'm ready for a fast finish and i've got the tricks to getting it right down pat.

if only i remember them . . .

Friday, January 19, 2018

at the end of my spool


i have been working with the yummiest fabrics in shades of peach, red, sand, cinnamon, petunia, and navy on this "mary, mary star contrary" quilt. i bought the prints for the backing separately, at different times, but i think they are all cotton + steele prints. originally, i was going to use only the two florals, but they fell short of the size i needed, so i added those adorable raccoon and circus prints.


something about the stripes on the border ends makes me think of chocolate wrappers and gets me drooling! the two border sets are in slightly different colors, with 3 stripes chosen from the center star selection of eight, and a flying goose block out of the other two colors set in each border. i really should have used the two blues, which i used as highlights not full colors in the center star, as a thin strip to separate the border from the peach background, but it seemed like too much work at a time i wanted to be finishing a quilt top. i think using one as the binding color was a good second choice.


 i chose to quilt this one in chunky 12wt auriful thread in Brass, at a larger 3.5 stitch length. i love how it resembles handstitching and stands out so nicely on the simple quilt design.


this is the 3rd "stella grande" quilt i've used brass on, so i wasn't too sure how far i'd get with what remained on the spool. surprisingly, i got almost to the end of my quilting on just the one spool! i had to guesstimate how much bobbin thread to spin on three different times at the end. you can see in the middle photo above that i got nearly done with my last complete bobbin, with just a few inches of the border left to go. i could have stopped quilting there completely, but i wanted to do a few more vertical seams for added stability. the last photo shows where i was when i finished one of those lines! talk about cutting it close.

after searching for more brass at the two places i normally get my aurifil 12 wt and not finding it stocked anymore, i was able to locate some at hawthorne threads. thank goodness! i got a few spools, which allowed me to complete the rest of this quilt and leaves me enough for several more in the future.

i don't like playing it so close with my threads, but it can be a little exciting, too.

in a "quilter home on a weekend night by herself" kind of exciting way.

Wednesday, January 17, 2018

penny patch 2.0 - school pennies, a finish


if you think the photo quality on this blog has plummeted, i would agree with you! each of the last few times i've needed to take photos of a quilt finish, i have been rushed, the lighting has been impossible, and my camera has malfunctioned. one of the reasons i blog is because i do enjoy quality photos of my quilting life and the items i make. this is such a disappointment to me, but it is what it is, as my husband would say.

the day i put the final stitches into penny patch 2.0 was a broiling hot september afternoon, somewhere in the 110+F region. the sun was merciless and the only acceptable place to photograph anything was a few meager feet of shade on the backside of my sister's house, where my mom was staying. marmee had just jumped out of the shower, so i didn't give her much notice, either. she was only in town briefly, and it had to be done. seize the moment and the less-than-stellar photos while you can, right?


this particular quilt was originally started for myself in late 2014. i came up with the color scheme while working on my first penny patch. it was an unusual palette pick for me - no red but rather magenta, which has long not been my color preference. however, i was in love with the joel dewberry floral i used as the focal fabric and backing pick. so, magenta, teals, turquoise, chartreuse, pink, and a healthy dose of white it was.

the fabrics were a collection of pretty florals, ditsy geometrics, and text prints that all reminded me of back-to-school times. my mother always sewed our dresses when i was a child, and the first day of school outfit was a big deal. the florals reminded me of picking out those dresses. all the alphabets were another nod to school, especially the cursive on school paper print. the pattern name, penny patch, with it's small change, made me think of the quarter mom would give me for milk money so i could get a carton of fresh milk with my home-packed lunch. thus, the name evolved to be "school pennies."


i had a few bumps in the road of constructing this quilt - some literal, like when my kids knocked the design wall over with a kicked soccer ball, and some figurative, like when i sewed all the directional prints the wrong way and had to make the quilt larger to reorient it rather than unpick and resew everything. that drug the construction out pretty long. then the biggest bump of all - my husband fell off a wall. while he survived, my quilting life did not. everything was put away for months and months.

holding it sideways because it's so tall and we're so short
 during that time, my mother was diagnosed with stage 4 colon cancer. she had always wanted one of my quilts, and i did have fabrics long put away for just that, but it didn't feel like there was enough time to start something new. the colors and fabrics were all perfect for my mom, something i hadn't considered before, but immediately recognized. i thought the quickest thing to do was quilt penny patch 2.0 and give it to her. well, i hadn't accurately considered how long a 72" x 84" quilt would take to quilt in 3" citrus peel blossoms. basically, forever.


in the end, it got done after about a year on and off the machine. then the binding gave me a bit of trouble when i was a yard short and had to hunt down more of the out-of-print fabric. honestly, in some ways you could say this quilt was payback for every silly, mean, or nasty thing i did as a child that my mother had to deal with.


marmee does have her quilt and well in time for another winter, when it will keep her cozy. i know she's going to enjoy contemplating and perusing all the fabric picks and combinations, as i do. this quilt is chock full of beautiful fabrics.


the even better news is marmee's cancer journey has gone much better than expected. we're approaching two years since the diagnosis and she's doing very well.

she tells me all the time how much she's enjoying the quilt.
honestly, i was quite attached to this one and choosing to give it to my mom was a painful choice.
of course, i'm glad i did.
it was really meant for her all along, i just didn't know it.

Wednesday, January 10, 2018

what i gave for christmas - a stella grande constellation


if you're an old blogging friend, you might remember christmas 2013 i tried to give each of my 7 children a quilt. in short - it didn't work. some children got quilts and others got pieces of a quilt. eventually, all of those quilts got done. (now that i think of it, d4 and i never did anything with her applique flowers, so i guess they didn't all get done. darn.) however, my dream of gifting a quilt to each of them at christmas fell decidedly short.

fast forward 4 years to the beginning of 2017, and i began experimenting with color combinations in a very simple and easy pattern: a giant sawtooth star with borders that i dubbed "stella grande." i could complete one of these quilts in about a week and had plans to make a different one each month. i had in the back of my mind that i could easily have a quilt for each child this christmas. since it would be the last christmas with all my children at home, i really treasured that idea.


but my life got in the way, as it so often does. i completed 3 stella grande quilts in the first few months of the year, and started 2 more. but none of those were the quilts i had planned for my children. once may hit, we were heading into summer and travel season, when i get no sewing done at all. christmas wasn't even on my mind.

even in the fall, i did very little sewing. when thanksgiving approached in november, i had one of the seven needed quilts mostly finished, and another started. but that one quilt had been quite difficult. i had tension issues with the quilting that i hadn't had on my previous stella grande quilts, and it took me the better part of a month just to quilt. i decided to accept the inevitable - i would not be gifting quilts this year, either.

in early december, i simply changed my mind. i knew it was now or never for this little dream of mine, and i chose to go for it. time was even shorter, but i sat down with my plans and decided on the solids i would need, and went to the store for a huge stack of kona cottons. i had gathered the backings, which were all prints, for the quilts earlier in the year. i had a general idea of color scheme and theme for each child, and the backing prints were the basis for those. once i picked matching solids, i was well on my way.

my husband conveniently went out of town a few times in december, which left me slightly more time than usual to quilt. it was still not quite enough, but i decided a reduced version of my goal would be perfectly acceptable. i got each top and backing made, and basted the quilt sandwich. by getting the quilts to this point, they felt like quilts and were presentable enough for me to gift.


and here they are, oldest to youngest, left to right:

d1, 19: mary, mary star contrary

s1, 17: rubix star

d2, 15: etoile de patisserie

s2, 13: star on the field

d3, 11: radiant suzy

d4, 9: star in the fairy forest

d5, 6: neopolitan sundae in pewter


each quilt has some slight variation from the original pattern to it. there are so many ways to go with this one basic pattern - sometimes it was a border change, other times the number or placement of colors. i've now tried out 12 versions, and i could keep going. but aside from finishing these quilts, i'm going to let 2017 be "the year of the star" and move on, or back to, other projects. i do have a handful of christmas-themed stella grandes i want to make, but that will wait for the next holiday season.

maybe i'll even get the tutorial written up by then and have a quilt along for anyone wanting a quick gift quilt. maybe.

what you get from a 17 year old boy when you ask for a picture from behind

my dear 6 year-old dslr was giving me problems over christmas, so i did not get the photo shoot of these quilts i had envisioned, but i'm happy enough with the capture. i have plenty of quilting and binding to take me into this new year. perhaps when they are all truly done, we'll get better photos with a more functional camera. for now, i'm accepting the incompleteness and imperfections of all.

Monday, January 1, 2018

Dorothy's Girls - a quilt finish


instagram is so instant! my goodness, it's taken me far too long to get these photos here and make this post. but i wanted to talk about this quilt in more detail than even a looooong IG post allows for. and since this quilt was finally completed in april, it really is time to post about it.

this quilt is made from the "indian blanket pattern" by rachel hauser of stitched in color, available as part of her online ::angled:: class, which i took in 2015. i adore rachel's original version of the quilt with its crisp contrast and bold, summery colors. as i chose to work with fabrics strictly from stash and to try a very new-to-me color palette based on two prints, my version is quite different from hers. mine's romantic, rather vintage-y, warm and more fall-ish feeling. rachel's "indian blanket" has a definite pattern to the value placement and the combinations feel more consistent in the value contrasts. mine are all over the place. one of the intriguing aspects of quilting is what changing value or color placement or fabric types will do to the same exact pattern. you can see our quilts are related, but they look like very different quilts from opposite ends of the family spectrum. i like them both for different reasons.


my favorite part of this quilt just might be the back. i used the 3 strip accent stripe backing format i have used for a few other quilts, this time using kona cotton solid in "curry" as the main fabric. i think it's absolutely delicious in its warmth and simplicity. the 3 accent stripes are out of the two main inspiration fabrics and another pick from the quilt top, "antique flower" by julia rothman for cloud9, that has emerged as a favorite fabric as i've worked with it.

the binding i chose is nothing special, but it works and i'm fine with it. (some french general for moda, i think?) it certainly adds to the vintage feel of the quilt.

 for the quilting, i used a soft, peachy-pink aurifil 2415 thread, which contrasts so beautifully with the solid curry backing, but doesn't photograph accurately. my fmq pattern is a set of modern loops done in rows and sized to fit each row of triangles. this is a quick and effective pattern, which was nice since the quilt is so large and took so much time to assemble. also, i think the loops contrast well with the sharp angles of the triangle pattern.


this was my first time working with triangles in a quilt. it was a fun challenge and a skill i'm happy to have added to my tool box. i did pretty well with my points, too. that is always satisfying.


the part i like most about the quilt top is the fabric pairings. some of them are just so good and make me happy when i look at them. namely, those i've photographed to share here. other combos are less pleasing and if i were to do the quilt over, i would remove them and just do more of the ones i liked. but it's a done deal. since this quilt was in part done to use up stash, it's inevitable that that happened.


but the fabrics that do please me please me a lot! i love to sit with the quilt and look at the good ones. each of these photos may look almost identical to you, but they don't to me. they are quite distinct and examining up them up close is what i enjoy about the quilt.

originally, i was using each fabric once in its own row. however, once i got going, i decided more of a good thing was good. so i added a row or two. and since the triangles were of various sizes, the rows didn't always come out equally long. instead of cutting some short, i made others longer. which just kept slowly increasing the size of the quilt. it ended up a whopping 68" x 90" total, a fair twin-sized quilt. but i made it as a throw, so its kind of too large. i tend to always add to quilts to make them "just a bit bigger." not because any of us are big people but because i want to make sure it's big enough to fully snuggle under, and then when it's almost big enough to use on a bed, why not make it big enough? i think the experience of this quilt has taught me that lap-sized quilts and a little restraint is a good idea.


one of the fun aspects of this pattern was the mix of triangle sizes and the occasional randomness and break from form thrown in. rachel directed us where to do that in a few places and i picked some other spots on my own.

in the above photo, you can see the row that's a mix of large and small triangles, as well as a few different fabrics, some of them seemingly out of place with the pattern and rhythm of the row. i like that.


every once in a while, i would throw in a triangle that felt the same as the other fabrics in the row, but wasn't, like the middle triangle in this photo. i like that, too.

so there you have it -  the "dorothy's girls" quilt is done.

but what about that name?

originally i was going to call this something like "indian summer" as a nod to the warm color palette and rachel's pattern's name. but back when i started actually quilting it, my aunt came down with breast cancer at the same time my mom, her sister, was diagnosed with colon cancer. i wanted to gift a quilt to each of them and quickly, but as my husband had just had a major accident (yes, it was a crazy time!), i was in no position to make new quilts, which i don't do quickly anyway. whew! this is complicated. so, i decided to give my mom the penny patch 2.0 quilt, which just needed quilting, and was considering giving this quilt to my aunt. long story short - i didn't. she got the "love all around" quilt instead.

i got to keep the triangles for myself. but i kept thinking of my aunt and my mom while working on it. and of their sister, billie, and their mother, my grandmother, dorothy. grandma dorothy generally brings the color brown to mind, but aspects of this quilt do remind me of her. and those 3 stripes on the back remind me of her 3 daughters. i was hoping the number of rows would come out to equal all the granddaughters, too, but it doesn't. anywho, all that thinking of grandma gave me a name for this quilt and thus it is "dorothy's girls."