Showing posts with label scraps. Show all posts

Saturday, March 5, 2022

crossroads joy


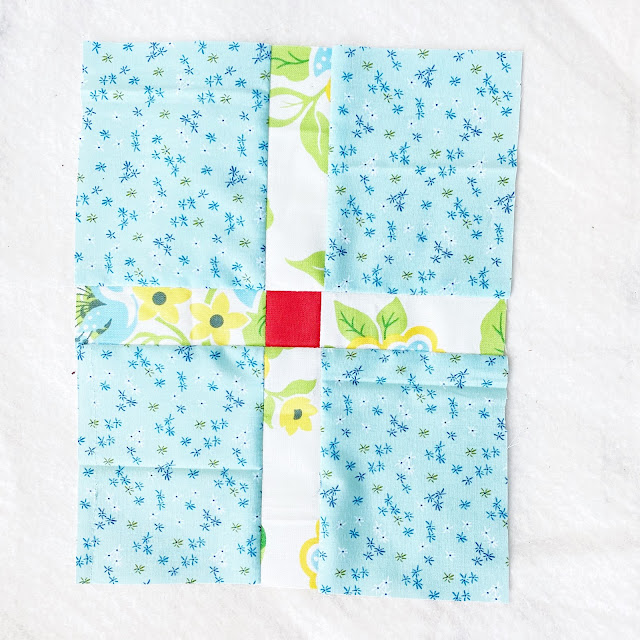
last spring i came across a quilt pattern known as the "crossroads quilt" by treehouse textiles, an australian company. i don't know where i first saw it or exactly how i got sucked in, but i surely did get sucked in. 

it's such a simple block and a great opportunity for making a very scrappy quilt. there's something about that red center that ties all the crazy blocks together. i was definitely intrigued, but it was marci warren's description of the quilt as "a rowdy yard sale" that tipped me over. 

i needed a rowdy yardsale quilt. especially one with little red squares in it.


i knew this kind of scrappy quilt could be a project i did one block at a time, here and there, so i decided to just get it started. because the more quilts i start, the more i finish.

it took me a bit to commit to buying the pattern, though. i have a confession to make - i loathe buying patterns i know i could easily figure out on my own. i actually like doing quilt math! often, when i see a quilt i like, the first thing i do in my mind is figure out how it's constructed and what the probable dimensions are. it's part of the fun and challenge of quilting for me.

and this block is about as basic as it gets. but i checked in with tracy and she said i needed to do the right thing and buy the pattern if it wasn't a standard, traditional block. i think she's right. there are patterns for sale out there that reinvent the wheel many times over by using traditional blocks and calling it theirs; blocks that have been around and redone by many quilters for decades and decades. those i do not feel obligated to buy. if i see a quilt composed of, say, log cabin blocks or flying geese, i don't feel obligated to purchase. but i hadn't seen the crossroads block anywhere else, so i supported the designer. even though i paid $15au for one page of instructions given in about two paragraphs and one diagram.

my problem is not at all with supporting designers. i'm all for that and do it frequently. my grousing is about the cost to level of difficulty ratio here. (i'd say this is a $2-$5 pattern. i mean, literally, all i needed was someone to say, "the units are this size, the strips are this size, and the center is this size," and i would have been able to make the quilt.) 

but i paid for it. designers have a right to make money on their intellectual property just like i have a right to share free tutorials if i choose. and when someone asked me about the pattern, i did not give them the dimensions, but referred them to the designer.

now that i've aired my conscience and views on the matter, let's get back to the quilt.


i selected a fiery red, kona "pimento" 865, that definitely has orange tones in it, for my middle squares. i decided on a color palette of sunny yellow, bright greens, baby blue, navy, and orange, with bits of pink or red in the tiny accents, too.


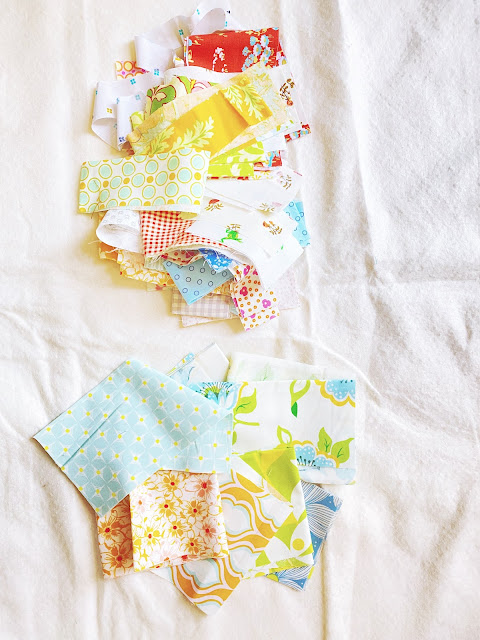
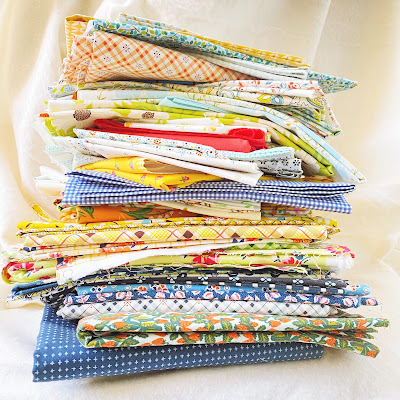
then i got the real pleasure of digging into my scrap bins for my skinniest bits for the "road" strips.

i sat down to make one block and made four. it was just that fun! once i got over the price of the pattern, i've had nothing but joy out of these blocks.


each block is an opportunity for pairing a unique set of fabrics together. mulling over those pairings was quite pleasing. by approaching the quilt one or two blocks at a time, i got to spread the joy of fabric selection out throughout the process of making the top instead of doing all that at the beginning and then just grinding through the assembly.

each block is sort of like a simple mini in and of itself. i go to do all the parts of making a whole top - fabric selection, cutting, sewing - in many small chunks. there was no tedium or slogging through a lot of one chore all at once. it's more like a collection of many little projects eventually coming together as one larger project. making a couple at a time satisfied my itch to quilt very thoroughly. i never felt rushed to get on to more or the next set. for a quilter with sporadic chances to sew, this worked very well.

once or twice i made a single block late at night when i couldn't sleep and it was exactly what i needed to help my brain wind down. there was also little to get wrong, unlike most projects that i have to walk away from when i'm tired. i'm happy to report i never once had to unpick a single block!


i got to use skinny bits of fabrics i love, including several pieces of liberty.


i found myself gravitating toward a vintage look, which lead me to use mostly denyse scmidt, heather ross, and heather bailey fabrics.


part of the fun in this project was i gave myself permission not to press the fabrics before cutting and to use my little roller presser right at the machine when putting blocks together rather than pressing all the individual pieces as i joined them. this gave me blocks and seams that were not perfectly pressed, but it added to the feel of this being a vintage, handmade treasure found in grandma's attic. interestingly, once i began joining blocks i found no more distortion than when i do all the pressing by iron; probably because i'm a heavy ironer not a good little light presser.


this saved a ton of time and really freed me to enjoy the process of cutting one or two blocks and knocking them out without having to get up from the machine and press after every seam. it allowed me to chain piece a block more quickly, too. having to do all that up-and-down for the pressing on each block would have been quite tedious. a small iron and pressing mat next to the machine would have done the trick, too. but i don't have that set up currently. i think it's something i need to consider investing in soon.


i've worked on these blocks here and there, a few at a time over the last several months. for some inexplicable reason they are just so fun to make and quite addicting.


now that i have all 56 blocks completed, i am thinking what other color palette i want to make this quilt in because i will really miss these blocks! i cant remember the last time i enjoyed making blocks so much.

Wednesday, March 8, 2017

building a c


 quite often when i'm in the middle of a project, i'll take photos of the process as i go, with the intention of making a blog post out of it at some point. and sometimes, much later, i find those photos when i'm looking for something else. such was the case with these photos of when i decided to make letters to spell my son's name for his blue and orange wonky quilt using the letter patterns in denyse schmidt's "proverbial quilt."

the letters could either be patchwork pieced or paper pieced. i chose to trace the pattern and patchwork it together. you can watch my letter "c" quickly come together.


there are 4 pieces to letter "c." i cut apart the paper pattern, then selected a fabric scrap for each component. when i cut the fabric, i added in a 1/4" seam allowance on all sides by pinning the paper the the fabric and using a ruler to gauge 1/4" outside the pattern piece. all the letters in this patter have all straight lines to each piece, so this is quite easy to do.


next i sewed  pieces 2 and 3, the top and bottom segments of the "c," to the center background piece 1. once pressed, there was only one more bit.


piece 4, the long left side of "c" was last to go on.


setting the seam.


then pressing open.


and there you have a letter "c."

this process was very quick and quite enjoyable! i do plan on doing an entire quilt of a favorite quote someday.


next time, i'll just need to make sure i can see the pins so i don't accidentally sew one into the letter.

this quilt is now in the binding phase, by the way. it should be a finish quite shortly!

Wednesday, May 27, 2015

a little bit of heart and a book review


 a few weeks ago i got a copy of jen kingwell's new book, quilt lovely, and instantly fell in love with 99% of the patterns. in love, as in "i absolutely must stop all other plans and spend all my quilty time for the next few years making these designs." they really are spectacular. as you may know, i've had my qualms with ms. kingwell's pattern writing for gypsy wife so i was a bit leery of a whole book of her patterns, but the absolute gorgeousness of the designs makes up for any weaknesses in pattern clarity. i am in need of several new quilts for our new mountain cabin and i think these will be absolutely perfect for the place.

doesn't this one say "cabin" to you?
the day after my book arrived, i was feeling less than inclined to work on my several wips laying around and picked up quilt lovely to see if there was something i could dabble in. i find taking a break from what i'm working on often helps me clear my head and refreshes my interest in the project which has gone stale. many of the patterns in the new book require templates or other involved processes, so i settled on making just one courthouse steps heart block from one of the pillow patterns, "she loves you." i figured i could make just one and work it into gypsy wife somehow if i didn't want to make any more.

the pieces for this block are so tiny! 1" high each. most quilters will throw something that small away. it reaffirmed to me that i'm not completely crazy for holding onto such small scraps, something i have a propensity to do. i started out by cutting pieces to the sizes needed and lining them up in rows according to size. there is a pile of color and a pile of neutral for each length.

first block - not very heart-ish
 the blocks, made up of four smaller component blocks, finish at 6" square. i love the combination of all the colored scraps in the hearts against the neutrals. i had fun digging through my tiniest scraps to come up with bits for the blocks. i completed one block after a friday morning sewing social with my friend, becky, and another evening session with fellow blogging quilt friend, kate, from quarter mile quilts. (kate and i met through blogging and instagram, and finally got together in person for some sewing, chatting, and chocolate. sew fun!) yes, it took me a whole day to complete one block.

putting together that first block taught me a few things about fabric choices, as well as how to put the blocks together. kate said she was surprised i could talk and work on such an intricate block at the same time. well, really, i couldn't. not very well.

 i made not one but three of the smaller component blocks incorrectly! almost enough for a whole heart. ugh! oh well. they're not wasted, i'll work them into something somewhere. and they are pretty cute all on their own. i might just make one more and put them all together into one jumbled courthouse steps/log cabin block.

anyway, after getting my first block finished, i had learned a few things and wanted to test my ideas out, so i made another block. also, i didn't feel like it looked much like a heart at all. i hoped that by making more than one, side by side they would start looking heart-ish.

 it does help to have more than one to give the effect of a heart. i'm thinking about making a row of them for a quilt, maybe a whole quilt out of the intricate blocks from the pillow patterns in the book. those patterns were written as pillows so you wouldn't have to commit to making a whole quilt out of them. they would be amazing that way but the work involved would be quite extensive. anyway, maybe a row of each kind would make a nice quilt altogether.

so here's what i found while working on these blocks:


1. absolute neutrals or nearly-neutrals were best for the white space parts of the block, the not-heart parts. originally i thought just low-volume was going to be good enough but i could tell immediately that i didn't want any low-volumes with color in them and weeded them out. but even low-volume prints that had an obvious pattern, like the floral or comma print i used (see above) were a little too loud, competed with the eye against seeing the heart shape formed by the colored strips. i had very few nearly-neutral low-volumes as it was so i had to invest in a few more tone-on-tone prints and solid colored neutrals for future blocks. upon closer inspection, the ones used in the book mostly seemed to be various colors of white, cream, ecru, etc. i like the effect of having different colors but the low-volume prints i used were a bit too attention getting.

good options
2. low-contrast, high-volume prints were best for the colored sections. by that i mean it was better if the print didn't have a super busy design or a lot of white/light colors in them, if there was little contrast within the strip's design itself. bold colors were best for if the prints were too light, they didn't show up well against the neutral strips. they sort of got lost and the shape of the heart did, too. if a light colored or high/contrast-busy strip was included, it was better to have it closer to the interior of the heart, not on the outer edges.

not-so-good options
these are all prints i like and prints i even used, but the ones with a lot of contrast between the colors within the print itself, especially with a lot of white, didn't define the shape of the heart very well at all. i tried to make sure that if i did use them, the white sections were facing inward, touching another color rather than turned out against a neutral strip. what really helps the most is to have a lot of contrast between the color strips and the neutral strips, however you do that.

here's a case of where i had a colored print with white in it and when all the seam allowances were hidden, i ended up with mostly white showing! i didn't expect that tiny tip of the heart to come out looking like this. it would have been better if i had used a solid or tone-on-tone print here. that white half of the top pink strip, coupled with the yellow part of the next strip distorts the shape of the heart because they basically disappear.

 in the book, ms. kingwell suggests considering the backside of fabrics as well as the front, for their effect. this worked nicely with some of the neutrals i was using. you can see above, that if you turn them around so the wrong side is showing, you get an even subtler effect of the print.

so now i have two nice little hearts hanging out on my design wall while i get back to work on my other projects. i do find that stepping back from them and viewing them from a distance really helps them look heart-ish. and some day when i have a whole row of them, they will probably look pretty lovely and heart-like together.


daisy do - the cover quilt - which i will eventually need to make. by hand.
there are several things i really like about the book other than the gorgeous patterns. there is some introductory writing about each of the designs. every quilt has a story and i like when the designer shares that story or at least some thoughts about it's inception. also, each quilt is photographed in use as well as fully laid out flat with a complete view of the top. seeing a quilt from different angles gives you different perspectives on it. there are no pictures of the backs, but ms. kingwell does not piece her backings, preferring as few seams on the back as possible, so they aren't relevant here. there are clear, colored assembly diagrams for the blocks as well as the whole quilt for each project. quilting ideas are also included, with basic sketches for some of the projects. in addition, i enjoyed reading ms. kingwell's thoughts in the appendix sections. all quilters have their own techniques, preferences, and reasonings, which can vary widely, so i appreciate hearing her ideas and rationales.

spinning around - composed of three different pinwheel blocks - is the other top contender for my favorite
as for what i think of the pattern writing this time around, i'd say it's improved. the pattern that i followed for this block was pretty good, it had nice color illustrations that helped with assembly. however, it wasn't labeled with where the different sizes of strips went, even though they were numbered in order of placement. with the help of the illustration i could accurately guess which was which and still got the block assembled. a beginner might have more confusion over the process. browsing some of the other patterns i'm interested in i could tell that some of the other instructions were not super detailed, like how to sew the template pieces together. it's just the nature of her writing style and of these types of quilts, meant for more experienced quilters, that there are levels of assumed knowledge. i know and accept that now. if i can't figure out something from written instructions that are rather general and don't include diagrams, i'm sure there are tutorials and videos online that will help. overall, it's a splendid book full of really, really lovely quilt patterns. especially if you love scrappy quilts with dozens of prints per quilt and want challenging projects that will push your skills. which i do.

this book has been read and browsed nearly every day since it got here. even if i only ever just looked at it, it was a worthwhile purchase for all the viewing pleasure it gives!

if you've seen the book, which pattern is your favorite?

linking up with lee's wip wednesday at freshly pieced

Monday, July 7, 2014

from scrap to confetti


how do you explain to a 13yr old boy that the seemingly insignificant and useless scrap of fabric he just mindlessly hacked to pieces with your (off-limits) rotary cutter was in reality rather precious? he certainly won't understand that itty bitty smidge of fabric being a still-useful piece of an out-of-print designer fabric that is hard to come by these days; nor that you had plans for it in your current project which actually calls for pieces to be cut to that size, which further means you now have to deface another larger piece. oh, the waste!

please, son, just don't touch any of mom's fabric, no matter how tiny it looks to you. and definitely leave my tools alone. unless you ask first, of course. then we're good.

#firstworldquiltingtragedy #dramaforascraphoardingfabriholic #thatwasfuntoplayup #butsomeofyougetit

Wednesday, April 16, 2014

Gee's Bend inspiration


if you've read anything about american quilting and it's recent history, especially the modern quilting movement, you've probably come across the term "gee's bend quilt." i enjoy reading about quilting history almost as much as i enjoy actually making my own quilts, so after coming across the term a few times, i looked into it. i found not only a book for myself, gee's bend: the architecture of the quilt, but a children's picture book, stitchin' and pullin': a gee's bend quilt by patricia mckissack, which follows along as a young "bender" girl describes her journey from baby playing under the quilt frame to making her first quilt. there's quite a bit of african-american history woven into the story. best of all, the young narrator describes how she makes fabric selections for her quilt from scrap clothing and fabrics; every piece has a meaning.

yesterday, the two littlest school girls and i enjoyed exploring the picture book and then looking at photos of some of the real quilts from my grown-up book. today we took that one step further when i had the girls pull scraps for their own mini quilts, built around a theme. getting them to stick to a theme and not just pull fabrics they liked took gentle reminding, but they managed pretty well. they also have a few other themes in mind to explore in the future.

 d4 picked "camping with dad" for her theme. she snuck a lot of "wildflower" prints in, but kept pretty close as i reminded what she was doing. her bits represent:
  • the paisley - lots of flowers
  • the brown spot - a hole i found that one time, probably a snake hole
  • pink oval elements - keeping dad's rules, because this one is in order like all his rules
  • burnt orange scroll - dad
  • purple flowers - flowers i find and trees; i find lots of flowers
  • blue - Jesus because i think of him sometimes when i'm lying in the tent or feel him when we are at the campfire
  • brown ditsy floral - dirt
  • navy blue solid - the river
  • green flannel - grass because it's green and fuzzy
  • white spots - marshmallows
  • orange - camp fire
  • green with circles - trees
she also picked some for pinecones, the tent, hot cocoa, and then started getting one for each person that goes camping with her.

 that prompted her to dig deep in the scraps saying, "where am i in this basket?! i need one for me."

 d3 settled on finding scraps to represent people in her life. if she tries to pick one for each and every relative, it's going to be quite a quilt since her extended family of aunts, uncles, and cousins is near 100 people. then again, she's enamored of very tiny pieces, so we'll see.

 as they worked on their gee's bend memory quilts, i worked on my memory book - project life. i'm so far behind! probably even farther behind than i am on quilting. there are just never enough hours in a day or lifetime to do all the things i'd like to.

Wednesday, December 4, 2013

my next wips and some scrappy help

i've expanded my palette for s2's quilt beyond the jelly roll of riley blake's "superstar." i just wasn't feeling it with the one line so i found more blues, greys, brown, and oranges to add to the mix. this project is up next in the kids' quilts for Christmas line-up.

goodness, there's been a lot of orange popping up around here lately. just look:

this little pile is actually all from one line of fabric, heather bailey's  new lottie da, but that's not bothering me here. it's a pull for a very, very special quilt i promised someone 3 years ago and has now been called into service. it's a great story that i'll share soon.

as i've been pulling fabric and quilting away, i've had help from this little lady. doesn't she look like the most innocent being in the universe? oh, but she's busy! into absolutely everything, growing that brain of hers through hands-on knowledge construction. she keeps me on my toes constantly.

i will do most anything to buy a few minutes peace from her so when she asked to play in the scrap basket just after i'd organized it a bit, i happily said yes! historically, this lasts for about 3.2 minutes, but it was a few minutes i needed. besides, i love it when she plays with the fabric bits.

she got right ot work laying the scraps out just like i'd been doing with my penny patch blocks. i'm happy to say i believe she stayed engaged for a full 10 minutes this time before moving on to her next project. it's high time i finished my current wip and moved on, too!

WIP Wednesday at Freshly Pieced

Friday, September 6, 2013

pincushion, finally!


i've needed a new pincushion for . . . i don't even know how long. since the dawn of sewing time around here, i suppose. this summer, some wrapped up binding has been standing in for the awaited arrival and the rest of my pins just live in the box. that binding is about to go on it's quilt and trying to get pins out of the box is a risky venture. so a pincushion was in order.

 i've got several patterns for some adorable heather bailey pincushions (supplies for some, too) as well as the countless patterns in my sewing library. but other than the strawberry i started years ago, i just haven't buckled down and made one. there always seem to be more pressing sewing projects to spend my limited time on. until this week!

i was browsing ayumi takahashi's book patchwork, please! and decided to make the pincushion on the cover. all it needed was a few scaps. i have plenty of those. i even had some linens stashed away from when we made headbands at girls weekend 2010.

 i selected some pink and pink-with-green fabrics from the scrap basket. for my linen, i chose a shot charcoal.

i've never done foundation paper piecing before or sewn a 3d shape, so this was out in exploratory waters for me. aside from it being maybe difficult to work with because it was small, i figured a simple project like this was a good choice for a beginner.

the books directions, however, were not extremely clear for a beginner like me. there was a certain level of assumed knowledge i was lacking and some directions that were just unclear. i was able to figure out how to do everything, but think the explanations could have been more precise and a few more diagrams would have been appreciated.

for example, in the paper piecing instruction section, you're told to temporarily glue the first scrap to the paper pattern, wrong sides together. then you're immediately told "with right sides together, fold the pattern down and cut 1/4" away from the paper." this thoroughly confused me! i thought it was a typo until i kept looking over everything and realized it just wanted me to fold the paper out of the way to create a 1/4" seam allowance on the scrap. "fold the paper down, right sides together" would have been more helpful. to me, at least.

when it came to the pattern for the pincushion, diagrams would have been helpful. having never done a 3d shape before, i didn't understand how to place all the pieces for sewing until i had played around with them a bit. but i did get there.

also, i do really think there is an incorrect measurement in that pattern. the little square patches are 2" sq, and you're supposed to end up with a patch 2 1/2" sq so that you have a seam allowance on all sides. yet the fabric scrap for the middle is supposed to be cut at 2" x 1.5", so i was missing the seam allowance in a few places.


the linen scraps were all to be cut the same size, which meant a lot of waste for the tiniest piece at the bottom and not quite enough for the piece across the top. i quickly discovered i could use pieces cut off the sides for the tiniest bottom triangle, which saved me 3 scraps. in the future, i think i would cut 8 rectangles as called for (2" x 1.5") and 4 rectangles at 2.5" x 1.5" instead of 16 at 2" x 1.5".

 i think that's why i had gaps in some spots, like in the photo above.  the gaps fell in the seam allowance, so when i sewed the top on, it all seems to have worked out, so i guess it's okay. but i'd rather be safe than sorry. if this were a project that was going to be washed ever, those little gaps might cause issues.

it was pretty easy sewing that little box together - i was surprised! i thought i'd have difficulty manipulating the pieces so they didn't get sewn together in the wrong places, but i had no problems at all.

when it came time to stuff the box, i got out my stuffing scraps. this box of strings and cuttings too small to be good for anything else has been piling up in hopes of being used as stuffing in projects that require some.

 so instead of polyfil, i used the strings. the washed bits from my epp project were especially soft and cushy feeling. so glad there was a use for them! i even used the leftover pieces cut off of this project when the piecing was all trimmed up.

 so here she is - not as crisp looking as ayumi's cover girls, but not too shabby, either. i did have a small mismatch along seams, so one of the patterned fabric pieces is slightly off in the center, but the button seems to be covering that up. ayumi used fabric covered buttons for her pincushions, but i didn't have kits for any small enough for this project. not wanting to delay with a trip to the store, i selected a sparkly green button from my button stash. (oh, yes, i have one of those, too.)

overall, this was a fun and quick project. heck, if i can do it, anyone probably can! i will likely make more of these if i have a need for a quick gift. i do like that it uses up scraps and that i got to dig into my stuffing scraps and button stash, as well.

in general, the book is completely adorable! there are several projects i'm itching to make, like the storybook quilt and pencil cases (zip pouches - another first!). and i really, really want to figure out where ayumi gets all her great fabrics. japan? i hope not. i sure wish she'd credited the sources so i could get my hands on some. her fabric taste is awesome.

my only other wish for the book? a cd with all the patterns on it so you could print out what you wanted instead of photocopying or tracing them. that would have been the icing on the cake. i might just have to join the zakka along 2.0 now!

linking in with finish it up friday at crazy mom quilts.