Showing posts with label cinched. Show all posts

Monday, August 31, 2015

"cinched" pattern tutorial


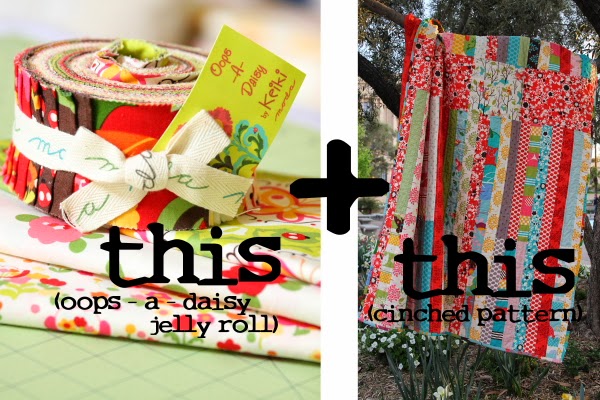
this is a simple strip quilt pattern which utilizes a jelly roll and a bit of extra yardage for an accent strip and block across the upper portion of the quilt. it comes together quickly and easily, with a few opportunities to embellish the design for more detail.

in this tutorial, i will give basic instructions for the pattern. for more detailed instructions, please refer to the links to each section of assembly.


fabric requirements

i'm starting with a generous amount of yardage partly because i already have it in my stash and partly because i simply like to work that way. generally i need room for error and i happen to adore scraps, so leftovers are quite welcome. 
  • one jelly roll (or 45 - 2.5" wide x wof  strips, see further options below)
  • fabric a - 1/2 yd for accent block and backing strip a (could be done with 1/4 yd or fat quarter if adjusting measurements slightly - see section on accent block)
  • fabric b - 2/3 yd for accent strip and backing strip b
  • fabric c - 1/2 yd for extra strips and backing strip c
  • fabric d - the equivalent of one jelly strip for strip joining squares (if using)
  • optional fabric e - 1/3 yd for accent block
  • 1/2 yd binding fabric
  • 3 1/4 yds backing fabric, 4 1/4 yd if using a directional print
it's a pretty small list. if you want more variety in the strips, which i do, you can use additional coordinating pieces. 

* note - 1/4" seams used through out and all measurements are for "cut" (seam allowance included) not "final" unless otherwise noted.

make the strip sections

cut the selvages off all jelly roll strips. (for more detailed instructions on preparing the strips, see cinched pattern, part one.)

select 30 jelly strips to be cut in half and used for the upper section. (set the other 10 strips and the 30 half strips aside for the lower section.) arrange these 30 half strips in a row for the upper section. (for a detailed discussion of strip selection and construction options, see cinched pattern, part one.)


layout the lower section with 30 full strips in a row. these full strips include the 10 remaining jelly strips from the jelly roll, your 5 additional full strips cut from fabric c yardage, and 15 full pieced strips constructed from the leftover halves from the upper section.


you can either simply piece the leftover half strips or . . .


you can make pieced strips that include small 2.5" x 2.5" cut joining blocks, for more interest. i did this, varying the placement height of the joining blocks in the strips, and also using three pieced sections and two blocks for some of the strips. (see cinched part one for a discussion on these joining options.)

cut the accent strip and accent block pieces from fabric b and e.

the accent block can be a simple 10.5" square of one feature fabric e or you can create any quilt block of your choice 10.5" in size. in this quilt, i chose to make a courthouse steps block. (for a discussion of block options and how i made my accent block, see cinched pattern, part two.)

join your accent strip pieces to your accent block to make the middle accent strip of the quilt top. there is a little extra length to this piece as cut so you can play with placement of where you want the accent block to fall.

lay all the pieces out either on a design wall, bed, or floor to check the placement of your strips in the upper and lower sections with the accent strip in between them so you can see how you like your layout.

join the strips in each sections together to create two panels, an upper panel and a lower panel. (for more details on joining the sections together, see cinched pattern, part three.)

join the three panels together to complete your quilt top, which is now approximately 70" h x 60"w, once you square it off. (i used 31 strips so my top is actually 62"w.)

next, create a backing. i like to piece my backings and used a three-strip accent stripe for the back of this quilt. (for directions on making this backing, see three strip accent stripe pieced backing.)


sandwich, baste, and quilt.


for the "out on a limb" version of this quilt, i did a simple echo quilt of all the seams. this resulted in lots of straight lines and a flatter, less-crinkly texture.


for "bloom where you are planted," i used a loopy figure eight quilting pattern, which ran along the strips. this quilt has glorious crinkle texture to it, if that is your preference.


in the accent strip, i stipple quilted for some contrast and added interest. the accent block also had some unique quilting in it's sections. (for a discussion of my quilting choices, see "loops and crinkles.")

"bloom" is bound in some lovely olive lottie dot from heather bailey's "lottie da" collection

now you just need to bind your quilt and you are ready to wash and snuggle!
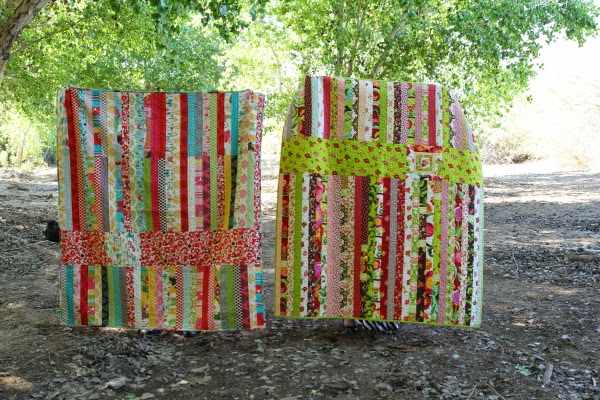
i've completed two versions of this quilt so far, and have the fabric for a third set aside. "limb" lives on our living room couch and is regularly used and greatly loved, despite all it's imperfections, which i don't really notice any more. "bloom" was gifted to my dear friend and quilting buddy, jill, who has moved away. despite the fact that my 16 yr old photographer did not notice "limb" was upside down, you can see the two versions of the quilt here together and how the slight variations affect the look of the quilt.

i've greatly enjoyed this pattern, which is so simple and satisfying. having designed something myself, especially as a new quilter, is very gratifying, indeed. giving the gift of love made tangible in the form of a cuddly quilt is the best part of all.

i hope you enjoy this pattern and would love to see any version of it you create.

happy quilting!

the detailed steps for this tutorial are spread over 6 posts i wrote as i made the "bloom" quilt and worked on the pattern. find the others here:

cinched part one - fabric requirements and strip preparation
cinched part two - the accent strip and block, modifications from the first quilt, joining blocks for the long strips
cinched part three - joining your strips and sections to assemble your top
the three-strip accent stripe pieced backing - how to make the backing
loops and crinkles - quilting choices for "bloom where you are planted"
cinched part four - quilting, binding, and gifting

linking up with friday finishes at crazy mom quilts

Saturday, August 29, 2015

the three-strip accent stripe pieced quilt backing

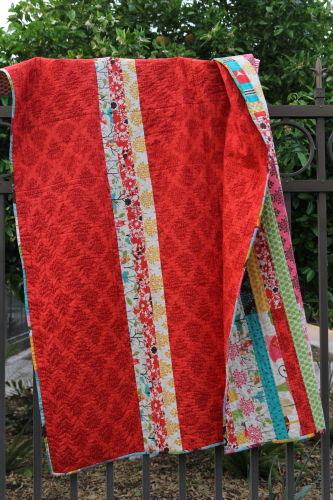
 this is one of my all-time favorite quilt backs, which graces the backside of my "out on a limb" quilt, the first run of my "cinched" pattern. honestly, this back makes me as happy as the front.

i chose to piece this backing because i was leery of trying to match up the strong graphical pattern repeat in the red fabric. and because i just love a pieced backing as an additional design feature for a quilt. i chose to offset the stripe not only for design interest but because it would keep the quilt from having a seam down the middle of the back, where a quilt often gets folded. apparently, this is supposed to stress the seam.

because i was so pleased with this backing and because it's so easy, i've tried to duplicate the back on two other quilts. tried. sure, i was able to use the exact same method for the other two quilts, but somehow it didn't have the same effect. and after looking at the other two, i know why. if you look at the first quilt, you'll see i have a strong feature fabric that has little contrast in it's design (it's a simple, tone-on-tone red print). the contrast comes in to play with the strips i used between the large panels. i chose the three fabrics based on fabrics i featured in the front of the quilt. the blue owl strip was my accent block print, the red bandanna print was from the accent strip, and the low-volume yellow strip was used repeatedly on the front, more times than other strips were. i placed the red strip in between the other two prints so it wouldn't be right up against the red panels. and this is the formula for success.

next, i made a similar backing for "romance in the garden." one change was i used two fabrics from the same line and with the same aqua colored field (background) but of different prints. maybe the two prints are the problem or maybe it's because there is just too much sameness all around, but this back falls kind of flat to me. it just doesn't say "wow!" like the first one did. there is no real volume contrast here. that must be the issue.

when i made the backing for my second "cinched" quilt, "bloom where you are planted," i tried the contrast theory again. i did get contrast, but the large panel fabric is so busy the strips kind of get lost anyway. oh, well. now i know even better for next time what to do.

 to make this backing was quite simple. i used one large 4 yard piece of fabric for the main panels and three strips, 2.5" x 72" cut for the accent stripe.

i cut the main fabric in half, resulting in two panels approximately 72" high x 42" wide when the selvages were removed. the top for this quilt was 70" high, so this didn't give me a lot of wiggle room for shrinkage and shifting when quilting, but i took the risk. a safer length would have been 4 1/4 yards of the main fabric, which would have given me 76" in height.

here, with the three strips sewn to the two panels, i have a backing measuring 72" high x 90" wide, more than ample in width for my 60" wide top. but this gives me room to place my top exactly where i want it in relation to the strips on the back. also, because i was using a directional print, i did not want to piece one of the side panels, which i could have done out of one yard of fabric. if i'd done that, the print would not have been running the same direction on both sides of the stripe.

however, if you are not using a directional print, you could use 3 1/4 yards of fabric. cut one panel at 2 yards and 6" long (78h" x 42w") and cut the remaining 1 yard 3" in half (2 - 19w" x 42h" pieces), which can be pieced together to create a second panel that is 19"w x 84"h. cut it down to 78" high to match the other panel. when these two panels are added to the strip section (78" x 6.5", which you made longer than my 72" strips to match the increased height for these more generous measurements), you will have a backing that is 78"h x 65"w. this doesn't give you exactly the 4" on each side normally recommended for a top to backing ratio, but it's pretty good.

if you use the 4 1/4 yd method, you're going to have some nice scraps leftover from cutting the side down 22". just be happy you have enough of your lovely fabric left to use it again in another quilt! (or if you're using the "cinched" pattern, maybe you used if for your accent strip or additional jelly strips for the front? there's an idea!)

now that your backing is done, it's time to make a yummy quilt sandwich. i always enjoy this phase because it makes the different pieces finally look and feel like a quilt, not just a bunch of parts.

when placing my top and bottom together around the batting, i tried very hard to get the strips to line up as best i could. this can be done by seeing that your backing stripe lines up with the same strips from the quilt top at both the upper and lower edges of the top. also, you might be able to see in the above photo that i could vaguely see the backing stripes through the batting. so i slowly and carefully lined up the seams on the strips with the top as i placed the top on the batting.

this is not essential, but if you are doing some echo or straightline quilting, it will make the back look better.

there you have my favorite pieced backing in a nutshell.
or maybe a few nutshells.
i'm not very brief. ever.

the detailed steps for this quilt's tutorial are spread over 5 posts i wrote as i made the "bloom" quilt and worked on the pattern. find the others here:

cinched part one - fabric requirements and strip preparation
cinched part two - the accent strip and block, modifications from the first quilt, joining blocks for the long strips
cinched part three - joining your strips and sections to assemble your top
loops and crinkles - quilting choices for "bloom where you are planted"
cinched part four - quilting, binding, and gifting
cinched full tutorial

Friday, April 3, 2015

bloom where you are planted OR make new friends but keep the old

jill and i have been friends for most of the 8 years she lived in my neighborhood. about four years ago, i talked her into taking a beginners quilting class with me, and over the next three years (instead of the month the class covered) we spent many a friday morning having a little sewing social, working away, ever so slowly, at those two quilts, and a few other things, too. last april, just before jill moved out of state, we completed those market square quilts and had one last friday morning together, eating brunch and photographing our creations. 

"bloom where you are planted" quilt top
 although i eventually found a new friday morning sewing friend, becky, i have missed jill and her family dearly over the last year. she recently emailed me they were coming in town for spring break and i realized i wanted badly to finish the quilt (she didn't know about) i had started for her on my birthday last year. that last friday we were together before she moved, i got the idea to make her a version of the first quilt i self-designed, which she loved so much. i even had somewhat similar fabrics by the same designer that i was pretty sure she liked. (now i'm wishing i would have hunted down a jelly roll online and made her an identical one. too late!) however, i didn't even cut into the fabrics before she moved and even though i completed the top eventually, it was just a flimsy languishing away in a corner. but when jill said they were coming, i decided to get to work on a finish.

"bloom where you are planted" quilt back
 getting the quilt done was no small task that required selective neglect of a few other things i should have been doing or people i should have been spending time with. and i was completely apprehensive about whether or not jill would even like it, when all was said and done. it is, after all, a really, really bright and in-your-face colorful quilt. but i got it finished before she arrived. i'd invited her over for brunch and told her i had a new quilt finish i needed help photographing.

jill and her family came over for sunday brunch, my husband's waffles he's been making almost every single sunday for the last 12 years. we hugged, chatted, ate waffles with fruit and bacon, and caught up. the whole time i was bursting inside to hand over her quilt. finally, the eating was done and i told jill i needed help with that photography.


then i handed her the quilt, all rolled and tied up. it took her a moment to realize i was giving it to her for keeps. when she got it open, she was just in disbelief that it was for her. she started crying and saying it was the nicest thing anyone had ever done for, and that it was so bright and cheerful, over and over. i wasn't expecting this kind of reaction at all. all my apprehension and doubts and regrets melted away and i admit i got a little choked up, too. i've never made anyone cry with anything i've made. (except for the time when we were newlyweds and my husband found a bone in the first bite of fish i'd made and spit it out on his plate. but i was the one who was crying, not him.)

two versions of my "cinched" pattern: the original "out on a limb" (inverted - oops) and the newer "bloom where you are planted"

i think this move from our warm and sunny desert home, where she'd been most of her kids' lives, to a new tiny town far away, coupled with a cold and windy winter, had been wearing on jill. giving this to her before she left would have been really nice, but i think the timing worked out even better the way it happened. it was a tangible statement about how she's been missed when she had been missing us, too. i hope my loud and cheery quilt will brighten up her home and remind her of friends who love her far away. she asked me what i had named it (because of course i didn't actually get a label made). when i told her i called it "bloom where you are planted," a saying that used to reside on a sampler in my mother's kitchen, she started laughing. "that's pretty appropriate," she replied. i hope this quilt helps her continue to bloom in her new place even as she remembers those of us she left behind.

 we went to a wild preserve section of the neighborhood and took a few photos of jill's quilt, as well as the original version, "out on a limb." my 16 yr old, d1, photographed anything requiring me to hold a quilt. i only quickly glanced at the photos for color and lighting. later, i noticed i was holding my quilt upside down. "how did you not notice this?!" i asked her. "i don't know - i don't know how your quilt is supposed to go!" she replied. "but they were the same quilt! couldn't you see that one was upside down?," i pressed. she just laughed her beautiful laugh, smiled loudly, and shrugged her shoulders, letting it roll off like everything else unimportant in her life. it wasn't her fault about the breeze blowing on jill's quilt, either.

jill, i hope every time you look at this quilt you remember our friendship in a happy way, that it encourages you to smile, be brave, and go on making a home and roots in your new place. that's a hard thing to do, but i know the Lord has transplanted you where he needs you and your family to be. just don't forget how loved you are where you were.

"make new friends but keep the old" is another great adage to live by.
that can be the back up name for the quilt.

the detailed steps for this tutorial are spread over 5 posts i wrote as i made the "bloom" quilt and worked on the pattern. find the others here:

cinched part one - fabric requirements and strip preparation
cinched part two - the accent strip and block, modifications from the first quilt, joining blocks for the long strips
cinched part three - joining your strips and sections to assemble your top
the three-strip accent stripe pieced backing - how to make the backing
loops and crinkles - quilting choices for "bloom where you are planted"
cinched full tutorial

linking up with crazy mom quilts's friday finishes.

Saturday, October 18, 2014

"cinched" pattern - part three

 so i'm jumping all over the sewing spectrum around here. yes, i started messing with triangles but now i'm ready to get my three big wips out of the way, to finish them up while enjoying the process. today that meant completeling the flimsy for my new edition of my "cinched" pattern, which i am calling "bloom where you are planted" because of all the blossoms and because it's for a friend who has been uprooted and replanted elsewhere.

i sewed the strips together by first sewing adjoining pairs, then sewing the pairs into groups of four, and sewing those into groups of eight, and so on until the whole top was together. each time, i sewed the seam in the opposite direction i had previously sewn, first sewing from the top edge to the bottom and the next time sewing the grouping from the bottom to the top. to have one consistently straight edge for matching up, i trimmed the bottom edge of the quilt even. since i had modified some of the strips, they weren't all the same length, which is why i needed to trim.

i was nearly done with the top when i left for summer roadtrip. this morning, i put the last three sections of the lower panel together, and this afternoon i joined the lower panel with the top panel and accent strip. it has come together quite quickly.

before i did that last seam, i squared up that lower panel. when sewing with jelly strips, its easy to get distortion where your strips start to lean in one direction or just aren't completely square. (well, for me it seems easy to have that occur.) sewing the seams in alternating directions helps with the leaning. i kept trimming the bottom edge of the sections each time i sewed more strips and sections together, but the top was uneven. by the time it was done, i was 3/4" short at one end. (see top photo)

folded in half and pinned together
 squaring the strips can be confusing because the seams are not always perfectly straight and neither are the edges. i was fairly certain the bottom edge that i kept trimmed the whole time was straight, so next i folded the panel in half across the width (so the strips are still full length), lining up that straight bottom edge and pinning it into place every few strips. i also lined up the two end strips with each other and pinned them. from there i could smooth out the panel and then trim the top edge, opposite the pins, straight and square.

 i did the same with the upper panel and accent strip before attaching because i figured it was easier to work with the small piece rather than try to square that edge when the whole top was put together. and that is true. but i also messed up the trim twice, because it's me, you know. when trying to correct a 1/4" slant, i slanted it further the wrong way and had to trim 1/2". this flimsy is rapidly loosing height.

then i laid the upper section out on my lower section to pin for that final seam . . . and discovered the upper panel was one strip longer than the lower! i think i added that one strip with the intention of taking the other end off so i could shift the accent block over, but it's been so long i can't be sure anymore! i did the easy thing, which was probably wrong, and removed the piece hanging out on the edge.

then, finally, i did my pinning.

and fyi - tip alert - pinning large pieces together while on the design wall rather than on the floor is a lot easier! pin the first piece (at every few strips) to your design board. lay out the second piece on top of it, removing the pins holding the bottom piece in place as you go and replacing them into both pieces so you have both pinned into the board together. then just go back and pin only the fabric together before removing from the board. easy peasy!

sew that last seam in and you have . . .
a completed flimsy!!!
(which still needs a piece of the accent strip trimmed off.)

i have to admit these fabrics were givign me a headache every time i looked at them hanging on the design wall the last few months. they are so darn bright and loud! but now that they are neatly sewn together, they are playing much more nicely and i kind of like it again. except looking at this photo i'm rather wishing i made that accent strip in white instead of green. too late!

my goal is to get the back pieced and the whole shebang basted as a sandwich before the piano teacher comes next wednesday because this flimsy is living on the piano room floor and that means trouble.

the detailed steps for this tutorial are spread over 5 posts i wrote as i made the "bloom" quilt and worked on the pattern. find the others here:

cinched part one - fabric requirements and strip preparation
cinched part two - the accent strip and block, modifications from the first quilt, joining blocks for the long strips
the three-strip accent stripe pieced backing - how to make the backing
loops and crinkles - quilting choices for "bloom where you are planted"
cinched part four - quilting, binding, and gifting
cinched full tutorial

Monday, July 21, 2014

modifications - cinched, part 2

i don't think i've ever followed a quilt pattern exactly as written. i always find some way to make adjustments, whether it be in size, layout, or fabric choices. apparently i can't even follow my own pattern without making modifications. i've made a few changes along the way with "cinched".

***to see where this quilt starts and to get all fabric requirements, go to cinched pattern part one.

accent square/block

first up, instead of that simple accent square in the middle section, i chose to make a courthouse steps block. i spent about an hour fussy cutting and fidgeting to create the block that will be the focal point of the quilt. it's a bit busy, but all the fabrics from this line are loud and luscious. i had a little fun including the critters in the strips i cut for a touch of "eye spy" action in the outer ring.

the white floral fabric came from my backing and the other two pieces came from leftover jelly roll strips not used in the body of the quilt. the sizes of the strips came about purely out of what i had available to work with. i just kept adding until i had the block size i needed.

this block of the quilt is one place where you could spend a bit of time doing something special if you wanted to amp this pattern up just a bit. any favorite block, as long as it's size 10.5" unfinished would work here. or, like in my original, you could fussy cut a fabric you wanted to focus on or highlight. anything the correct size goes - the possibilities are wide open.

if you are simply cutting a 10.5" block, cut it from fabric a. if you are making a "racing stripes" pieced backing like mine, while you're cutting, you can cut additional 2.5" wide strips of fabric a until you have an 80" x 2.5" pieced strip.

*measurement options - another adjustment i've made to this quilt is a few of the measurements have changed. originally, i was trying to keep fabric requirements as small as possible, so i made the accent square 9" in order to get it out of 1/4yd. but after putting the quilt together, i noticed the 9" square didn't match up with the 2" strips. so i enlarged the square/block to 10" finished/10.5" cut. this means the accent strips adjoining the square are also slightly larger than the original at 10.5" high. if you want to buy less fabric, you could reduce the square/block to 9" cut in order to get it out of 1/4 fabric. just make sure you also adjust the adjoining strips to the same height.

accent strip

the rather clumsy name of this quilt comes from the accent strip & block that divides the upper and lower strip sections. i originally toyed with the name "sweet spot" because of that accent square, but that didn't sit right for a few reasons. then i thought how the accent strip looks kind of like a belt "cinched" around the waist of the quilt body. and this quilt is a "cinch" to make, being so easy and all, so that became the name. since nothing else brilliant came along, it's stuck with a somewhat lame name.


the whole point of the accent strip was to add some length to the quilt, making it a larger size than just a jelly roll alone allows. also, it was a chance to add interest to a basic strip quilt and showcase a few favorite fabrics from the line. selecting two fabrics with lots of contrast makes a better impact in the quilt.

anyhow, to make that accent strip, first create your 10.5" unfinished square/block (options above). from fabric b, cut one strip 10.5" x wof (or 42" long) and one strip 10.5" x 12". (this is a little wide, but it will give you room to place your block exactly where you want it in the quilt top.)

sew the long strip to the left side of the accent block and sew the shorter strip to the right of the accent block, as pictured above.

upper strip layer

this is where i left off last time - ready to sew strips together. once you have all strips laid out in a pleasing manner, begin sewing them together in pairs. then join 3 pairs together in one group of 6 strips. square off these groupings of 6 before joining them together. this will help keep everything straight. when you sew multiple strips by just adding the next strip on, you can get a slanted piece. so chain piece in pairs, then group in sixes, and square up before joining them all together.

also, to aid in keeping everything straight, i alternate the direction i sew the strips in. i chain pieced the pairs top-to-bottom and pieced the pairs together bottom-to-top.


now join your upper strip layer to the middle accent strip layer.


when you do this, line up the seams of the accent block with the strip seams above it. pin at the seams and at other intervals along the length of the seam, then sew.

lower strips layer


 a few days ago i got the top section of half strips sewn all together. now for the lower strip section. but as i looked at them hanging on the design wall, they weren't exciting me much. meh. blech. boring. so i just left them alone and did what i was supposed to be doing around the house instead.

however, yesterday i was browsing blue elephant stitches, catching up with jolene's work, when inspiration hit. i don't think i even saw anything specific there, i just got the idea of how to spice up my strips some while i was looking at her lovely quilts.

i was never really crazy about all the half strips put together in this pattern, but it was a necessity because of cutting all the strips in half for the top layer. so i tried cutting more long strips from my extra yardage and weeding out some of the pieced strips. surprisingly, i liked that even less. the joined up strips were adding interest to the quilt. i thought about breaking them up into more pieces per pieced strip, but each time you cut the strip you loose 1/2" length to seam allowances and that cut down the length of the over all quilt.

well, the idea i got was to take one extra half strip of  light green gingham and put a 2.5" (cut) block in between the joined strips. i already had my pieced strips sewn together, but it wasn't much work to unpick those few short seams. and it was worth it! i like the way these little boxes look a lot.

by using the little block to add length, i was able to put more pieces in some of the strips so that there is also variety in where the blocks fall and how many per strip. the lower section is peppered with little bits of green gingham and i like it. this could also be done with more than one fabric but i like the consistency it adds to the quilt having just one fabric for all the small blocks.

 i liked it so much that once i got going, i cut into some of the other long strips that i hadn't intended on cutting at all. now i have more variety and am much happier with the way the long lower section is looking.

new lower section layout awaiting sewing (just ignore the unrelated blocks sharing the board)

next up, part three: sewing the strips together and finishing this top!
nearly there.


the detailed steps for this tutorial are spread over 5 posts i wrote as i made the "bloom" quilt and worked on the pattern. find the others here:

cinched part one - fabric requirements and strip preparation
cinched part three - joining your strips and sections to assemble your top
the three-strip accent stripe pieced backing - how to make the backing
loops and crinkles - quilting choices for "bloom where you are planted"
cinched part four - quilting, binding, and gifting
cinched full tutorial

Monday, July 14, 2014

"cinched" - a pattern in the making, part one


i was quite content to work on that wip list of mine and not feeling the need to start anything new. but then my birthday rolled around and while everyone else spent a few hours watching the world cup game, i decided to sew something. seeing as it was my birthday, i also decided i wanted something fresh, especially since my machine was still tucked away upstairs and i had no desire to lug it down. a little pressing and cutting seemed perfect.

happy birthday to me sewing time
several weeks ago i brought out this jelly roll, which i had slated for a project for a friend, with the intention of completing the quilt before a certain deadline. but that didn't happen and the jelly roll has been decorating a cake plate in the dining/sewing room ever since. until my birthday, that is. a few hours to myself seemed the ideal opportunity to break open the jelly roll and get to work on that gift quilt. (um, sorry kids.)


flat view of the top - taken quickly on the back porch/excuse the sloppiness
i'm revisiting the first pattern i ever put together myself - the very simple jelly roll-friendly "cinched" pattern i used for "out on a limb." i've always meant to do this again, photographing along the way so i could write up a pattern to share. now here we are.

the friend i want to make the quilt for has always admired my "out on a limb" quilt and also likes the "oops-a-daisy" fabric line, so i think it's a good match. i'll be recording my process along the way and then try to do one sum-up pattern post when it's all done.

i'm not doing a quilt-along, but since i'm posting this to share, anyone is welcome to follow along. (that said, i'm not working on any set schedule. this is getting fit in as i have time.) it's a pretty easy beginner quilt, but also a fast and fun way to use a jelly roll you might have hanging around. of course, it could easily be made with yardage or scraps, too.

fabric requirements

i'm starting with a generous amount of yardage partly because i already have it in my stash and partly because i simply like to work that way. generally i need room for error and i happen to adore scraps. for the final pattern, i'll narrow down the fabric requirements more specifically.
  • one jelly roll (or 45 - 2.5" wide x wof  strips *see further options below)
  • fabric a - 1/2 yd for accent block and backing strip a (could be done with 1/4 yd or fat quarter if adjusting measurements slightly - see section on accent block)
  • fabric b - 1/2 yd for accent strip and backing strip b
  • fabric c - 1/4 yd for strip joining squares and backing strip c
  • fabric d - the equivalent of about one jelly strip for joining blocks in the lower strips, if using
  • 1/2 yd binding fabric
  • 4 yds backing fabric
it's a pretty small list. if you want more variety in the strips, which i do, you can use additional coordinating pieces. once i started getting my strips up on the design wall, i realized the fabric line i'm working with has a lot of repeats to make the full 40 strips. since i already have a lot of other yardage cuts for this line (went a little crazy on a clearance sale purchase), i'll be cutting into that to supplement the jelly roll. however, this quilt is totally doable with just a jelly roll + 5 extra strips for the strip portion.

* note - 1/4" seams used through out and all measurements are for "cut" (seam allowance included) not "final" unless otherwise noted.

preparing strips

my design wall is only half a wall, so i'm laying out my pieces in reverse - the top portion of half strips is on the floor

this pattern is constructed with 30 full strips, (measuring cut 2.5" x wof - some full length and some pieced from 2 halves) and 30 half strips (measuring cut 2.5" x 21"). a standard jelly roll has 40 strips so you will need an additional 5 full strips minimum for this pattern. options:

  • one option is to use 5 white or other solid colored strips. this allows for some white space/breathing room in the busy design. 
  • in my original quilt, i cut 2 additional strips from 3 pieces of yardage in the same line and pulled one fabric i didn't like. i did this to add some consistency to the quilt so it wasn't 100% scrappy. 

begin by sorting your jelly strips into those that will stay long and those you will cut in half. options:

  • if you are only going to use the jelly roll + 5 more strips, you'll be cutting 30 of your strips in half, so pull the 15 strips you want to remain long. 
  • if you are using extra yardage or scraps, you can decide how many extra strips you want to cut to which lengths. you will need a minimum of 30 half strips for the upper portion of the pattern. the lower portion is made of 30 strips that are either full length or pieced together out of two half strips. 
also, if you don't want pieced strips on the lower portion, you have two options.

  • for jelly roll + 5 only, choose 15 strips to cut in half to make the top portion. (this means you will have each fabric in this section  repeated twice.) you will then have 30 full length strips left for the bottom. 
  • if you are using extra yardage, you can choose to cut either more half strips or full length strips at your own discretion, so that you have 30 half strips for the top portion and 30 full strips for the lower portion.

 start prepping the strips by opening the jelly roll and pressing the strips. the jelly strips won't be that wrinkled, but i do find they need some quick pressing, especially that middle crease where they're folded in half. once the strips is pressed, i cut the printed selvage off. i don't bother with the other end because it comes off when the top is squared.

when they are all pressed, cut your half strips. you can do this by measuring with your rulers, but i use the following method:

fold the strip in half and lay out on your cutting mat, aligning it with the lines on your mat. slide your ruler up to the very edge of your fold, so that the fold just barely hangs out by a few threads. square the ruler with the fabric and mat lines, then cut along the ruler.

you'll have one tiny bit of a scrap left when you've cut.

my reference photo to check distribution
  if you have a design wall, begin laying out your strips in a row as you cut. you can also use a bed or the floor for this part of the process - just somewhere you can see how it's looking. when you have them all laid out, take a reference photo that you can use to get another view on how balanced your color/volume/scale distribution is looking. also, once it's completely arranged, i print the reference photo as a guide for when i'm sewing the strips to help me get them sewn together as i intended. no matter how well i mark them, i always mess up something, so i find the photo helps me a lot.

if using jelly roll + 5, you will have 30 half strips in a row for your top portion. to make your lower portion, you will have 30 half strips (leftover from when you cut for the top portion) to piece into 15 long strips and the 15 long strips you already set aside.

 as you lay out your strips, start pairing up the half strips to make pieced full strips. my pieced and full strips are randomly placed. in some places, i have pieced strips next to each other, but never in a mathematically patterned way. see the photo above of "out on a limb" for reference. you can make a pattern of every other one or if you are using solid strips for breathing room, place them every 5th or 6th strips. once you are happy with your layout, sew all the half strip pairs into pieced full strips for the lower portion.


while creating this quilt, i decided to join my pieced strips in a slightly different way. i chose to piece the leftover half strips with small joining blocks in between. my joining blocks measure 2.5" x 2.5" cut. i created them from one jelly strip i wasn't using for the top since i had extra yardage i was supplementing with. (see part two, modifications for details on these joining blocks.)

you are now ready to sew your upper and lower strip sections.

ready to move on? see cinched pattern part two to learn how to make the accent block and strip.

linking up to lee's wip wednesday at freshly pieced


the detailed steps for this tutorial are spread over 5 posts i wrote as i made the "bloom" quilt and worked on the pattern. find the others here:

cinched part two - the accent strip and block, modifications from the first quilt, joining blocks for the long strips
cinched part three - joining your strips and sections to assemble your top
the three-strip accent stripe pieced backing - how to make the backing
loops and crinkles - quilting choices for "bloom where you are planted"
cinched part four - quilting, binding, and gifting
cinched full tutorial