Friday, May 30, 2025

still edna-ing


my edna strips and star pieces are all cut, after no small amount of trial. the number of mistakes i have made in the process of making this quilt is incredible. it hardly seems possible. but i've taken it all in stride, just kept calm and pressed on. after a certain number of errors, it began to get funny whenever a new one occurred and i could laugh it off. 


i had a fat quarter of that large pink circle fabric, a tilda dot basic, and somehow i ended up with not quite enough fabric to cut all 5 sets of large and small squares i needed for the stars i'm making with it. i was a mere two small squares short. i don't know if i turned the fq the wrong way or what, but i came up short.

what to do, what to do?

at first i decided to just replace it with one more star from another of the four star fabrics. i was cutting the purply berry fabric (pod vine from michael miller) next and made an extra set from that.

then i came across this cute strawberry fabric hiding in my stash and thought that would be a good replacement, so i started to cut that up.


but after consideration, i changed my mind. again. (these are the kinds of problems i cause myself.) i remembered there was a spare large square of the tilda dot and chided myself for not thinking to cut that up for my two squares. but on consideration, i realized i could only get one small square with the needed dimensions out of it, of course, because it was 1/2" too small to get two side-by-side. 

sometimes my brain is sloooow to catch on. this day it was sloooow a whole lot. it was like that old dial-up lagging sound you'd hear while the computer was trying to connect through the modem. eventually, the old brain caught up/connected. but it took a minute. every time.

i really wanted to figure out a way to eek out two star points from the fabric i had (why this was important to me, i can no longer say. either of my first options would have been just fine). fully half the square was going to be trimmed off for the star point anyway. so i pieced two squares together from the leftover bits of fabric.

then i decided that didn't look good enough and went to etsy to order more of the fabric. actually, i think what happened is i noticed the tilda dot while i was looking for a different fabric later in the day and just decided to do it right and get more of the tilda dot, which i would use again elsewhere. goodness, i was silly. i think i'd spent so much time already fixing mistakes and was feeling patient with the whole process so i felt like getting it exactly as i had planned no matter what i had to do to achieve this. that was a little overkill.


once the stars were cut, i moved on to the other strip sets. after making the first two sets of strips with the star blocks, i decided to change the length of the strips to accommodate the 16 patch blocks. i knew what the new length was, but when i cut the next set i made half of them 1/2" too short. ugh. 

do over. file the scraps. move forward.

this pink blender fabric is a different colorway of my favorite neutral blender, which i've used a lot and still have more of. (see it on the back of "collins".) it's by corey yoder for moda. the pink looks a lot different from the white with black sunburst spot thingies. i didn't recognize it as the same fabric at first. it's a good blender print. i'd take it in several colors. i think i might also have it in yellow.


i put together the third set of strips and began attaching the star points to the ends of the strips. while trimming off the hst ends, i accidentally cut one of the other strips that was hiding under the end of the one i was cutting. ouch. sloppy.

the good news on this one is that the nicked end will be trimmed for a star point later and there's enough left of it to do the point correctly. i won't get the little bonus hst from that point, but that's okay. it could have been a bigger loss, for sure.


at this point d5 came into the sewing room and asked if she could help me sew. i put her to work on pairing the strips for me and we began to fly through the job. i wasn't done with making mistakes, but it did get better.


 i don't remember why i took a photo of these mice strips. i don't think anything went wrong with them. just a cute process photo, i suppose. i have been second-guessing this choice because of the strong secondary colors in the mice clothing. but i think it's going to be fine. they're too cute to not include.

the pink rose print (heather ross far, far away 2 collection for windham) is another loud-ish piece that doesn't actually fit perfectly in the color scheme. but i think it's good to have one or two colors that are a tad off to give depth and balance to a scrappy quilt like this. it's not completely clashy, so it adds that little note that an ugly fabric or two can contribute which a lot of quilters like to incorporate. but without using ugly fabric because this one is really cute. 

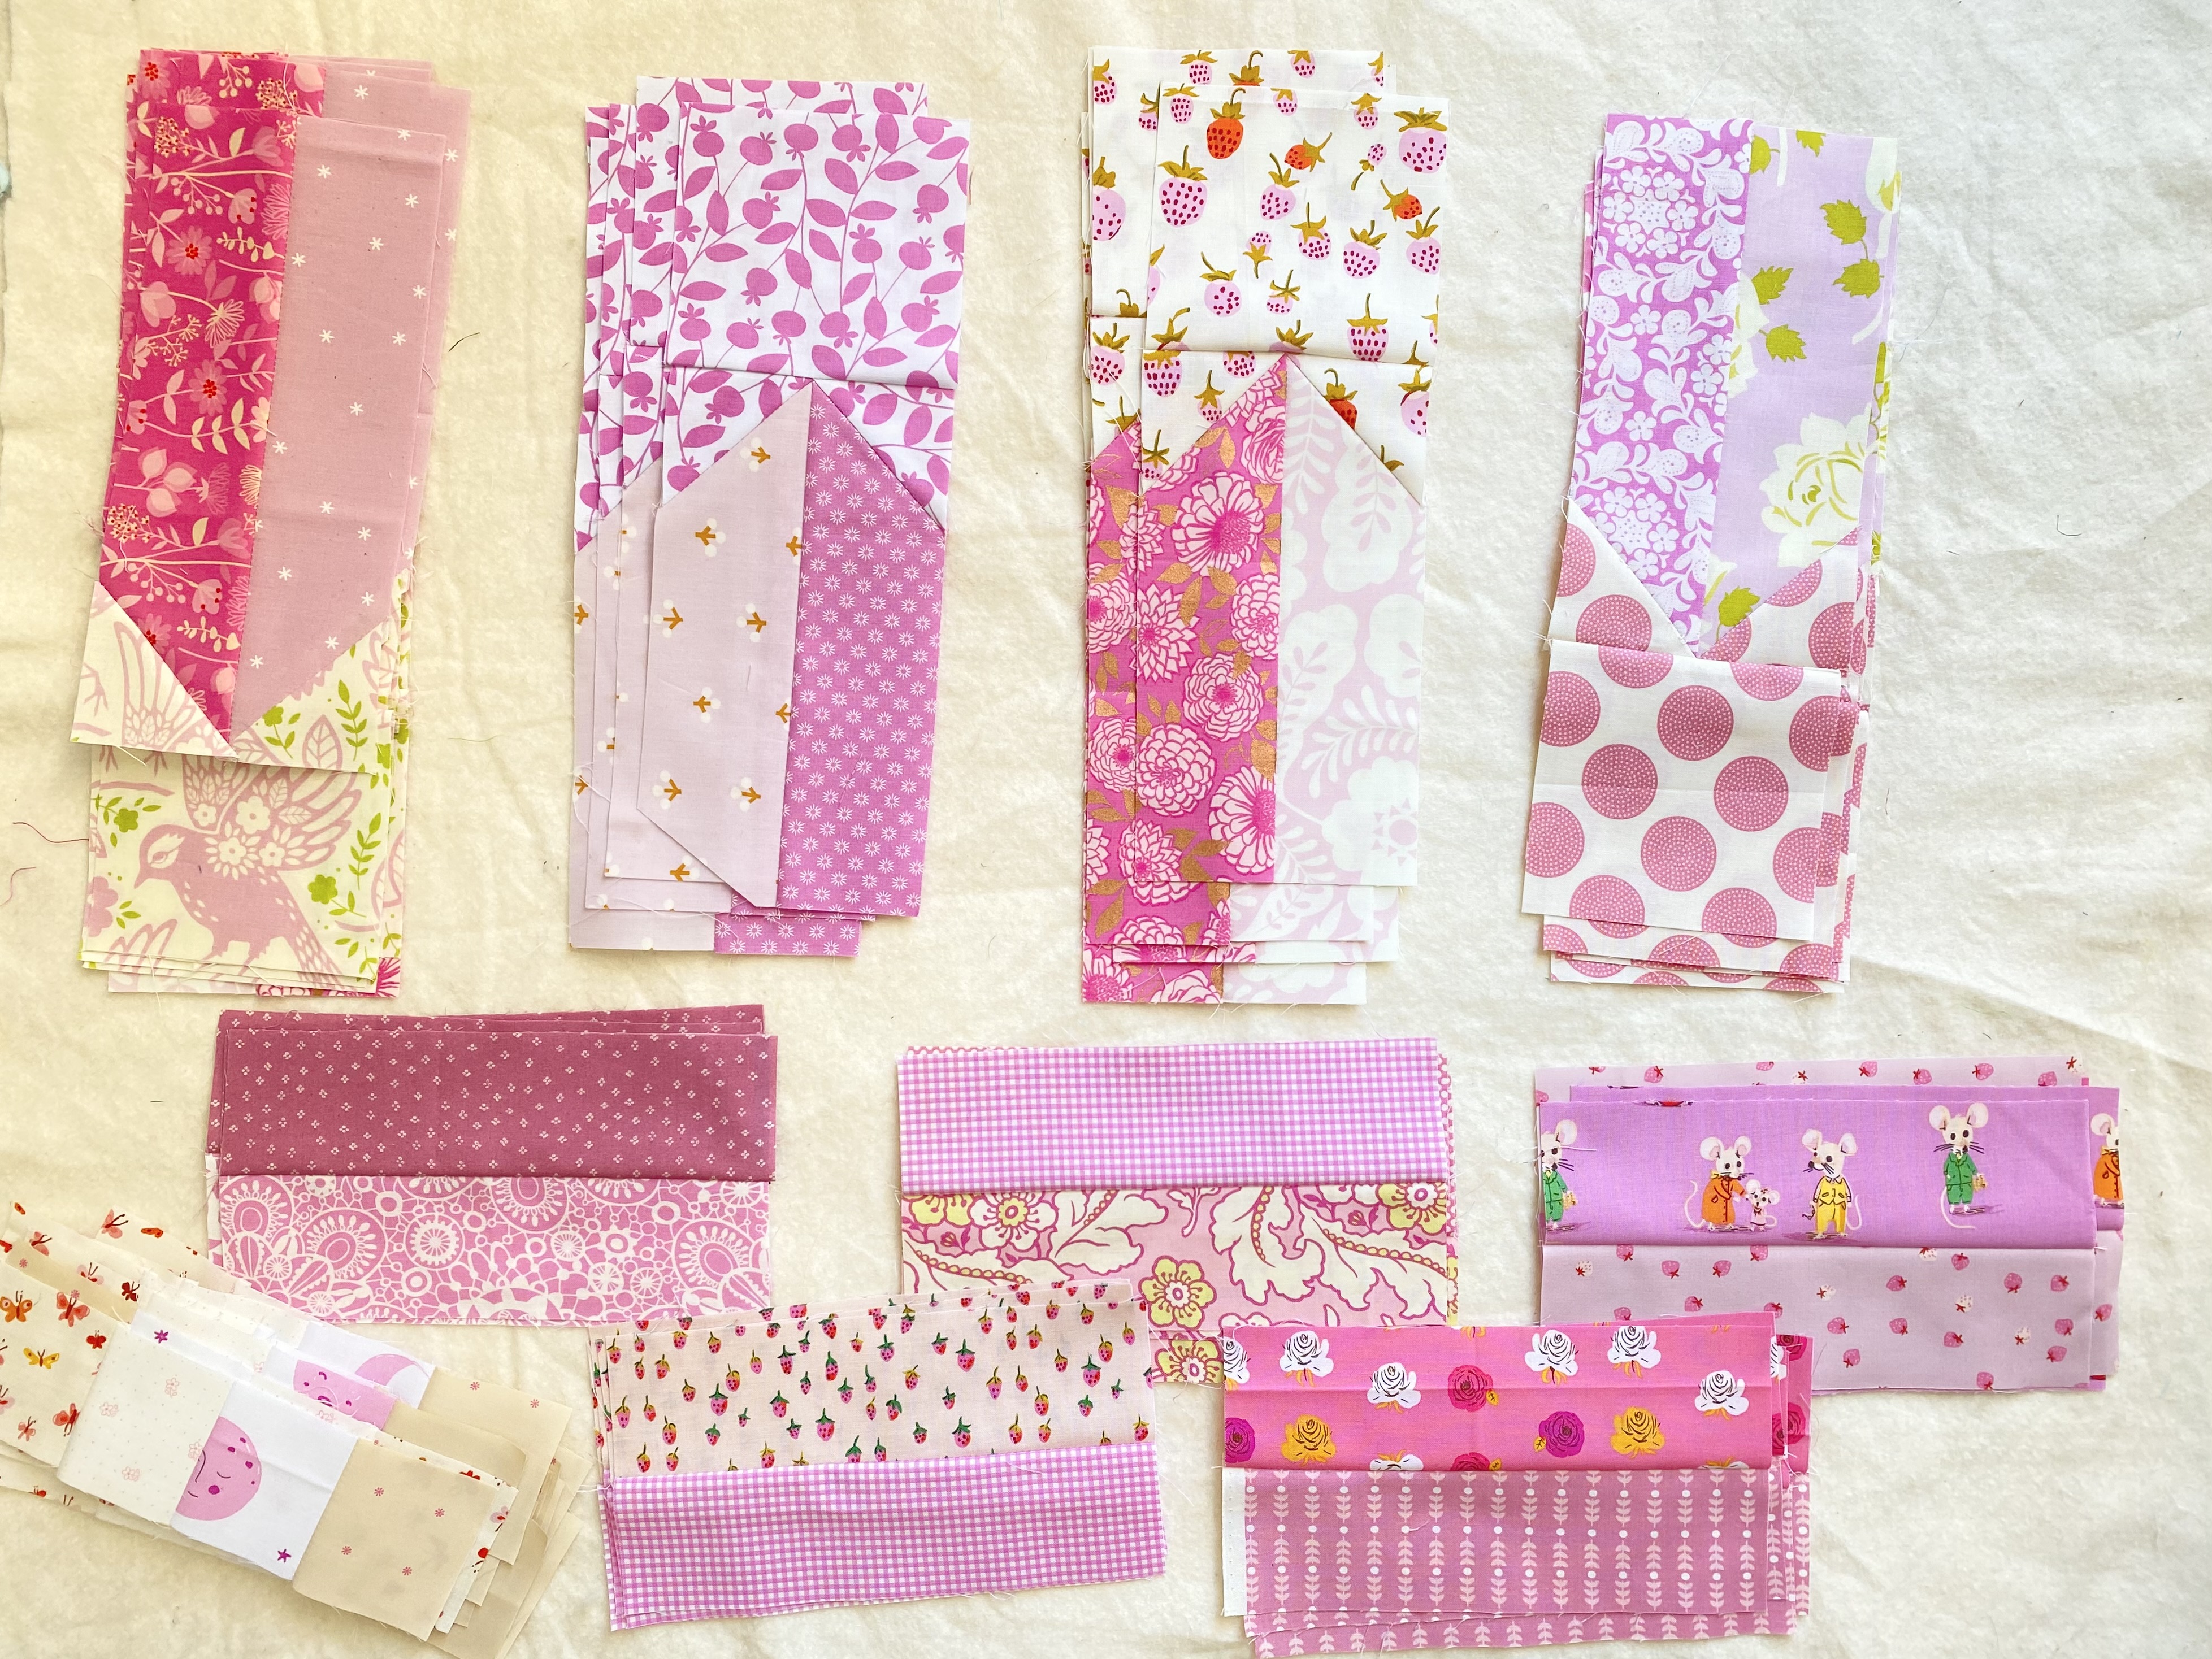
that's all the strips and stars pieces cut now. we've assembled all the strip pairs and i've added the star center block and top points to four of the strip sets. they're all gathered together in that opening photo at the top of the post. (i put that one first because it's the only daylight photo i took and looks the nicest.)
once we get the 16 patch blocks assembled we can begin putting the top together! 

i'm not stopping til we get there, no matter what other mistakes i manage to make along the way.

never give up, never surrender.
make the quilt.

Wednesday, May 28, 2025

pressing matters


i've had another first - a new mistake i've never made before! this was a bad one that could have been disastrous. my lovely pink oliso iron has feet that retract when you grip the handle. this is to reduce wrist strain by allowing the iron to rest horizontally and not have to be turned upright every time you pick it up. i wasn't sure i liked this feature, but i've gotten used to it. and i do agree it helps with wrist strain.

well, apparently i set it back down unevenly on my pressing surface, which jogs a bit where the pressing top i made is surpassed in length by the ironing board under it. this caused the iron to make contact with the pressing board surface for a little while, long enough to begin scorching it.


it was making a smell when i noticed it, but i actually saw, not smelled it first. yikes! that was a close one. i was completely caught off guard by this. i've never done that before and it was absolutely unexpected. there were a lot of things happening on the board that i was working around, which must be why i set it down in an unusual manner.

while we're on the topic of my iron, i'll comment on my experience with this oliso. i like it! i don't think it's perfect, but it's been a good iron. i've been using it for over 5 years now. i'm not a heavy user of the iron, but it's lasted very well for my purposes. 

pros

  • easy on the wrist with the retracting feet
  • turns off after extended period of unuse, but not too quickly
  • heavy, presses well - i'd give it a B+ or A- for this
  • steam option
  • gets very hot but not too hot
  • pretty colors to choose from

cons

  • steam tank is a little hard to reach for filling and emptying
  • sometimes the retracting feet are annoying or i want it turned off, which you can do, so i really can't complain about this one. however, the times i've turned it off, i forget not to just set it down, which is a problem. so i just leave it on and get annoyed every once in a while.
  • the tip is rounded and the outline jogs a little (see below), which both mean they are less precise for running along an seam edge when pressing my seams open. a sharper point and continuous edge would be better. a sharper tip would be able to get right into a seam whereas this blunt one doesn't really.
  • i haven't thought about it in a long time since my pressing habits are better, but there was a time i felt it could be heavier, that that might be helpful. but since i am better at pressing and use my floppy books to help flatten blocks after pressing, this is not really an issue.


this review came to mind because an IG friend recently had her oliso die after two years of use, and was looking for a new iron. however, she contacted the company and they replaced it for free! after my experience with the oliso, i was surprised hers died. hopefully her new one lasts her a good long time.

my former iron was a rowenta, another moderately expensive iron. it began leaking on me after a couple of years. i now know that was because i was just leaving the water in the tank all the time, not emptying after use before periods of unuse. live and learn! i now (usually) empty the tank after i've used water. but most often these days i don't steam at all, but rather use the spray bottle to spritz the fabric.

Monday, May 26, 2025

edna mode


here's a look at my pinky-purple "edna" quilt in the earliest stages. i've had a lot of fun making this quilt even though it's been so labor-intensive, thanks to my own ideas of making it very scrappy with the 16 patch blocks and directional, scrappy stars. "edna" can be quite beautifully simple. maybe next time. this one is anything but simple. there have been soooo many mistakes along the way, but i just keep plugging along.

wrong and correct
 
first, i misunderstood the pattern and made my first star/stripes interface wrong. i mentioned i don't usually use patterns, so i misunderstood the graphic for adding the star points to the ends of the stripes. i think the pattern was attempting to show piece placement 3-dimensionally with seemingly 2d graphics  and i read it as being 2d, so i put the corner square in the wrong place. i thought it was odd and unexpected to put the corner squares where it looked like the pattern said, but i told myself, "trust the process - do it exactly as the pattern shows." and i messed it up. but, i knew how to fix it! and fortunately for me, i was able to use the same stripe pieces, so i only lost two little squares. i turned two of the cut-offs into a tiny hst block, so its okay. and now i know a little more about pattern reading!


i got the first set of 5 with the bird print made and moved on to the strawberry print the next morning. with the first set of bird prints, i was doing everything one at time, which is more laborious. i did it that way because i was figuring it all out. with this second set i got a lot smarter about batch-processing and created a chain-piecing process. this worked great until i realized i forgot to factor in directionality for the strawberries. this wasn't an issue with the bird blocks so it caught me off guard. but with the strawberries, i wanted them all facing the same way throughout the star and i had to figure that out. it's not too hard, once you wrap your head around it. but since the four sides are coming from different directions, i'm going to have to figure it out each time i do another side. maybe i'll share that when i get to it.


since i'm cutting all these corners off, i went ahead and made a second seam so i could make little hsts out of the corners. they're small and very cute, and a bit tedious. it definitely added more time to my making. but i can't waste them, so i went ahead and added those steps to my process. i'll probably incorporate them on the quilt back somehow or put them in another quilt altogether.


once or twice i cut the corner pieces off on the wrong side of the second seam i'd made for the hsts. shoot! i lost those hsts, but at least i didn't ruin the larger piece. i include these mishaps to show that even with constant mistake making, i still make quilts! just gotta keep calm and carry on.

day three, once i had the first two sets of stripes done, i decided to turn my attention to the 16 patch blocks for a change and because i was going to need them in place to start assembly. this is where i got a real headache, a maths headache! i thought i was going to be making 10" blocks, which would me i could use 2.5" squares. then i thought a little more about seam allowances and realized maybe i would need 25 patches at 5x5 squares. i didn't have enough different fabrics for that and it would be a whole lot more work. what else could i do?

somewhere along the way i looked at the cutting instructions for the squares again and realized they were 10" cut (layer cake friendly) and would finish at 9.5" sq. uh, oh! that was entirely different. the real headache of trying to make that work started. i was getting discouraged. should i resize my strips i'd already made? then my brain said, "what are you thinking? you can make the size you need with 2.5" squares. that works out right." so i laughed at myself and got cutting. i cut a whole entire set of rows, 41 squares each of 4 fabrics, and started sewing my rows up.


i was having a great time doing this.

somewhere along the way, after i cut the whole set (using up two of my fabrics completely), i did some more quick math in my head and realized i was so wrong. i was on my way to making 8" finished squares, not 9.5" i just wanted to cry. i turned everything off and left the sewing room for a nap. 

but instead i started looking at "edna" on instagram to see if anyone else had done smaller than four-patches and could help me with my math. i found one! i sent a message to the maker, lydia, and on a whim sent another one to the pattern writer, jennifer, in case she knew how to do it.


jennifer got back to me right away and we began a whole discussion on the topic. we noticed the star points didn't match up in size with the squares, so they weren't 2.5". lydia must have done the crazy math and cut things at 1/8ths of inches. i wasn't up for that.

in the end, i decided to shorten my stripes to fit the 8" blocks. this would simplify my math dilemma, save the fabrics i had already cut, and shrink the quilt a little, which was desirable. it's a generous 64"x77", which is a little larger than i normally make my throw quilts. 

problem solved.
back to work.

my quilt making may feel like this sometimes, but i still get quilts made in the end! it's going to be a while before i'm done with this one. so many small parts and tons of cutting still to do! but i'm up for the process of this one, fussy cutting and directional star points, and all. i'm enjoying the process and making it the way i want to.

 every time i say the name of this quilt pattern - i hear the edna character from the incredibles movie saying her name from this clip in my head. "ed-na mode." that's the mode i'm in!

Friday, May 23, 2025

edna fabric edit

choosing fabrics for a quilt is one of my favorite parts of the quilt-making process. it's really fun, but it can be super daunting and discouraging, too. if you add the quilts i've completed with the quilts i have in progess, i've picked fabrics for nearly a hundred quilts by now. i'm no expert, but i've learned by trial-and-error, failures and successes along the way, something about picking fabrics. this post is a detailed look into how i went about the process of choosing fabrics for one quilt.

above are my fabric picks for my pinky-purple "edna" quilt. (you can read about my inspiration for the quilt here.) when gathering fabrics for this quilt i went for cool-toned pinks that had a definite purple cast to them, which slid into light purples with a pink overtone. everyone defines colors on the margins differently. my kids and i argue over whether a certain mango color is yellow or orange all the time. so feel free to call these colors whatever you wish! (what would you call them, anyway? i'm curious.)

in this fabric pull, there are a range of pinks and purples in this color-tone family i described, whatever you call them individually. some are more pink and some are definitely light purples. some of the pinks also lean toward bubble gum pink but with that cool tone. i used the photo of amanda's "lyric" quilt as my guide for the range i chose. 

amanda's original pink "lyric"


knowing what to take out of a fabric pull is just as important as what to use in the quilt. these are the fabrics i edited out of the collection. 
  • the top left one is too purple and strong.
  • the adorable desnyse schmidt ditsy print with the pink background had too much of the other colors in it, including the strong blue. in person i don't feel like it reads pink enough. i was sad to leave this one out because i love it so much, but it's not right for the feel of this quilt.
  • i think the two pink monotone prints on the right got cut because i had enough fabrics in that color already and didn't need these two.
  • the two heather bailey prints on the bottom left got culled for their strong secondary color.
  • there were also some low-volumes i culled for similar reasons, but i already put them away 
a square throw "edna" by jennifer jones

"edna" is composed of stars set in a grid of stripes with background squares between. i had to think about which fabrics to use for the stars, whether i wanted to feature them or let them blend in more. i knew the colored prints would be the stripes and the low-volumes would be the background, of course. so what to do about the stars - another color, a solid, what? i didn't have any solids in my stash that were a fit and i wanted to keep the look as close to amanda's quilt as possible.


i decided to use some of the low-volume fabrics that had very strong/large spots of color in them for the stars. there was a whole lot of color in them, so they felt like they'd be too strong for the low-volume sections even though they had white backgrounds. they seemed to be halfway between the other catagories so they would stand out from both sections but still blend with the quilt overall.

there were four fabrics that fell in this category. the rectangle throw has 20 stars, so i'll be using each of these five times.


i came up with 9 sets of the full-colored pinky-purples for the stripes. i'm doing the rectangle throw size (as opposed to the toddler, square throw, twin, full-queen, or king, all of which are included in the pattern), which has four columns and five rows of fabrics. somehow that said to me do 9 sets for the stripes. making them in controlled sets rather than just randomly matching up pairs from the fabrics as i went along seemed easier. and although i want this to look scrappy, i needed a little bit of control in there, too. so sets it is - four for the vertical, five for the horizontal stripes. 

i loosely divided the fabrics into nearly-solid, monotone prints (blenders) and the busier prints, many of which were novelty prints or florals. then i paired them up, trying to have contrast between them (one lighter, one darker - all of which is relative). 


then i paired 16 low-volume fabrics into four sets for my 16 patch background squares. i chose fabrics that had the same range of pinky-purples, but allowed them to be a lot lighter than the colored fabrics and more loosely interpreted. i carefully considered any other secondary colors in the fabrics, too. the country mouse print from heather ross (top left corner) is going to be the loudest block and i'll need to fussy cut for the colors so it's primarily pink showing. i don't have enough of one or two of these fabrics to meet the needs, so i might have to replace them with another fabric entirely or use some of these twice when the need arises. i actually like this so that the quilt won't feel completely matchy-matchy from block-to-block. it's quite common in traditional quilts for the maker to replace a fabric when it runs out, often with something entirely different that was on hand.


i decided to make sets of fabrics for the 16 patches, too, for simplicity. i'm still not sure if i'll assemble all of them exactly the same or not, but putting rows together will be easier than randomly choosing how to place them. i can rotate the rows some if i want to. have some level of pattern when making a scrappy block or quilt really helps production.

to create the row sets, i divided the fabrics into those that had just the one color and those that had other colors, too. that worked out to be about half-and-half. then i put two of each kind in each set, trying to balance the simplest, more graphic prints with the novelty prints. i've already got the bottom set all cut and in assembly. using 42 - 2.5" squares of each fabric is taking up nearly a whole fat quarter per print. that's all i had of the two heather ross novelty prints (butterflies and moons) i'm using for the bottom set, which is why there wasn't any more of them left to photograph with the others. 


there are 42 background squares in the rectangle throw version of "edna." i made a lot more work for myself by choosing to make 42 - 16 patch blocks out of 2.5" squares. that's a whole lot of fabric cutting and patchwork chain piecing coming up!

Wednesday, May 21, 2025

Inspired #2


i've had a stack of pinky-purples/purpley-pinks and low-volumes set aside for quite some time. (in my quilt life, that means a few years, at least.) my intention has long been to make something like this beautiful "lyric" quilt from amanda @a.crafty.fox. i fell hard for this one when i first saw it.

these days, when i'm serious about making a certain quilt but know i won't be starting it soon, i usually begin collecting fabrics for it, putting them all together in one of my wip boxes. there's been a pile for this one going for a while now.

amanda's pinky-purple "lyric"

amanda's original is a log cabin variation with mini sawtooth stars worked in. i love it so much. amanda no longer sells her patterns, just kits, and i already had a lot of fabrics i could use for this one, so i knew i'd be approximating her quilt as best i could. that's been my plan since this came out in 2021.


earlier this month i was reading jennifer's penelope handmade newsletter about her quilt of the month (on sale), the "edna." i've pinned versions of "edna' before, but as i was reading the newsletter, i realized it might be a good fit for my pinky-purple/low-volume mash-up. 

i rarely buy patterns these days because i'm just really into figuring out things for myself and most of the quilts i want to make are things i can figure out by using basic, traditional blocks.  but i decided to get the pattern because i was curious to see how jennifer wrote it (an idea jolene shared). plus, jennifer does a lot of amazing work and is so engaging as an online friend that i kinda wanted to support her just a little bit for once. so i broke down and bought the pattern.


then i saw the handquilting in the white space/background of this one and swooned. the deal was sealed - i needed to make an "edna." and i guess i'm gonna do a whole lot of handquilting on it. 


the pattern includes directions for using a four-patch block instead of the large squares for the backing space. since i had amanda's "lyric" in mind with all it's little squares, i looked around to see if anyone else had done 16 patches. i found this darling version made by lydia labadie of @llquiltco. there ya go, it can be done. 

ironically, deciding to use the 16 patches means i won't handquilt this one because i think it would be lost in the patches. so maybe i'm making two versions of  "edna." maybe. there are lots of pretty variations, so picking another one won't be hard.

so i've started another quilt! after making tests blocks for two other quilts earlier in the day, i got the urge to start this one, too, that evening. it was a saturday night and everyone else was out. i got the pdf pattern online from jennifer's shop, downloaded it, and started figuring out my fabric placement. i'll share my fabric ideas in another post.

Monday, May 19, 2025

test blocks


our first night home, i unpacked all the fabric orders that were delivered while i was gone. i mostly got bits of heather ross's malibu collection (for obvious reasons). it had been a loooong day driving, so that's all the fabric adventuring i did. it was really nice to open the blue sewing room doors to a clean space, that's for sure. all the cleaning and decluttering i did before we left paid off.

as i was drifting off to sleep i was seized with an idea for a new liberty + chambray quilt. in the morning, i promptly began pulling fabrics for it and testing my idea. i was thinking of a dark chambray with some vibrant primary prints, particularly those with a groovy, 60's kind of vibe. liberty has several of these. i thought i had a handful of them, which is all i would need for my idea. i didn't have as many as i thought; the majority of the prints i had with the right feel had the wrong color palette. annoying. so i started pulling other prints with the right colors and a close enough feel.

i found a really beautiful, deep indigo chambray in my stash. unfortunately, there's only half a yard of it. what was i thinking ordering only half a yard for something that would clearly be a background fabric? i sort of want to give younger me a smack in the pants for that.

i spent way too long this morning looking online for some more vibrant, groovy prints and that chambray. i found one or two prints and no chambray. so i gave up and started working with what i have on hand.

for my pattern i'm using a rectangle pinwheel (as opposed to an hst pinwheel) setting. after debating on block size, i settled on 2.5" x 4.5" pieces, which makes 4.5" sub-unit pieces and 8" finished blocks.


after making the first pinwheel block i took a break to try another of my newest ideas - the "lemonade" solid with green dense schmidt prints. i took the course of least resistance (mostly) and made a few crossroads blocks. only i downsized them. these blocks are made with units that measure 1"sq, 1" x 2", 1" x 2.5", and 2" x 2.5". they're on the petite side! and really cute.

i will need 196 of the smaller blocks to make the same sized quilt as the original crossroads. i might be going a little smaller there, too. time will tell. 

i was also excited to work in a few non-neon pinks, especially some liberty "capel" in pink. but since i decided to use this very pretty "petal pink" from the ruby + bee solids collection, i'm now unsure where to work in more pink. the little center squares are a miniscule 1/2", so i don't think you'd even see the print if it was used there, which would be a waste. maybe i'll go a little rogue and use the pink prints as road pieces and something else in the center on a few blocks.

once i got testing that idea out of my system, i went back to the liberty pieces.


i saw that flipped unit in upper right after taking photo; fixed it

 since i couldn't find the indigo chambray online anywhere and i only had enough for 20 blocks, i knew i was going to have to supplement somehow. i could do sashing or borders maybe? i should have had enough for 24 blocks, but i did some sloppy and then mistaken cutting. i was a right cutting idiot, which was very frustrating considering i'm already tight on the fabric. shoot.

i looked through my stash of chambrays and found a lighter version of the same fabric and tested it out.

there are at least two ways i can mix these blocks. the above setting has both colors in the same orientation. 


i think i like the secondary pattern in the chambrays on this second setting better. the checkered rectangles are fun.

i spent a whole lot of time picking fabrics, pressing and cutting, and then a little bit of assembly. i just don't understand quilters who are like, "i made this top last night. it was so fast and easy!" i thought these blocks would be fast and easy. so why don't i have a top yet? 

probably because i had too many other thing also going on today. i can't just sew dawn to dusk most days, darn it.

Friday, May 16, 2025

shop stop - so cal edition

i got invited to lunch by a new friend from church and took the opportunity of going inland to meet up with her to make a stop at a few more of the so cal quilt shops relatively close to me. i found some really pretty and fun stash-building pieces at the two shops i made it to.


the first place was called "the fabric shoppe" in callibsas. it is a small, stripmall store that had a whole lot fit in to it's little space. there was a classroom/workshop in the very back and a longarm machine someone was quilting on. the fabric collections were nice but not super modern. it's a riley blake, andover, bernartex, batiks, mottled/grunge monochromes type of store, if that makes sense. 

one of the things i really appreciated about it was they had fat quarters and half yards (usually my preference) cuts of many of their fabrics set with them on the shelves. this made shopping so much faster and easier! i didn't have to carry many bolts to the counter because they already had the cuts done.

i selected several low-volumes for stash and a cute green stripe for a binding (top photo).

they gave me a reusable shopping bag that will earn me 10% off future purchases if i bring it back with me on future shopping trips. if i lived here/begin coming back often, this is a shop i know i would use periodically.


my second stop, which was a whole lot further away from the first one than i originally anticipated, was at "quilty pleasures" in simi valley. it was easy to get to right off the freeway. the store and classroom/workshop next door are located inside a large, nice outdoor shopping mall. the center was hit hard during covid and is half empty these days, which was sad because it looks like a fun place. but the quilt shop is alive and kicking, and they have online ordering if you're interested. 


this store had a few more modern fabrics, like tula pink, amh, and a few ruby star society picks mixed in with their batiks and reproduction prints. there was a lot of riley blake again, as well as some tilda and a holiday picks. i'd say it was a pretty wide selection. if i was local, this would be a shop i went to first even though it's farther away from me.

i'm really happy about all the low-volumes i picked up here. i especially love those little golden bees! the red ditsy floral spray is really pretty, too. i had a couple of my current projects in mind when i selected most of these half yards. the greens are for the green irish chain quilt like amanda's limerick quilt i've been collecting fabric for. the yellows, neutrals, and that gold print are for my "sunny crossroads" quilt. i'm going to cut into them as soon i get home!

Wednesday, May 14, 2025

inspired #1


as i prepare to head home to my machine and sewing room with stash, i am getting excited about the wips i have there that i can get back to work on. i'm pretty revved to finish off my gypsy wife quilt (how has it been twleve years???) and accompanying "gypsy hst child," as well as a few other beloved but long-delayed projects. as i've knocked off some other longterm wips this past month, i'm quite motivated to just work on finishes and see how far i can get with them.

however . . . 

i also have at least one new make that i'm burning to do.

when d5 and i went to quiltcon in february, i was smitten with this grellow/greens/pink "snaketrails" quilt in the denyse schmidt booth. it was so vibrant and alluring. thank you denyse for marking the quilt with a tag that had details. the background is a ruby + bee solid in "lemonade." although i didn't absolutely love the neon pinks in the quilt, i think there are pinks i would like to mix in with the greens. 
 

you can get this as a quilt kit on the DS website, but i have found in the past i do not enjoy making quilts from kits. and as much as i like the look of this snaketrails quilt, i'm not up for the curved piecing and templates it requires. 

this means i need to find a similar but different kind of pattern. i think i will be happiest with lots of the "lemonade" and small pieces for the prints, although the idea of cutting a lot of new yardage into little bits is daunting and discouraging. seems like it would be better done with scraps, if i had them. but i don't have enough green scraps in the right colors. i was a part of the DS patchwork panel club last year, so i have the panel she used for this quilt. i've been dreaming of how else to get this effect of all the little green pieces with a lot of "lemonade" background.

i have some ideas. 


this is a "lemonade" looking colorway of denyse's "run + fall" quilt. lots of background, little pieces. i can see this being fun with the green and pink prints.


i love jolene's "field of triangles" quilts. i think i would strip piece the triangles to get more of the fabrics mixed together. otherwise, it has a lot of the background color and would be pretty cool, i think.


i saw this beautiful "irish chain" variation on IG from orla brady at "diddy and meg." just precious! and, goodness, a whole lot of small, intricate piecing. but i guess that's the look i'm going for.


and slightly less intricate, but could still have a big punch of "lemonade" and mix up the patterns would be an alternating version of the treehouse crossroads quilt done like my "sunny crossroads" quilt. in my yellow version (a companion to my "sunny geese" quilt) i am making two blocks from each paring of fabrics: one with the yellow print as background, one with the low-volume neutral as the background. i could do this with the "lemonade" and prints, using an appropriate pink for the centers.

my dream for any of these quilts i make would be a pink liberty capel backing. that idea sends chills down my spine! i'm not sure if i want to go soft or bright with the pink (maybe both?), but i love the idea. i guess i'll see what works with the green prints best.

i have ordered the ruby + bee "lemonade" yardage (twice, accidentally). when i get home i'll see how i feel about all this and hopefully get started on something fun. maybe more than one idea!


i've also ordered bundles of denyse's two latest collections, "pretty things" and "bonny." can't wait to dream up ideas for them, too.

blogging sidenote: i'm starting a little series of posts for ideas i have percolating in my head called "inspired." this is post number one in the collection. i may never actually make all or any of these quilts, but i like to explore the ideas. maybe someone else will be inspired, too. 

Monday, May 12, 2025

citrus season, a finish


"citrus season" is a finish! 

well, it still needs a few threads buried (there were a whole lot) and a wash, but that'll happen shortly when we get home.


ever since i started this quilt, i've wanted to photograph it with my own mini citrus orchard at home. but here we are with it all finished up and a lovely lemon orchard about 20 minutes from our rental in malibu. i think it worked out nicely.


d5 and i were going inland one last time before we leave and i brought along two quilts to photograph in the beautiful farm settings just down the coast and around the mountains.

we had a lot of wind, which makes shooting so hard. but the spot was nice. i've passed this orchard several times in the last 6 weeks and knew i wanted to bring this quilt here when it was done. the lemons were ripe and the blossoms just starting.

d5 said it smelled like our backyard at home when we got in among the trees. my sniffer isn't as keen as hers, but i did get a whiff of the blossoms periodically and there's no better scent in the world. there were ripe lemons scattered on the ground everywhere, which made cheerful pops of color in person (less visible in the photos). d5 told me to get them in the pictures and i did try.


this quilt is a healthy 60"x72" size, which can be quite hard to hold up, especially for two gals sized 5'5'' and 5'3". add in the wind and shifting sun for a challenge. i think they turned out nicely. 


lemon tree very pretty

and the lemon flower is sweet

but the fruit of the poor lemon

is impossible to eat

well, that's what honey and sugar are for. i love that old peter, paul, and mary song! it goes deep into my childhood. but i never bought into the idea that love was like a lemon. and my grandson loves to eat lemons, so i guess not everyone agrees about the fruit's impossibility, either.


here's a closer look at the echo quilting i did on all the major seams to form an on-point (diamond) grid pattern. i really like the big stitch effect of using thick, chunky auriful 12wt thread on these giant star quilts. it adds a little texture and depth to an otherwise simple quilt.


this quilt rings more orange than lemon, but we took what we could get and i love it.


this was a fun mini adventure for us two. i think d5 is always going to remember our quilt shoots together. she's not always eager or excited, but she does get into it and has some great ideas for me sometimes. 


because of the side of the orchard i parked on, we had to hop this steep dirt ditch to get to the trees. nimble rock climber that she is, d5 had no problems. i was ... less nimble, but i made it. getting back across was harder! oh, the things we do for our quilt photos.

details

size: 60" x 72"

fabrics: kona and moda solids for the top, stash prints for the backing

pattern: stella grande, my design, with piano key border

machine quilting: echo quilting of seams in grid pattern in auriful 12wt, 2021

binding: moda bella solids in clementine

*click links to see details up close