
i was quite content to work on that wip list of mine and not feeling the need to start anything new. but then my birthday rolled around and while everyone else spent a few hours watching the world cup game, i decided to sew something. seeing as it was my birthday, i also decided i wanted something fresh, especially since my machine was still tucked away upstairs and i had no desire to lug it down. a little pressing and cutting seemed perfect.
 |
| happy birthday to me sewing time |
 |
| flat view of the top - taken quickly on the back porch/excuse the sloppiness |
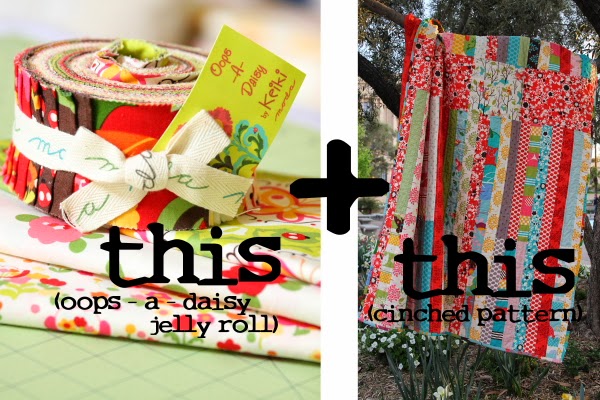
the friend i want to make the quilt for has always admired my "out on a limb" quilt and also likes the "oops-a-daisy" fabric line, so i think it's a good match. i'll be recording my process along the way and then try to do one sum-up pattern post when it's all done.
i'm not doing a quilt-along, but since i'm posting this to share, anyone is welcome to follow along. (that said, i'm not working on any set schedule. this is getting fit in as i have time.) it's a pretty easy beginner quilt, but also a fast and fun way to use a jelly roll you might have hanging around. of course, it could easily be made with yardage or scraps, too.
fabric requirements
i'm starting with a generous amount of yardage partly because i already have it in my stash and partly because i simply like to work that way. generally i need room for error and i happen to adore scraps. for the final pattern, i'll narrow down the fabric requirements more specifically.
- one jelly roll (or 45 - 2.5" wide x wof strips *see further options below)
- fabric a - 1/2 yd for accent block and backing strip a (could be done with 1/4 yd or fat quarter if adjusting measurements slightly - see section on accent block)
- fabric b - 1/2 yd for accent strip and backing strip b
- fabric c - 1/4 yd for strip joining squares and backing strip c
- fabric d - the equivalent of about one jelly strip for joining blocks in the lower strips, if using
- 1/2 yd binding fabric
- 4 yds backing fabric
it's a pretty small list. if you want more variety in the strips, which i do, you can use additional coordinating pieces. once i started getting my strips up on the design wall, i realized the fabric line i'm working with has a lot of repeats to make the full 40 strips. since i already have a lot of other yardage cuts for this line (went a little crazy on a clearance sale purchase), i'll be cutting into that to supplement the jelly roll. however, this quilt is totally doable with just a jelly roll + 5 extra strips for the strip portion.
* note - 1/4" seams used through out and all measurements are for "cut" (seam allowance included) not "final" unless otherwise noted.
preparing strips
 |
| my design wall is only half a wall, so i'm laying out my pieces in reverse - the top portion of half strips is on the floor |
this pattern is constructed with 30 full strips, (measuring cut 2.5" x wof - some full length and some pieced from 2 halves) and 30 half strips (measuring cut 2.5" x 21"). a standard jelly roll has 40 strips so you will need an additional 5 full strips minimum for this pattern. options:
- one option is to use 5 white or other solid colored strips. this allows for some white space/breathing room in the busy design.
- in my original quilt, i cut 2 additional strips from 3 pieces of yardage in the same line and pulled one fabric i didn't like. i did this to add some consistency to the quilt so it wasn't 100% scrappy.
begin by sorting your jelly strips into those that will stay long and those you will cut in half. options:
- if you are only going to use the jelly roll + 5 more strips, you'll be cutting 30 of your strips in half, so pull the 15 strips you want to remain long.
- if you are using extra yardage or scraps, you can decide how many extra strips you want to cut to which lengths. you will need a minimum of 30 half strips for the upper portion of the pattern. the lower portion is made of 30 strips that are either full length or pieced together out of two half strips.
also, if you don't want pieced strips on the lower portion, you have two options.
- for jelly roll + 5 only, choose 15 strips to cut in half to make the top portion. (this means you will have each fabric in this section repeated twice.) you will then have 30 full length strips left for the bottom.
- if you are using extra yardage, you can choose to cut either more half strips or full length strips at your own discretion, so that you have 30 half strips for the top portion and 30 full strips for the lower portion.

when they are all pressed, cut your half strips. you can do this by measuring with your rulers, but i use the following method:


 |
| my reference photo to check distribution |
if using jelly roll + 5, you will have 30 half strips in a row for your top portion. to make your lower portion, you will have 30 half strips (leftover from when you cut for the top portion) to piece into 15 long strips and the 15 long strips you already set aside.


while creating this quilt, i decided to join my pieced strips in a slightly different way. i chose to piece the leftover half strips with small joining blocks in between. my joining blocks measure 2.5" x 2.5" cut. i created them from one jelly strip i wasn't using for the top since i had extra yardage i was supplementing with. (see part two, modifications for details on these joining blocks.)
you are now ready to sew your upper and lower strip sections.
ready to move on? see cinched pattern part two to learn how to make the accent block and strip.
linking up to lee's wip wednesday at freshly pieced
the detailed steps for this tutorial are spread over 5 posts i wrote as i made the "bloom" quilt and worked on the pattern. find the others here:
cinched part two - the accent strip and block, modifications from the first quilt, joining blocks for the long strips
cinched part three - joining your strips and sections to assemble your top
the three-strip accent stripe pieced backing - how to make the backing
loops and crinkles - quilting choices for "bloom where you are planted"
cinched part four - quilting, binding, and gifting
cinched full tutorial
Thanks sharing a birthday gift with all of us in the form of your tutorial. This is a nice variation on the strip quilts I've been making!
ReplyDeleteA little time to yourself starting a project you love sounds like the perfect way to spend some of your birthday! I hope it brings you joy and satisfaction as you work on during those snippets of time which you find.
ReplyDeleteLooks like a nice, easy quilt to put together and the impact is wonderful!!
ReplyDeletehope you had a wonderful birthday Hydee. Thanks so much for sharing this with us - I have always loved your "Out on a limb" quilt so i would love to use this pattern. I can't start just yet, but soon :-) I have a jelly roll of Sew Stitchy to use - so it will be nice and pretty!
ReplyDeleteI have begun making a "test" (Christmas) "Cinched" for myself before choosing a Jelly roll for my granddaughter....I ironed and trimmed 15 strips so far....before my (dang ) back began to hurt (the bad side of aging!!). I just love this pattern so much....it reminds me of Gypsy Wife --only an easier strippy version for those of us (hmmm) who cannot piece blocks with lotsa pieces....and have them come out well....I am using Moda's 3 Sisters "Etchings". I only have 42 strips in my roll so I'll have to cut 3 more wof right? thanks so much for this wonderful tutorial.... Hugs, Julierose
ReplyDeleteI made this for my granddaughter's "going away to college" quilt and she loved it...I backed it with a Christmas side for the Holidays....thanks so much for this wonderful tutorial so easy to follow...hugs, Julierose
ReplyDelete