
the new chevron quilt i am making is coming together quite easily thanks to the triangles on a roll paper templates louise introduced us to in class. this week in class i photographed myself using them to show how simple they are to use. easy-peasy.
there are 3 types of lines on the template you will be using: 1) solid lines = cutting lines; 2) dotted(dash) lines = sewing (seam) lines; 3) directional arrow lines = guide to which direction to sew in.

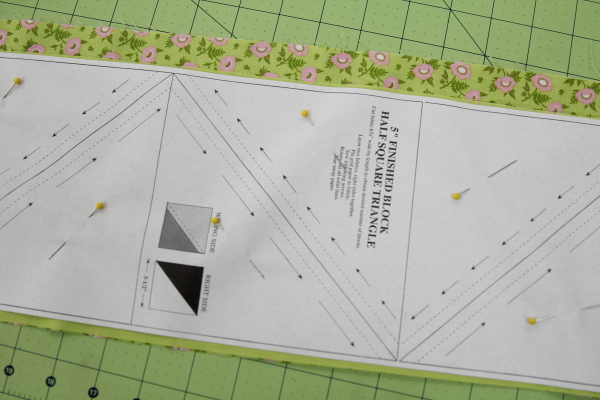
the finished blocks i am making will be 5" sq, so the template is sized to compensate for a 1/4" seam allowance on all 3 seams of each triangle, with about an 1/8" margin on the outsides to allow for shifting. this just means that the block is 6"sq and the template is 6 1/4" wide.
i cut my 3/8yd fabric pieces from the kit into 2 strips each between 6 1/4" and 6 1/2" wide. you want a little room to allow for shifting of the paper template when sewing. (there is a bit left over - yay, scraps!) i've found that when using these paper templates that since it's impossible to keep it lined up exactly flush with the edges of the fabric because of slight shifting once you've pinned and sewn, there is no need to square off my fabric strips beforehand, saving me some extra cuts and time. i just lined up the selvages after pressing the fabric, then lay it flat for cutting my strips. when putting my paper template on, i line it up with the grain as best i can for pinning.
for pinning, take one strip each of the two fabrics used for the row and place them right sides together. next, place the paper template on top, leaving a little room on each side of the template. (in the photo above, i was using a green strip [on top] cut to about 6 1/4" wide and the floral print [on bottom] that was slightly wider because i hadn't trimmed the excess off after cutting the first strip from my 3/8yd fabric piece. this is why the floral is so much bigger than the green strip.)
once your template is in place, starting in the middle block of your row, begin pinning once in the center of each triangle, 2 pins per block, working your way out from the center block to the end blocks. starting in the center rather than on one end will help keep your paper from sloping up or down as you move down the row.
with the paper pinned down, you are ready to sew.
the template is marked with directional arrows along the dotted seam lines. to start, begin at either end, moving in the direction of the arrows. put your needle down at the beginning of the dotted line, just a bit off the edge of the paper template.

then you will need to pivot and sew a bit to get yourself in place for the next block's dotted seam line.
(click photo to enlarge for more in-depth look at instructions.)

continue to work your way along the length of the block strip you are sewing until you get to the end of that dotted seam line (here, my 5th block). then you will need to pivot and sew around the corner to get yourself in line for the other seams to complete your blocks.
(click photo to enlarge for more in-depth look at instructions.)

that was pretty simple, no?
now you're ready to cut and press.
first, cut your strip down into managable sections. the 5 blocks on my strip were too long to cut without having to move and realign my ruler, so i cut them down to 2 sections: 2 blocks and 3 blocks long, respectively. i just used the solid black cutting line between the blocks as a guide and zipped it off with my ruler.


i had a small home ec moment when i put my first set of blocks together incorrectly, requiring two small seams ripped outl. that was no big deal. it always takes me a moment to wrap my brain around how to place them for chain piecing.
then i had a big home ec moment when i sewed two rows together the wrong way the entire row. i hate unpicking! it takes so much time. i probably could have completed another row in the time that took to unpick and resew. oh, well. as it was, i got another 5 rows done, which means my top is half way complete. i need to do the rest before class next week so i can get my borders on and have louise help me sandwich the whole mess.
I appreciate this tutorial. I just tried these for the first time and hated them - I think I need to use them in smaller numbers (5 like you did) and it might make life a little easier! I'm so glad I found your blog.
ReplyDelete