the gypsy wife quilt calls for two old maid's puzzle blocks. it's a fun little block with lots of room for fabric play. there are two types of component pieces included in the block: a bow tie piece of hsts and squares, and a crazy triangle/hst mash up piece. both of my blocks use uniform fabrics for mirrored sections of the block, but you don't have to do that. you can use as many fabrics as you like!
A photo posted by A Pieceful Journey (@apiecefuljourney) on
or, instead of totally scrappy, to define this block in an already crazy, scrappy quilt, you can use just two or three fabrics for the whole block.
now how to make it.
first, decide on your fabrics, and which you want to use where. i selected a low-volume stripe for my background, the red with white flowers for my bow ties, the yellow pinwheel fabric for my large triangles, the red ditsy floral for my "background" triangles in the "crazy" piece half, and a dot for the inner triangle in the "crazy" piece half (which i later changed to a blue and white dot for a bit more color).
here's a diagram from the pattern that i will use to explain fabric placement.
i'm calling the upper right and lower left component pieces "bowties." the upper left and lower right component pieces i'm calling "crazy hst" (for lack of a much better term). the crazy hst is composed of a large triangle and the crazy side, three background triangles and one inner triangle.
the bowtie component has two hsts and two squares. i used only two fabrics for this piece - background B (two squares and two hst halves each piece) and bowtie fabric A (two hst halves per piece).
the "crazy hst" has three fabrics - the large triangle fabric C, "background" fabric D (three triangles per piece), and the small, inner triangle fabric E.
quite frankly, although i've followed the pattern instructions for this block twice, i've never been sure exactly which fabrics ms. kingwell is referring to in the cutting directions. and i altered those cutting directions, anyway, so i'm going to give you my version of the block directions. it comes out looking and measuring the same, so pick your preferred method!
i do apologize for the photo lighting quality here. it was night and there was nothing i could do about it. i have to quilt when i can, and that doesn't always make for ideal lighting. thank goodness i'm not a sponsored professional, right?
from the background fabric B for the bowties (my stripe), cut 2 - 3" squares, and 4 - 2.5" squares. (the top two are doubled up in the photo, so you can't see there are four. actually, i forgot to cut them the first time around, but pretend with me.)
from bowtie fabric A (red w/ white flowers), cut 2 - 3" squares
from large hst half fabric C (yellow pinwheel), cut 1 - 5" square, halved diagonally
from crazy hst background fabric D (ditsy floral), cut 3 - 3" squares
from crazy hst inner triangle fabric E (blue dot), cut 1 - 3" square
note - all my squares are slightly overcut and will require trimming of individual component pieces so your block comes out correctly sized.
now, if you are going more scrappy than this with your fabric choices, you will have to work out how many more squares you are going to cut for your hst units and all. basically, for each different colored triangle you want to use, you will need one full square to cut it from. the pattern says to cut all the squares in half and set aside/discard/scrap one of the halves from each fabric. another option is you could make hsts from all of them and set the extra hst aside for the hst blocks that are in sections 4 & 5 of the quilt. your choice.
take the 2 - 3" background fabric B squares and the 2 - 3" fabric A squares to make your 4 - 2.5" hst squares for the bowtie components. with your favorite marking device, make a diagonal line from one corner to the other on the wrong side of the lighter fabrics. (if you are using a directional print, like my stripes, make sure you have them facing the same direction when you mark them.)
place your squares wrong sides together and sew a 1/4" seam on each side of the diagonal line.
cut along your line, and press the hst units open.
these are slightly oversized, so trim to 2.5" each.
arrange your bowties, and sew together. again, if you are using a directional print, pay attention to where you place your fabrics so they run the same direction. i thought i was going to have stripes running in two directions until i flipped both my component pieces to exactly how they would appear in the final block.
once it's assembled and pressed, the bowtie components should measure 4.5" each.
now let's make the triangle half of the crazy hst components.
take one of the 3" squares of fabric D background, and the one 3" squares of fabric E, and make two hst units, just like you did for the bowties. trim this to 2.5" after you press open.
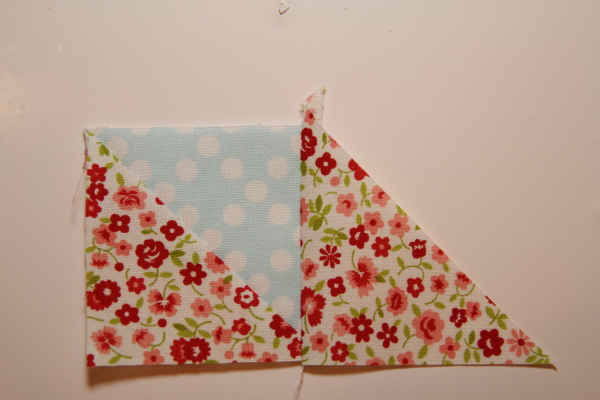
take another of the 3" background fabric E squares, and cut in half across the diagonal, forming two triangles. lay out your half crazy hst component as it will appear in the component piece. the long edges of the triangles will be on top, looking like and arrow pointing down. the hst unit will be in between them with the background piece on the bottom.
take the triangle on the right of the hst unit, and fold it over so the right angles are lined up. this will look really big and wrong, but it's not. you'll have about 1/4" of the triangle hanging out past the square on each side, but if your edges are lined up and your right angles match, you'll be good. sew on with a scant 1/4" seam along the right side of the hst unit.
press open. now they are starting to look more the same size!
put your sewn pieces back in place so you can see where to go next.
now fold the left side triangle down over the hst unit, again matching the right angles together, and aligning the edges of the square and triangle. sew with a 1/4" seam down the left side. press open when done.
next, trim your triangle along the bottom/longest side. do this by lining your ruler up with the tip of that inner triangle 1/4" away from the edge. this will give your the proper spacing to keep your inner triangle edge. also, you can see i aligned the right edge of the piece with the 45degree diagonal mark on my ruler. this will ensure your new long edge is angled properly while still being distanced from the point at 1/4".
then line up one of the large triangles (fabric C, yellow) with your crazy triangles half, right sides together. if you're like me, the crazy side is probably slightly larger. so i just made sure my two long sides were aligned, and that there was approximately the same distance on each side of the points so that the triangle would be roughly centered on that crazy half. sew together with a 1/4" seam and press open.
once it's pressed open, you can trim the component down to it's 4.5" size. to get the best placement and to retain my triangle points, i made sure the diagonal seam line of the piece lined up with the diagonal marking line on my 4.5" cutting ruler (both yellow, so difficult to see here), and that the outer points of that small (blue) inner triangle were 1/4" away from the ruler's edge. if you have to choose, go with the out points so they don't get cut off.
now, arrange all four component pieces (4.5" sq, each) in the configuration shown in the pattern diagram, and sew together with a careful scant 1/4" seam. the final block measures 8.5" unfinished.
the pattern calls for two old maid's puzzle blocks, so make another one right away if you're feeling crazy. otherwise, you can wait until section 8 comes up.
Both your blocks are really pretty Hydeeann. Great tutorial - I always cut my HSTs oversize too so that I can trim them back and pretend that I sewed them perfectly :-)


visiting from crazy mum quilts. That is amazing tutorial and I love the block
ReplyDeleteBoth your blocks are really pretty Hydeeann. Great tutorial - I always cut my HSTs oversize too so that I can trim them back and pretend that I sewed them perfectly :-)
ReplyDeleteLove this block! You have shown some great variety, too! Fabric play is the best. Thanks for a wonderful little tutorial!
ReplyDeleteVery pretty blocks! and great tutorial. I too cut larger sized HST's, allows for a bit of wriggle room when squaring things up!
ReplyDeletethank you :)
ReplyDeleteNot sure that you will read this after all this time but your directions and sizing really helped, thanks Debi
ReplyDelete