
 |
| at work on a photo shoot in early august |
i have been a hobby photographer for about 15 years. i got my first slr camera in 2000 and made the switch to digital in 2008. this was later than most because i wasn't satisfied with the quality of digital til that time. currently, I shoot with a canon 60d, usually with my 2.8/24-70mm zoom lens. i've read dozens of books, taken some real-time workshops from professionals and at least two online courses, too. i've also taught basic photography classes to mom groups a few times.
i love photography!
and making pretty pictures.

in order to not bore with a bunch of words, this post will be interspersed with photos i took recently on our big road trip as well as fabric and sewing shots. warning: it's a big post.
 |
| tour boat on san juan island, wa |
although i shoot daily and have done infant portraits and a few family sessions (as well as one engagement shoot - yikes!), i am NOT a professional photographer. in fact, being asked to do photography for others makes me super nervous! i just really like learning about photography and making the best photos i can in-camera at the time i take them. capturing my world and experiences makes me happy.
i'm a homeschooling mom of 7 who also likes to read, scrapbook, and quilt. i do NOT want to spend my time editing photos. therefore, i do my best to shoot well-lit and cropped photos when i take them. and i live with what i get. an imperfect photo often captures enough of what i want to some degree. i'm okay with that.
 |
| the backlighting in this photo made it rather hazy and faded, which can be corrected with editing. but i like it fine the way it is. |
the opening photo in this post was taken by my friend's daughter while i was consulting with jen about the shots i got of her and her husband. jen, a college roommate and my bestest old friend, talked me into doing a last-minute family session for her while visiting them in Washington state this summer. her idea, NOT mine!

 |
| my kids playing on the private beach of the house we rented on san juan island |
i learned how to shoot in manual mode a few years back and am fairly competent in it. i definitely understand the workings and interplay of iso, aperture, and shutter speed. however, i find that shooting candids of children/moving targets does not usually allow for time to work in manual. so most often i shoot in P (program), which is sort of like auto but allows me to make adjustments.
my go-to adjustment is the exposure compensation. i use it to quickly bump up or down the amount of light coming in the camera's auto settings. this works quite well for me most of the time. if i'm not happy with what i'm getting that way, then i go manual.
 |
| bakery stop in canon beach, or |

when i started blogging about my sewing and began shooting more things rather than people, i quickly realized my product photography needs help! i keep my eyes peeled and take note of other sewers photographs and look at styling in craft books for ideas on how to improve.
 |
| bear d1 made 2 yrs ago - acceptable, but needs better exposure and less distracting background |
 |
| desk of merriweather lewis at fort clatsop, or |
i know my photos are not the best out there. however, i'm satisfied with the quality of them and that's what's important. like i said, i'm happy with imperfect photos and i'll post them if they're all i have. but there are three basic things i learned a long time ago that can improve any photography with any camera tremendously. i'll share those today and maybe some more complicated tips another day.
1. shoot your subject and leave out the rest
most untrained people, when handed a camera, will center their subject in the frame and leave as much room around it as possible. you don't want to cut anyones head off - i get it. (my grandfather was 6'4", that happened to him a lot in group photos.) but what that can do is give you a shot like this:
when what you wanted and were thinking of when you took the photo was this:

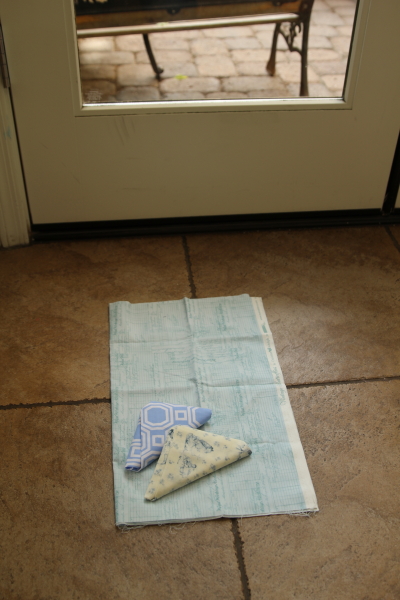
so think about what you want to photograph, the story this photo is to tell, and then include only that in your photo. in my sample photos, the story i wanted to tell was "fabric i got at a certain shop." the top photo is "some fabric i bought, my tile floor, my courtyard door." the second photo captures much more closely what i was trying to show.
get in close. fill your frame with your subject as much as possible. maybe even cut off a bit of it.


now if you want an atmospheric shot and the setting is part of the story you are trying to tell, then include the entire setting in your photo. but if not, then zoom in on your subject and leave the setting out.
case in point - the top photo of the fabric on my floor in front of the door was actually taken to show where i was shooting so as to demonstrate shooting in natural light. that's the story that photo tells. but i didn't include the whole hallway or entire door, just enough to give you the idea.
zoom in close. then closer still.
don't forget that sometimes the zoom is you not just your lens. move yourself.

 |
| i love how this photo captures the seaweed muck on their feet |
2. try different angles and perspectives


 |
| lavender farm san juan island, wa |
i've been known to lay on the sidewalk or climb on a fence to change my angle when taking photos. walk around, move yourself, try out different sides, get higher or lower. by playing around with perspective you can change your photos dramatically. and often you can crop out background distractions by moving yourself rather than your subject, which isn't always possible.
here are two photos that are not at all great, either one of them, but one is much better than the other just because it's oriented differently.
 |
| awkward! ugh. |
 |
| still somewhat awkward, but better |
 |
| taken standing in front of the table the blocks were on |
 |
| taken standing directly over the blocks, shooting down |
3. take lots of photos
 |
| photo #1 - fabric pull for new nephew's quilt |
 |
| photo #2 - added a bit more light |
 |
| photo #3 - tried shooting from the top to see pile better, but it shows the top too much |
 |
| photo #4 - shifted angle and tried adding light; too much |
 |
| photo #5 - better light, but i'm not liking this angle |
in the days of film photography, you had to shoot blindly and hope it was working out. film and development cost $$$. digital doesn't work that way! you get to see (mostly) how your shots are coming out and you can erase what you don't like. memory cards are super cheap compared to film and can be reused many times. the storage capacity on them these days is enormous.
 |
| photo #6 - restyled pile by fanning out and stood over for another angle |
 |
| photo #7 - new angle on fanned pile |
don't be stingy.
just make sure you download often or carry extra memory.
 |
| photo #8 - shot from top again, zoomed in a bit |
 |
| photo #9 - added some light |
 |
| photo #10 - restyled again in a pinwheel, off centered |
 |
| photo #11 - one more shot! but i like #10 best because i cropped just a little better |
sometimes the first photo of the 6 or more identical shots i took works the best, but usually not. and if you're photographing people, the more you have in the group, the more you need to shoot to increase your odds of that one great shot.
you also have to learn how to use that trash can button a lot so you don't end up with photos you don't need clogging your storage. be ruthless! take a lot, then get rid of what doesn't work or isn't the best.
here's the bonus tip:
4. turn off that flash & learn to use natural light!
this is an entire subject unto itself, beyond the scope of my post. but after you've started playing with the above 3 tips, it's going to make night-and-day difference in your photos. there are limitless resources dealing with this subject. look it up and figure it out. you won't regret it.
this post was inspired by beth's new photography workshop link up at plum and june.
What a great and informative post! I like how you included examples of everything you were saying. I totally agree about using yourself as the zoom instead of the lens (I actually use a prime lens 95% of the time so I don't have a choice) and your advice about moving yourself instead of the subject to help unclutter the background. Thanks for linking your post.
ReplyDeleteGreat post! I love # 10 the most. I enjoyed reading your thinking process too. I'm also linking up at Plum and June.
ReplyDeleteYou have shared sew many great tips here. I really enjoyed seeing all your photos and reading your explanations. Thank you for sharing!
ReplyDeleteThese are really great tips! I have to play around with daylight, location and angles because I actually take all of my blog pics with my iPhone, so all of the technical camera adjustments are impossible for me!
ReplyDelete:) Kelly @ My Quilt Infatuation
I have a great eye, and I have noticed the photography on your site. Very nice and I enjoyed all your tips! My motto is to take a ton and hope one comes out!
ReplyDeleteNice to see photos of the PNW :-)
Nice photos. :) And great tips. I can't wait to try some of these next link-up.
ReplyDeleteAwesomeness! Cute kidlets, liberty and pretty photos :-)
ReplyDeleteThanks for sharing. I loved reading about your process.
ReplyDeleteOne thing (among many) i need to learn to use is the exposure thingy you spoke of... Instead of my current work around in post processing.
There's so much to learn and I enjoy earning about it as an amateur. :)
Very helpful! Thanks so much - lots of good tips to consider!
ReplyDeletewhat a fantastic post - thank you for so many helpful tips. I love your photography :-)
ReplyDeleteWow - this post was incredibly helpful! I homeschool my kids too and time is so valuable so I've been putting off learning to use my nice new camera.
ReplyDeleteSo I'm staring by reading the posts in the photography linkup and will go from there.
Beautiful pics!
Love your pictures! I love the way you do close-ups of your family to tell a story. It took me a while when I first photographed my family to start taking photos of other parts of them instead of having them front and center.
ReplyDeleteI loved your interesting and informative post. Thank you so much for putting everything down so that people like myself can see what you are talking about!
ReplyDeleteYou have inspirred me to go out and have another go!
Great informative post! Picked up few things from your experience too. Love the photo where your kids have mud/ weed..
ReplyDeleteWhat an awesome post. I will have to try taking pics at different angles like that. You gave some really great tips!!!
ReplyDeleteLovely photos! Thanks for the hints.
ReplyDeleteI love how you showed your progress... what worked and what didn't. It's always so tempting to just show the best, but it really helps to know what didn't work as well too!
ReplyDeleteWhat a useful post! Thank you so much for taking the time to write up all the tips. I really like your lifestyle photo examples, actually, about how framing certain parts of people doing things can create different moods.
ReplyDeleteYou take amazing photos.
LIBERTY ON A PRETTY WHITE CAKE PLATE. <3
I can tell you also enjoy photography. Digital has made photography so much fun and instant too - love it!
ReplyDeleteBeautiful photos and great tips. They group photo is wonderful!
ReplyDeleteThis is a great post! Thanks for all the tips. and 7 kids and homeschooling - I am impressed!! Nicely done!
ReplyDeleteGreat photos and thanks for all of the tips!!
ReplyDelete