Pages
▼
Monday, October 14, 2019
some spray basting thoughts
i've got a backing made, and this pink and navy improv quilt is now basted.
have i ever mentioned that i like to keep the paper label scraps from the batting roll and use them to cover the floor and baseboards around the quilt sandwich while i'm spray basting? the warm and white batting roll (i get mine at joann crafts with a 40% off coupon) comes with a thin paper label wound with all the layers of batting, so whenever i unroll some batting for a new quilt, i also get a long strip of paper to rip off.
by putting it down on the perimeter of my quilt when i'm basting, it protects the floor and keeps any sticky mist from settling on what's nearby. currently i have enough paper to go 3 deep around the quilt. i also have two old towels i keep tucked away in my sewing room for this purpose. i usually lay the towels over the carpeted staircase base or at my sewing room doors, depending on where i've positioned the quilt.
when i'm done with all the basting, i put all the paper strips in a stack and roll them up to stow away with the towels. they don't take up much room at all and really help keep things neat and tidy when i'm spraying that adhesive everywhere. i do try to stay very close to where i'm spraying on the quilt layers, just a few inches away, but the mist still floats a bit sometimes, especially on the perimeter of the quilt. i've got plenty of photos of gummy feet or socks to prove it. (if you followed the "socks" link, obviously i got on the spray basting train! thank you, odif 505.)
some people use old sheets for this, which would also work well. i like the convenience and compactness of the batting roll label. plus, i'm upcycling the papers.
when i was pulling the tape off the basted quilt once it was together today, i had another idea to try.
i'm rather notorious for sewing the extra ends of the backing to the quilt body while i'm quilting. that's one of the reasons i don't give myself as much wiggle room as i should when making the batting and backing larger than the quilt top. standard is 3-4" on all sides. my margins are often closer to 1-2". i also hate the waste, so i make my overage a lot smaller than i "should," in most cases.
today i noticed that the excess batting around the quilt top was sticky and i decided to fold the excess backing over to the top of the batting. i think this might help keep it out of the way when i'm quilting! there's certainly less flopping around now. i'll let you know how it works.
a just for fun photo because i noticed my dress was coordinating with the quilt backing.
here's one more color coordinated photo: my backing fabric and new pink steam iron. i'm giving this oliso iron a try. i don't really know much about it, but someone (can't remember who?) recommended it. i saw a discount code at suzyquilts.com, and ordered it direct from the company for 20% off and free shipping (suzyquilts20).
today is my first time using it. the whole smart handle/retractable platform/horizontal resting is quite new to me. i've only used it on the backing today, so i can't really say what i think. but it did do a really nice, tight job on getting my backing seams wide open and flat.
again, i'll report back when i've had more experience with it.
Friday, October 11, 2019
fall-ing for log cabins
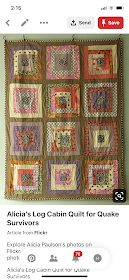
fall's here! in theory, at least. most days we still hover in the 90's for now. i feel like it doesn't actually reach us until december. that's desert living. however, now that it's october, i feel safe making seasonal changes inside the house no matter what's going on outdoors. after practically two months of no sewing, on a complete whim i've started a fall log cabin quilt inspired by one i pinned ages ago:
something about this color combination and the log cabin layout really appeals to me, which is kind of funny because i'm not a purple lover. somehow the purple-loving chromosome got left off my X gene. (or is that the gene got left off the chromosome?) i consider myself a girly-girly, but that has never included liking purple. but here i like it!
yesterday i was picking up a sewing machine from servicing and decided to get some purples for my stash so i could make a fall log cabin quilt. then i stopped at my other local store on the way home and got even more bits and pieces.
$$$xxx later, i'm ready to make a fall log cabin quilt! so bad.
interestingly enough, i must have mashed up all the low-volume log cabins i've been admiring lately with the memory of the fall log cabin, because when i looked up the original quilt i had in mind, once i was home and had bought all that fabric, i was really surprised with what i saw. i didn't remember the dark colors at all. but i like both ideas!
i got mostly 1/4 and 1/3 yard cuts of fabric. i really wanted the quilt to be scrappy, so i got a lot of different little bits. obviously, even with small pieces of fabric, there was going to be a lot of leftovers, which was totally fine by me. there are some other layouts i want to make with the same color scheme anyway. so i plan on having a couple of fall quilts when i'm done making with all this fabric.
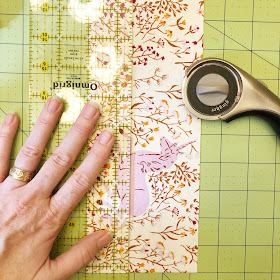
i decided to work with 2.5" cut strips to get the size of blocks i want quickly. at first i was just cutting one or two strips, but then i realized it would be much easier to just cut each piece into as many strips as i could get from it at once. that way i would have lots of strips for any other quilts i want to make with this fabric pull. almost all were 2.5'" friendly, anyway, so why not?
i've never bought 1/3 yard cuts before, but i was feeling like i might want just a bit more than 1/4 yard and not as much as 1/2 yard with some printss. i like the extra few inches i am getting out of them.
cutting into this heather ross unicorn fabric from stash was nerve-wracking. the unicorn was bigger than the strip i needed and i didn't want to make it look funny or have a lot of waste after i cut. i know it's "only fabric," buuuutttt . . . heather ross out-of-print unicorns!
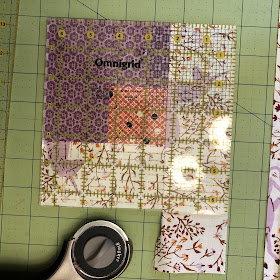
after making the first few blocks, i realized it is much faster to work on two blocks in tandem. that allows me to let a pressed block sit under some floppy books and get flat without wasting time waiting on it. also, moving from machine to cutting table to pressing board with each addition takes a lot more time than other types of piecing do. the log cabin block is pretty straight forward and simple, it's just time consuming. maybe there's a better way to go about making log cabins, like precutting everything. but i'm just deciding what to add on in what order as i go, only working with strips and trimming once they are on the block.
the process goes something like this:
1. sew the new piece on the block.
2. trim the strip.
3. press open the strip and leave sitting under some floppy books to aid flattening of the block.
(sometimes i press and then trim.)
4. move back to machine and work on the other block, repeating steps 1-3, while first piece is flattening and cooling.
i keep building both blocks at the same time in this way. without having everything precut (which would also take a lot of time and thinking and prep), it's as close to chainpiecing as i can get. having to press each strip once attached before adding the next one is what takes so long.
i'm pretty sure i would like the look of the blocks even better with thinner strips, but that would take ssoooo much longer! and i'm really hoping that this will be a quick-ish finish. for this fall, not next year.
six of the 12 needed blocks are complete.
it's time to get back to the other machine.


