Saturday, February 7, 2015

dreaming easy: checkered arrow block sans pretrimming

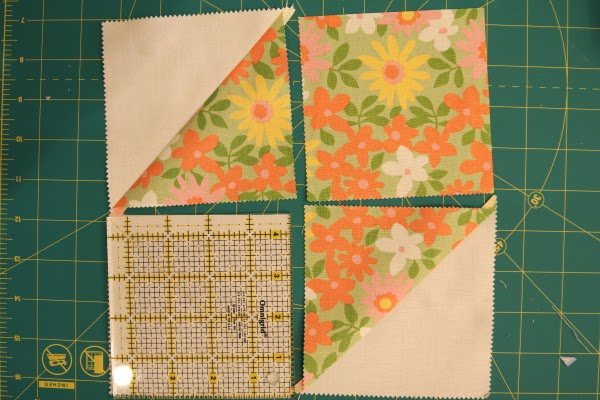
pre-trimmed units
finished block still needs trimming

when i first made this block from 4 charm squares, i trimmed the two square units down to 4.5", so they matched the size of the hst units, prior to assembling the block (first photo). i call this pre-trimming. however, i found i still needed to trim up the final block because the pinked edges of the charm squares left the block uneven. also, i wasn't trimming my hst units before joining the block together, which contributed to it's slight mismatching. rather than pre-trimming the square units and the hst units to perfect 4.5" squares, i took a shot at assembling the block without any pre-trimming.


i made sure the excess fabric was going to be on the outside edge of the two sections and joined them by lining up the center seams. (if you don't, no big deal. just see the end of the post for instructions.)

my assembled block looked like this:
obviously it needs a trim, but i saved time by doing it all at once.

i don't have an 8.5" sq ruler, so i used the closest size i have, my 9.5" sq. i l located the middle point of the 8.5" sq (the intersection of the 4.25" lines) to line up with my center seam intersection on the block. then i made sure all the edges fell within the 8.5" guidelines. the pencil is lined up with vertical line and the tip of my rotary cutter is lined up with the horizontal line so you can see where they are in the photo.


after eyeballing that everything is within the proper lines and as straight as i can get it, i trimmed off the top and right sides of the block. thank you rotating cutting mat for making this easy.

all that's left is to rotate the block so you can trim the other two edges. once it's flipped, you can easily line up the 8.5" lines on the ruler with the straight edges you just created.

there you have it - a perfectly trimmed block and no pre-trimming required.


excess seam allowance before pressing

if you find yourself in the position of having excess seam allowance after the final seam is sewn, just give it a trim to 1/4" before you press the last seam open.

just trim, then press

Wednesday, February 4, 2015

dreaming easy: the genesis

i have 8 wips in various stages of completion. it's about time i finished rather than started something. and i most definitely didn't need any more patterns or ideas because if i did start something new, it should be one of the dozens of patterns or "to do" pulls i have sitting around my bawthroom sewing space, waiting their turn to come to life.

yeah, but i have a real problem with all those concepts. and self control. i recently picked up the quilty mag special edition of beginner friendly quilts despite my decision to not indulge in magazines anymore. and most of the quilts in it were even simple enough i could probably figure them out without instructions on my own. but i bought it anyway. (coupon was my enabling excuse.) i especially liked the cover quilt. they call it a chevron pattern, but to me it looks more like a scrappy houndstooth, a pow wow modification, or even a feline head silhouette. whatever unidentified pattern it is, i like it. i did not plan on making it for a while, though.

arrow shape? i think i'm calling it an arrow block. i don't know! any better ideas out there?
and the pattern looks like a checkerboard of arrows - an arrow check. best i can do. no wait - checkered arrow. this is a checkered arrow pattern.

enter enabling factor #2 - i was stuck in my bawthroom sewing space for a while as the littlest one played in the tub. my dining room is my main working sewing spot these days. the bawthroom is mostly about storage of the hoard. i was sitting there, looking at all the fabric, remembering how i used to sew while the girls splished and splashed in the tub (hence the blog name) and thinking surely there was something i could do while she played even though there is no longer a machine or any cutting implements up there. creating a fabric pull was all i could come up with. (organizing or destashing just wouldn't have been any fun.) i had the chevron/arrow/kitty pattern on the brain and began wondering if i could further simplify the pattern with precuts; either use a layer cake or charm squares.

turns out i could and i selected "dream on" by urban chicks for moda on the spot. i adore this fabric line so much i may have severely over-purchased it when it clearanced out a while back. the layer cakes are already spoken for by another pattern but there were two charm packs up for grabs. that's perfect anyway because i can use white charm packs for the neutral space in the quilt pattern.

i do love "dream on" so much. it reminds me of 60s/70s bedsheets from my earliest childhood. and i'm a sucker for precuts like many a quilter/fabric junkie. lately, however, i find i like working with just one line of fabric less than i used to. mixing things up is more to my taste these days. but i have all these precuts. my solution - add coordinating fabrics from my stash to round out the precut line! i picked several more stash fabrics (yay for shopping my stash!) that go well with "dream on". only problem was once i started making blocks i noticed many of my fabric selections are low volumes on white backgrounds, hence they won't be very distinctive in this pattern formation. i think my solution for this is to get a couple of barely-there tints of the colors in the fabrics (yellow, blue, green, pink) like the two kona samples (ice and maize) i pulled from my modular color card, to use as the background for the super white prints. the hint of color should help the prints to stand out without overpowering or altering the design. it won't be quite as crisp as the quilt in the magazine, but it will be pretty.

***actually, i decided to use one single color for the background because it would be too much thinking to get the background laid out with cohesively colored solid arrows. i didn't want to lay the whole top out and then assemble, i wanted to chain piece the individual blocks and then assemble. so  instead of multiple solid colors, i used some fussy cutting to make the patterns stand out more. also, you can refer to this post to see how i dealt with directional prints when making the arrows.

the inspiration quilt from quilty, "chevron and on", is composed of squares and half square triangles (hsts) that produced 8.5" finished blocks, with precise cutting directions from fat quarters. it was also a square 68" x 68" size. i prefer rectangle quilts. something about the symmetry suits my taste preference better than a square. thus i decided to enlarge the quilt and alter the dimensions by adding two rows of blocks.

also, i wanted to use charm squares, which would require some trimming since i would be making squares and hsts, which do not start out cut the same size but charm squares obviously do. i don't prefer wasteful trimming when i can avoid it. but this is why i'm in favor of it here: i want to use precuts from my stash. the upside to this is i don't have to cut tons of squares out, just trim up blocks after they are assembled, which i do anyway. the negligible amount of waste simply can't be avoided with this method but at least it's small.

since i have modified this quilt design and have created my own method for making these blocks, i'm making a tutorial for how to make this quilt my way.

these blocks are so quick and easy to make! i'm having a lot of fun whipping up a batch at a time each night.

linking up with wip wednesday at freshly pieced

Monday, February 2, 2015

little pennies

 this weekend i completed the binding on three quilts, starting with this little lady here. this is the baby quilt i made for my newest niece out of the leftovers from my penny patch 2.0 quilt. (although now that i need to increase the size of the penny patch 2.0 to correct my orientation mistake, these weren't really leftovers. whatever.) i sort of didn't want to post photos of this quilt since it's stealing the thunder on my full-size penny patch, but i also couldn't resist sharing a finish.

 i went to the store to get a backing for this quilt and settled on the teal october afternoon for riley blake print pictured, but i totally forgot to get a binding while i was there! i didn't have a perfect binding on hand at home but i did have this cotton + steele basic print, which in the end works out nicely.

i quilted with a large dogwood blossom, except for one penny patch where i made it the size of the smallest squares as a subtle accent feature. i chose to go larger because it would be faster. and it was. however, it was harder to get into the groove of the shape when making it that large. also, i like the look of it done smaller on my original penny patch. but this way it keeps the quilt softer for the baby and allowed me to finish it in less than half the time.

 i had good luck with the binding at first. i only cut 4 strips and it was just long enough by about an inch! i've never cut it that close before. so glad i tried attaching it first rather than cutting that extra strip just to be on the safe side because that would have been a big waste.

 that little bit on the right is what was left once i trimmed the ends to connect them. i just squeaked by, didn't i?

and then when i attached the ends, it worked perfectly the very first try! i love when i get those fiddly ends together and then it just snaps perfectly into place. it makes me feel like such a big girl to get it right the first time! for my first several quilts, attaching the binding ends was a real trial. but now i can do it with ease, without even looking at a book or tutorial to help me. the process has become second nature. i've finally wrapped my head around how it works together, which helps me remember how to do it. very satisfying as an old dog to learn a new trick after enough practice.

attaching the binding down by machine is not second nature yet. i made a complete mess out of this binding when getting it sewn to the other side. i tried out my clover clips, which were great for holding it in place, but they didn't improve my accuracy because, unlike pins, you can't get the clips up very close to the needle. unfortunately, this little lady was the learning curve for the new process i used. by the time i was on the third binding of the weekend, i had it down pretty well.


that's a wrap on this little one. my niece was born on friday, i had this finished on saturday, washed and delivered it on sunday. that's pretty good timing for me.

i'll be posting the other finishes soon, once they have been photographed.

linking up with crazy mom quilts

Saturday, January 31, 2015

a binding bind

i like a lot of things about the binding phase of making a quilt. one thing i especially like about binding is all the hsts you get out of trimming the joints.

i save all of these in a box so someday i can make a certain scrappy quilt from sunday morning quilts. it'll be scrappy and awesome; sort of a scrapbook of all the bindings i've ever used on my quilts.

this particular binding is going on "bandwidth", which is long overdue for some binding and finishing. pieced in late 2013, quilted late 2014, and now going for the finish in early 2015. so close.

at first i was going to put on a bright orange binding but thought it'd be too bold, sort of stand out more than i wanted. then i tried out a few different shades of blue prints, and considered doing it in solid kona windsor blue the color of the large panels in this quilt. i really don't want the binding to draw attention to itself. then i began to think a scrappy binding made from all the fabrics in the strips would be great.

but when i pulled out the scraps to see what i had for strips, i found a large wad of this navy and grey circle dot (rings, maybe?) fabric from "superstar", the main line used in the quilt, and it just seemed easier to make a single fabric binding. i'm happy with this decision, the course of least resistance.

i've seen other quilters roll their binding on an empty thread spool and since i sew with it on the thread pin, i thought i'd give this a go. so i began winding it on a spool as i was pressing it in half. this didn't work out too well for me because it kept getting wrinkly on the inside layer as i wound, kind of like a sleeping bag will when you are rolling it up, if that makes any sense. i think it was because the spool is so narrow that i was starting out rolling too tight. going to the trouble of pressing it nicely in half, it didn't make sense to me to wrinkle the fabric on the spool.

so although it was looking cool, i took it off and just rolled it freestyle like i normally would. i'll try the spool again another time. i was too anxious to get the binding going to mess with the winding method too much. i actually tried to insert the spool after i had it wound, but the center of my binding roll was too tight for the spool ends to go through. go figure.

at last, a complete binding roll, ready for attaching to the quilt.

i did something completely out of character here: i changed thread colors. twice, even! normally i am a "sew with whatever neutral color is on the machine at the time" kind of girl, which means i mostly use white or cream for everything, even dark stuff. i know it's supposed to show up if you do it that way, but call me crazy - i just don't see it. i think it blends just fine.

however, i'd already quilted this big boy with a contrasting thread that showed up too well on the navy panel sections. since i was going to machine attach the binding for durability purposes, i did not want a light colored thread showing up, and calling glaring attention to, every single mistake and wobble on my machine binding, which is tenuous at best. plus, i have a small collection of various aurifil shades, some purchased when i was going to quilt "bandwidth" in multiple colors, that would potentially blend in with the binding.

i started by attaching the binding to the quilt top with the deep, glowing blue on the right above, but decided it didn't blend as well as i wanted. so i switched to the grey on the left for sewing it down on the back.

as i rounded the fourth and final corner of this very large (90"x100") quilt, heading for the home stretch where i was going to complete this beast, i stopped to check the back . . . and discovered the backing was an inch short for several feet on the last corner.

how this happened, i'm really not sure. i haven't touched this quilt since i completed the quilting nearly three months ago. i thought i had squared it off after the quilting was done. but as i was attaching the binding, i did notice the edges seemed a little choppy, more like they were cut with scissors rather than a rotary blade. my best guess is i first scissor trimmed this and meant to/thought i had later rotary cut it. that would explain a lot.

so here i am, almost done. but not. this is the second project in a week that got put in the corner of shame/timeout/doghouse to be dealt with when i have simmered down and feel capable of dealing with it.

fortunately for me, i have plenty of other projects to distract me work on in the meantime.

Wednesday, January 28, 2015

gypsying along, learning as i go

bordered dbl sq-in-a-sq (economy) block and kitty in the corner, block 1
i've been inspired to pull out the old gypsy wife lately. maybe it's because liz (mostly)finished her top (but decided to add a border to fit her bed), sarah's blocks are killing me on instagram (@sarahscraw), and megan is working on hers again. maybe it's because i really just like it and i'm mad at my other wips at the moment.

i've given up on the quilt along schedule. partly because it's over and partly because i like the idea of going at it section by section better. i was beginning to worry my colors wouldn't be spread out evenly enough over the quilt if i didn't see what went next to what. besides, getting one little section sewn would look like an actual quilt as opposed to the piles of blocks i've got.

however, although i completed all the blocks for section 1, i don't have all the strips ready for it! so i've hit another temporary snag and just kept making whatever blocks i liked for the next two sections. i do have lots of strips cut, but i've been cutting from the fabrics i'm using as i go. consequently, all the strips i have cut are the same fabrics in the blocks i was hoping to sew together. i need to cut other strips so i don't have identical fabrics in the blocks and strips for each section.

the bird block on the left is a bit of an improvisation on my part. first of all, i wanted to use that bird in a specific location in the quilt, so i had to switch two blocks around. i have two other animal blocks, the elephant and the goat. i wanted the animals spread out over the quilt but the bird was going to be next to the elephant, so i had to find a different block of a similar size so i could switch them. i found a bordered sq in a sq/econ block in a different section that i could trade, but the center was the wrong size for the bird so i just made up my own block altogether. maybe this block has been made before or maybe i invented a new one. i shall name it "bird in a cage" and leave future generations to guess at what it has to do with a bird like i wonder over "kitty in a corner", which doesn't even seem to have a corner for the kitty to be in.

so i made up my own block to feature the heather bailey bird from her up parasol collection. it was just going to be a multi bordered sq in a sq/econ block, but then, i used some scraps for the red-and-aqua eiffel tower second square border. i had just fussy cut an eiffel tower and had four hsts on hand, which i liked with the bird, so i used them.

unfortunately, they weren't all quite big enough. i did a stitch-and-flip to add some red triangles to the tips to ensure at least the corners were right.  the sides i could make up for in the seam allowance.

in the spots where the seam allowance was really lacking i simply sewed right next to the seam three or four times to strengthen the area. i'm fairly certain this will work. even though it's under 3/8" i don't see it unravelling with all that stitching over it.

then i had outer boarder troubles. originally, i used the icy blue boarder you see on the butterfly block (on instagram for anyone interested), but it seemed to make the block sort of fade out when i wanted it to have a really strong outer edge against the surrounding strips. also, the red corners looked weird and totally out of place. i took it off and put the red on instead. i like it much better now. my bird is well contained.

old maid's puzzle and perishing blocks
each of these blocks has a been a mini exercise in technique and fabric placement as i deal with bare-bones instructions in the pattern and think about each little piece and layer of the block, how it plays against or interacts with it's neighbors. it's like a lot of individual projects that will add up to one eventually.

i've been going a bit crazy with the lack of directions in the pattern but it's also forcing me to figure a lot of it out on my own, which makes for more memorable learning. thank goodness for rachel's angled class so i have some clues about triangles and how they interact! this was incredibly helpful when it came to the old maid's puzzle and the perishing block.

i'd been hung up by the perishing block for months. it was the next big block i was supposed to do for the quilt along (and maybe the reason i fell off the wagon) but i kept hearing how difficult it was. having done enough economy blocks now, i was ready to tackle it. (i was going to talk all about what i've learned about sq in sq/econ blocks, but i think i'll just make a separate post. that'll be easier. since i have many a sq in sq/econ block to go for this quilt, there will be lots of opportunities to talk about them coming up.) with the fabrics i selected,the perishing block is not my favorite but i like it well enough and am so glad to have it done! i didn't put a lot of thought into each fabric but i did pay attention to value when selecting them, which really helps the individual layers either blend or stand out. value-wise, i'm please with my results.

the old maid's puzzle i basically had to figure out all on my own with little help other than a diagram and inaccurate measurements in the pattern. i'll be writing a separate post on that process, too, in case anyone else needs some help. i really liked all the fabrics going into it but the results feel quite flat and dull to me. however, the quilt could use some quiet places so it will remain as is. there is another one of these blocks in the quilt so i have a second chance to jazz it up on round 2.

i knew this quilt would push my skills, and my oh my, has it ever. i now feel like i can take on anything with a straight line. (curves coming up soon!) i'm getting less upset when i make a mistake or something goes wrong because these just become opportunities to learn or to improve, to do something even better.

and when i have completed this lady, i will feel i can absolutely, with out a doubt, call myself a real quilter.

linking up with lee's wip wednesday at freshly pieced

Saturday, January 24, 2015

cutting edge

aren't all the itty bitty chained pieced bits of my "kitty in the corner" (my modernized name for "puss in the corner" block) just darling? it's like a mini bunting this way and may have inspired a project idea. but in the meantime i am once again full speed ahead on the gypsy wife quilt. i've been tackling lots of the intricate main blocks, one at a time, and doing so much cutting. which has inspired me to talk about my cutting tools, some of which are recent acquisitions.

most quilt teachers or books for beginners will tell you that you only need a few quilt rulers to get by. and this is very true. i did just fine with a 6"x24", 9.5"sq, and 12.5" sq ruler for my first several quilts. these are enough for squaring off fabric, cutting strips, trimming blocks. they're quite versatile. you can even successfully cut triangles with those rulers.

but over time i found myself thinking a few other sizes would be more manageable for different jobs. so whenever i had a coupon or rulers went on sale, i would pick up one that seemed handy. when discounted, they are only a few dollars each. given enough sales and enough time, i've amassed a good pile of rulers.

when it comes to square rulers, which are fantastic for trimming blocks precisely or fussy cutting certain sizes of fabric, i now have each graduated size, by the 1/2", from 2.5" to 6.5", minus the 3", which was out of stock at the last sale. (but two of the 4" because they both came with some sets i bought. i suppose i have a spare. one for upstairs and one for down?)


the 2.5"sq came with a mini cutting mat i bought for travel purposes. at the time i thought it was too ridiculously small to use but have since been proven wrong. even that tiny fella gets a turn at the mat periodically. like when i'm trimming up mini hsts.

my gypsy wife quilt, which features a great variety of block sizes, is the type of project that makes all these different rulers quite handy. i'm continually needing to either fussy cut or trim up blocks. so i find myself frequently reaching for those square rulers.

my rotary cutter is a gingher i got on sale from joann crafts. i love my gingher shears and snips, and i thought it looked really nice, so i picked this instead of an olfa when i started quilting. they routinely go on sale and so do the replacement blades. for my cutting surface i have a 36"x24" fiskars self-healing mat. i really like the soft green color (it's butter yellow on the other side). i find it to be very accurately marked and no longer use two rulers for squaring up or cutting strips. rather, i use the mat-and-ruler method.

my cutting area lies at the end of the table so i can work off the three edges easily, which is quite helpful when cutting as it allows me to move myself rather than the fabric or block at least half the time. however, the fabric inevitably has to be moved at some point. here enters the genius called "rotating cutting mat." i had heard of these wonders a time or two but didn't think they were for me. until i was elbow deep in gypsy's blocks and always having to shift everything. so i looked on amazon and found the olfa 17" rotating self-healing rotary cutting mat. there are smaller mats, too, but i had the space so i wanted as much rotating space as possible. i can see how it would be convenient to cut small blocks on a smaller mat, but i'm good with this one.

there is the black under-mat, which stays put, and the top green cutting surface rotates a full 360 degrees in either direction for cutting. its perfectly smooth and wonderfully flat.  just look at the following photos to see it move.

spinning to the right

and all the way back around again
i was a little skeptical of just how useful this might be but i can sing it's praises now that i've given it a go a few dozen times. i'm certain my trimming accuracy has increased and it definitely saves me time. i'm doing a ton of trimming for the gypsy wife as i am working on my accuracy with all the points involved.  each block is a mini project and i trim most every bit accordingly.

one nice thing i just discovered is that since the diagonal of this mat measure 24" across, i can still trim strips longer than 17" if i just put the fabric on the diagonal. very handy. otherwise i have to move the rotating mat off the big one. maybe someday i'll have a dedicated sewing room with both these mats in their own spaces.

as for my other rulers, i have two 6"x24", a 3.5"x24", and a 3"x18"rectangles. the two long ones are for squaring up fabric, making large cuts, and trimming quilts. the long skinny one is for when i am making skinny but long cuts and don't want to deal with the width of the wider one. like when i am cutting strips. and the short skinny one is for shorter strips or smaller cuts when i don't want all the length of the other two. this mostly goes by feel. if i find i have too much width or too much length for what i'm cutting i'll switch to another ruler. i store these on a recipe book stand.

the stand is also good for holding up quilting books or patterns i'm working from and it houses my quilting notebook, which is for keeping track of projects, working out maths, and sketching out ideas.

then there are the triangle rulers! you can definitely cut triangles without special rulers, but i've found it simpler to use them for cutting rather than trying to use the lines on the straight rulers. also, the fons and porter rulers have some of your math already worked out for you right on the ruler. i have been using the 60degree pyramid ruler for my indian blanket quilt and epp cutting. i liked it so much i picked up the flying geese ruler at the last sale. i've heard it highly recommended by others, too.

so that's the scoop on my cutting gear.
i used to despise cutting when i first began quilting. it was one of the most difficult parts for me. but over time, with practice, i've gotten better at it and actually enjoy it in doses now. having a variety of tools on hand to help makes it that much easier and more enjoyable for me.

happy cutting and sewing all!

***i should probably put some sort of disclaimer on here that no one asked or paid me to say any of this, that i purchased all these tools myself for my own use. i'm just sharing what i use and why i like it.

Sunday, January 11, 2015

heirloom

most quilters can trace their love affair with quilting back to a specific quilt or quilter that enthralled them, grabbed their notice, and got them interested in this hobby or that they have an emotional attachment to. my roots in quilting go back to my childhood, to one particularly lovely pink patchwork star.

my mom made some whole-cloth, tied quilts at various points in my childhood, and i even helped her tie a few of them, but she never did any patchwork quilting. so the first patchwork quilt i ever met and loved was the pink texas lonestar quilt that resided on a bed at my grandmother margaret's house in my aunt catherine's former room. when i lived with my grandparents for 6 months as a 13 year old, this became my room and quilt for a while. i always loved seeing it when i visited. as a new bride in 1995, i was staying with my grandmother and noticed the pink lonestar was no longer on the bed in my room. she told me that, sadly, catherine had tried to machine wash the quilt and it now needed repairs, so she had removed it from the bed. at some point, catherine took the quilt in hopes of finding someone to fix it. i was quite disappointed. although i was not yet a quilter, i loved the quilt and had a deep love of family heirlooms. the pink lonestar would have been in my top 3 choices of items i would like to inherit.


last year i contacted aunt catherine and asked her if she could send me a photograph of the quilt because i wanted to try to recreate it. she said she'd hunt it down and send me a picture. the photo never came. however, when i realized our summer travels would be taking us close to my aunt, i asked her to get it out so i could photograph it myself when i visited her. i'll admit i was thinking of tactful ways i could convince her to let me take it home with me so i could get it repaired myself. and maybe keep it. there was no need for me to be devious. when i got to catherine's house and asked her about the quilt, she said, "it's in the front hall. i'm giving it to you." i honestly started crying on the spot. this quilt is the only heirloom quilt in my family that i know of or have ever seen. and now it's mine through my aunt's generosity.

  grandma margaret told me this was a wedding present from her aunts. as a war bride in 1945, i can only imagine what went into the making of this by her aunt(s). i've always thought she said her mother's sister(s) made it, but now i'm not so sure of my memory. anyway, this quilt that was about 40 years old when i first met it is now approximately 70 years old. and it's rather delicate. there is evident fading going on, but it's still in quite lovely condition.

 i don't remember this, but when aunt catherine gave it to me, the quilt came with two pieces: a quilt and a pillow sham. i don't know what else you call the sham exactly because it's not a pillowcase type sham like we have today. it's more of a half-quilt panel. but i'm pretty sure it's designed to cover the pillows. the cool thing about the sham is that it's not as worn or faded as the quilt, so you can see the original colors better. the fact that it's not faded and that i seem to remember using the quilt to cover the pillows when i used to sleep with this quilt, leads me to believe it wasn't on the bed. even the sham has some fading in the brightest pinks, which just don't seem to be colorfast.

here i laid the sham over the quilt to show the difference in the colors. there are anywhere from  4 to 7, possibly more, pinks used, but it's just too hard to say with the fading.

 even with all the fading and spots of damage, this is a stunning quilt. when i laid it out on my bed to photograph today, my three year old excitedly exclaimed, "it's PERfeh!" the sixteen year old was also quite taken aback by it's beauty when she walked in the room.

in light of what we consider "modern" vs. "traditional" in today's quilting world, and now that i know a little of quilt history, this quilt strikes me as not typical for the 1940's or at least not what most people would think of as typical. it is not a scrap quilt, apparently made from fabrics chosen specifically for this quilt rather than pieced together from reclaimed items. also, it's not made from prints - it's all solids. how very modern! and the bright, all-pink palette is definitely modern.

i think it just goes to show that the lines between modern and traditional are a lot blurrier than we think, that traditional quilters generations ago made some very "modern" pieces just like quilters of today can choose to make some very "traditional" quilts. really, even though there are trends in each age of quilting, there have always been quilters who quilt outside the lines of what is most common for their era. and maybe there is just a lot more variety in taste and style all along than we realized.


 at my grandmother's house, this quilt lay on a full-sized, brass framed bed. today i photographed it on my king-sized, aluminum framed bed. as much as i'd like it to stay on my bed, it's not suitable for everyday use anymore. but i think i just found the perfect place for it. more on that later because it's kind of a big deal and is going to take some work before i can get it in place.

peeking through the rips and fraying, the piecing seems to be done by machine, but the quilting was definitely done by hand. on the star, the quilting is stitch-in-the-ditch around the diamonds. these lines then continue into the negative space, where they are crossed by another set of lines to create more diamonds, with the four corner squares all being quilted in the same radiating direction. the four triangles formed between the points on each side of the quilt also were in a pattern, but after studying it i realized just one of them is not going in the same direction as the others. a little oops when in the making? probably. but it's not noticeable in the least unless you are trying to pick out the pattern.

 the backing is a solid pink, pieced together by at least two of the pinks from the front. i think the batting must be some kind of polyester or polyester blend because it's rather full and slightly puffy, and has kept it's shape all these years. it's not creased like a cotton batted quilt would be after so many years in folded storage. also, it's not extremely dense like a wool batting would be. i had no idea they had polyester batting in the 1940's but i guess they must have.  seeing how well the batting has worn over the years has given me pause to reconsider my own personal preference for 100% cotton battings.

the binding is the lightest pink of those used in the quilt. on close examination, i can tell it was machine sewn down and then turned to the back and attached by hand like we would do today.

however, it's not stitched on with a blind hem stitch but tacked down by small, rather uneven stitches every 1/4" or so. this imperfect detail, along with several other imperfect factors in the making of this quilt, remind me that quilts don't have to be perfectly crafted to be beautiful or loved, that the mistakes or small cover-ups for shortages will fade into the larger picture of the finished quilt. this gives me not only comfort about all the flaws in my own quilts, but makes me love this quilt even more.

i don't know how long i'll be able to preserve this particular quilt in good condition, but i'm immensely grateful to have it since it's the only quilt from my family's tree i've ever seen.
truly, it is a priceless heirloom.


i hope i can make enough quilts that my great grandchildren can all say they own or at least have seen something from their family's quilting roots. i hope i inspire lots more quilters and quilts to grow on that family tree in the years to come. maybe this little lady will make some of her own someday, like the great-great-great grandmother she was named for.

but that is another family tree quilting roots story for another day.