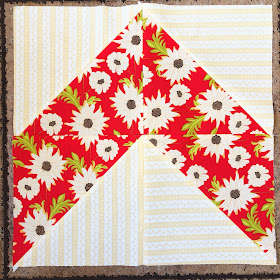
when i got back to making my chevron blocks (after 4 years of 2 blocks hanging on the design wall), i found 2 squares of that yellow stripe fabric already cut and hanging on the design wall with the 2 blocks i had already completed.
i pulled a fabric i wanted to pair with the stripe from the stack of fabrics i had selected for the project, and without thinking too much got to work making the hsts for the chevron block.
everything was going really well until i began to arrange the 4 hst blocks into the chevron formation and realized i hadn't taken the directionality of the stripe into consideration when making the hsts. ugh.
i searched and searched the mountains of fabric in my sewing room, certain i had more of that yellow stripe somewhere. but to no avail. there was no choice but to put the block together with the stripes going in different directions.
this especially perturbed me because the red daisy fabric is a favorite old print from sandi henderson's meadosweet line. it's been out of print for a while. fortunately, i am plenty stocked on it. but i didn't want to unpick the block and redo all those bias seams on the hsts. i hoped the stripe was pale and subtle enough that it wouldn't stand out and that it wouldn't bother me. however, the longer i looked at that block as i worked on the rest for the quilt, the more it did bother me. so i will be unpicking it and making a pinwheel block out of it to use on the back of the quilt instead. i found a different yellow stripe to pair with the red daisy print and made a new block for the quilt top.
and, by playing around a bit, i figured out how to get the directional prints all going in the right direction. it's very simple, really.
when you are marking the fabric with the diagonal line to form the hst pairs, simply draw the diagonal lines in opposite directions across the directional print on the pairs, as seen above.
this will give you exactly what you need. simple, right?
if you happen to have 2 directional prints, it's a little more complicated, but not much.
you still start by marking the two fabrics with opposing diagonal lines, like above.
then it sort of depends on which way you want your two directionals to run against each other. this will be slightly different with each set of fabrics. basically, it requires turning the print you aren't marking a quarter turn from where you have it placed in the first pairing.
i didn't photograph this as i never fully perfected it in my mind, but i found if i simply made one pair of the blocks first, then i could figure out what was needed for the second set by laying the pair together, right sides facing, and peeling back the corners along the diagonal line to see how the blocks were going to turn out.
(these aren't directional prints, but you can see what i mean about peeling the corners back to see what your block is going to look like.)
by comparing the already made blocks to the second set i was about to sew, i could see which way i needed to turn the fabrics to get the desired blocks. just play around with it and you'll see. you definitely still need to draw the lines in opposing directions on the first fabrics that you are marking. once you've drawn those, go from there.
i was SO very happy to get this block right! and the stripes even lined up nicely.
now the question is, does this work the same for other blocks that utilize 4 hsts, like the pinwheel? i should know as i just made a pinwheel quilt, too, but i really can't say. i'll let you know when i unpick that first daisy and yellow stripe block to make a pinwheel.


Another excellent tutorial---thank you for taking the time to share these on your blog.
ReplyDelete